home
introduction
build
sva tests
links
latest updates
April 2
- Finished -
I had some inspiration last night, and I realised that I don't have to weld brackets onto the chassis for the anchor points for the crotch strap eye bolts - I can just bolt them through the floor, so long as I put some spreader plates in to spread the load a bit.
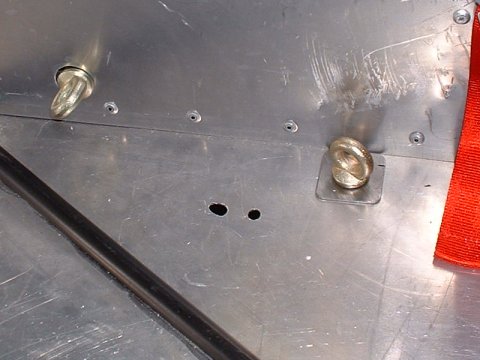
That done, the seats dropped in nicely, the belts went in nicely, and that's the job all done - aside from gluing some trim around the edge of the passenger seat.
- Clocks in, clocks out, ... -
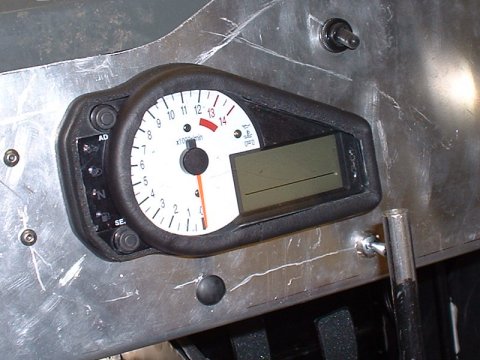
In another stroke of inspiration, I figured that I'd try sticking foam round the edge of the clocks to see if I could make them SVA friendly, as everything else I tried was pretty unsatisfactory. The foam seemed to take quite well, so I put the clocks back in their rightful place, and we'll see what the SVA man makes of it.
- Gripping stuff -
Earlier on today I bought some skateboard grip tape, which seems to be just sandpaper with an adhesive backing. This I cut to shape and stuck on the pedals and on the floor in front of the pedals to ensure there's plenty of grip - this is for SVA, but also because I think it's a good idea, having experienced slippy pedals in the 21 a couple of times. And a slippy floor is not that great for levering yourself out of the car either!
April 3
- Fitted -
Fitted the mirrors this morning. Yonks ago I bought some GSXR mirrors off eBay, and when I sat down inside the car and held them up, I found that they sit quite well on the upper longitudinal bars of the roll-cage (albeit upside down and on the wrong side (fortunately it seems that mirrors don't invert the image when you turn them upside down  )). So I welded on some plates, drilled and tapped some holes, and in 2 shakes of a lambs tail had side mirrors.
Then the centre mirror. Again, by mounting it upside down (this is a standard Sierra mirros I think, which I purloined off DH2) I found it sat quite well. More plating, welding, drilling and tapping, and that was down too. Super!
- Nismo knob -
I bought a Nismo knob off eBay a while ago. This has a 15.3mm nylon insert in it that I assume you make a thread in by screwing it onto a M16 stud on the end of the gear stick in Japanese cars. Of course, my gearstick is made of a 1/2" steel tube, so no joy there.
However, I found a screw inside the gear knob, that when removed leaves an M6 thread. By some extraordinary coincidence, an M6 caphead bolt is an almost perfect fit inside a 1/2" tube, so I stuck on in there (with a bit of grinding to size), tacked it frmly in place with a blob of weld, and screwed the gear knob on. Easy.
- Tunnel stuff -
First off was to fit the glove box floor - easy.
Next came fitting the tunnel cover - not so easy. I'd decided to do this using M4 button head bolts into rivnuts in the flanges at the top of the tunnel side panels. No problem, except that rivnuts are very intolerant of a misalignment, and I spent a large amount of time fitting and removing the panel a bolt at a time and gently filing out each hole in the panel until the bolt could fit through it exactly perpendicular into the rivnut below.
April 5
- Tunnel stuff -
Finished off the tunnel today by making up a gear stick cover (by chopping down a rubber cover I'd found on a diesel Sierra in a scrapyard some months ago) and by cajoling, cutting and squeezing a Mk4 Golf handbrake cover (from eBay) over the Sierra handbrake.
- New repeaters -
A few weeks ago, a friend on Cam7, Carl (Hi, Carl!) sent me some old Ford style repeaters that he had taken off his TVR. I fitted these, but wasn't very hapy with them - the clips that they use to locate weren't deep enough to securely locate on the GFRP bodywork, and I'd had to silicone them on. It didn't look very good.
But recently, some Fiat Bravo ones came up on eBay, so I bought them on the chance that they'd fit better - and they did! An almost perfect fit, in fact. The only downside is that they have a sharp edge that may attract the wrong sort of attention from the SVA man. I think I can seat a bit of rubber beading on it though, so it shouldn't be a problem.

Whilst I was in a light sort of mood, I fitted on all the other light covers.
- Some more little jobs -
A few other odds and sods jobs rounded off the day:
- one of the oil cooler pipes runs through a hole in the steering rack mount brackets - I put some grommet strip round this to prevent chafeing.
- centralised the steering wheel
- DH2 came round to help me bleed the brakes, and to help me Sikaflex in the bonnet and radiator grills.
April 6
- Doom. Despondancy. Brake Pressure switch has failed. -
Last night, after DH2 left, I thought I'd test all the lights, and I found, to my dismay, that the brake lights weren't working. I checked each part of the system, and realised that it was the pressure switch that was broken. Already! I've not even used it in anger yet!
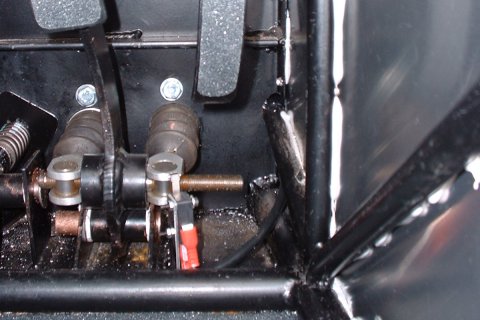
Despite not being very sympathetic in an "I told you so" way, DH2 came round, again, and helped me fit a roller microswitch that is actuated directly by the brake pedal balance bar.
It works quite nicely - I'd resisted doing it before, because there was nowhere for it to act on, but I must have made that decision before I'd fitted the balance bar.
Here's a badly out of focus picture
April 7
- Camber, Castor and Toe -
I set up the suspension today, to a recipe given me by Ian many months ago (Camber: 1 ° front, 0 ° back. Toe 2mm front, 1mm back - it seems sensible enough.) Once I find the relevant bit of paper I'll try and remember to put up on this page the angle of camber introduced by each turn of the camber adjusters.
Whilst doing this, I noted that the rubber on the N/S lower ball-joint has started to split. I glued it back together with superglue, but in the long term I think I'm going to replace these with rod-end bearings.
I didn't actually change the toe at all as I don't have long enough bits of straight things with which to go about measuring it. The long straight thing I do have indicates that I've got a 'some' toe on the front, and hardly any, if at all, on the back. Good enough for now.
- brake microswitch -
Wired up the brake microswitch - quite time consuming to do. A side effect of using the microswitch is that the fuel sender, which gets its power feed from the power feed to the (now bypassed) brake pressure switch now only gets power when the brakes are on - better fix that some day
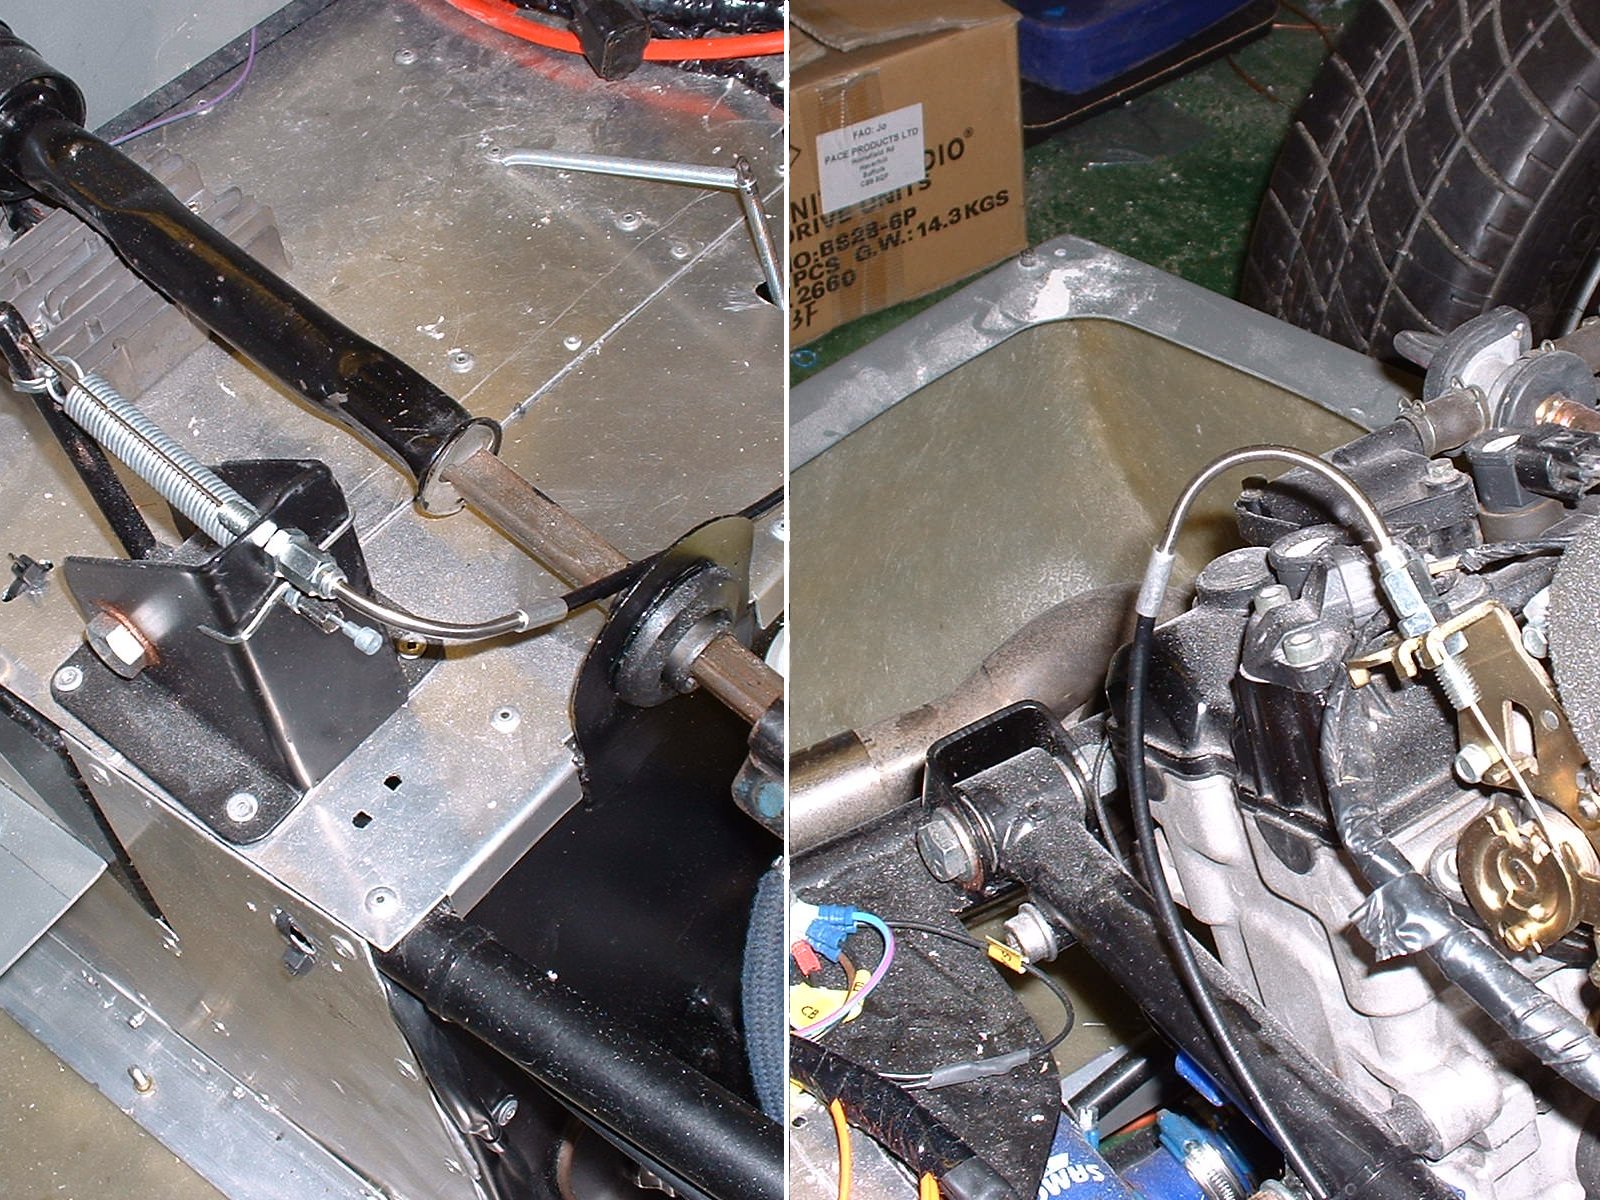
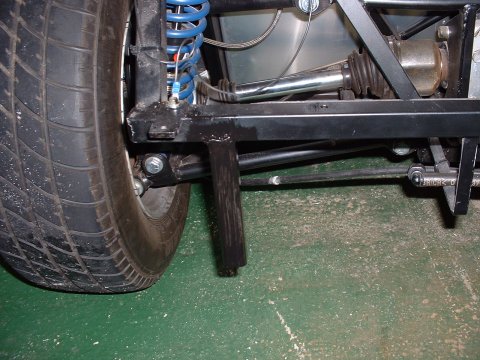
- Better routing for the throttle cable -
The throttle cable outer has kinked where it comes out of the throttle pedal turret. It doesn't go through an extreme angle, so I must have lent on it sometime. However it happened, it seems to me that it could happen again, so I decided to fix it.
I bought from my local bike shop some V-brake pipes. These are used on mountain bikes to route brake cables from the frame into the top of one of the arms of a set of V-brakes.
The pictures show the effect - the cable action is even smoother than before, there's no risk of kinking the outer, as it exits the pipes in a straight line, and the outer is shorter too - a great solution!
- Important little job -
Drilled lots of holes in the corners of the floor panels - these will let the rain out...
April 8
- Important little job -
A little job that turned into a much bigger one this morning. Ever since I fitted the Barnby wheels, I've just has a pair of plain nuts on the ends of 1/2" rid that runs through the bottom of the suspension upright - there wasn't clearance for some nylocs, so I left it until 'later'. Today was 'later'. I decided to replace the plain nuts with stiff nuts, but to cut a long story short, I couldn't do up the stiff nuts on both ends of the rod at the same time - either one undid itself as I did the other one up, or the one that was already on as far as I wanted it. In the end, I welded one of the plain nuts on one end, and used a stiff nut on the other end.
Then I tightened up every bolt on the suspension, front and rear. My original plan was to do this with the car on the ground, so that the metallastic bushes would all stand a bit more of a chance of some longevity. But most of the rear bolts are pretty inaccesible with the wheels on, so I gave up and just did them up as they were.
- More little jobs -
To finish off the day, I did some other finishing up jobs:
- glued down bits of trim
- made a note of the fuse and relay layout
- fitted the glove box lid
- redid the sticky foam around the clocks - to make it look a bit neater and more permanent
- Cut some rubber pads to go on the driver's seat - to try and provide a bit of protection from the bolts that go through the bottom and back.
- painted the mirror mounts
April 9
- Microswitch broken already -
I noticed after I got back that the microswitch that DH2 and I put in the other day has already stopped working. Upon investigation, it turned out that a little too much Hackett mightiness had been applied to it, and it was flopping about in a broken state. Dave came round and helped me fit a new one (after giving me a lift to Maplins to get a new one)
April 10
- Post MOT - final little jobs before SVA -
Quite a long day today. DH2, once again, offered his services, and a it's a good job - there's no way I'd have got everything done without his help.
The things what we did was:
- DH2 fitted a new number plate light (the previous one was hopeless, and pointed the wrong way
- DH2 fitted some lock stops - following Adrian's suggestion on Cam7, he fitted some jubilee clips on the sticky out bits, which limits the travel of the wheels and stops them bashing into the sidepods
- I made a collar on the inside of the rear tub for the fuel filler cap to sit in, in an attempt to stop the SVA man pushing it out of the way
- I wrapped some luggage straps round the fuel tank to supplement the existing straps
- I fitted the pedal cover
- I applied lots of bits of trim and nut covers
- I made some mudguards for the front wheels - most importantly to stop any water being thrown up by the O/S wheel onto the battery
- I riveted in the boot back plate
April 11
- What's that funny smell? -
Well, it's the day before SVA, but I've only got a few hours before I have to set off - I need to get to STM by late lunchtime in order to fit the cat equipped exhaust
Most important remaining job is to make up some covers from thin aluminium sheet, to cover the humunganormous holes that I made in the bodywork where the front portion of the rollcage is. That doesn't take as long as I thought, and then when I check the list, I find that the only thing left to do is stick a 'brake' sticker on the brake test light (an SVA requirement)
Gosh. All done.
It then takes ages to pack for the trip - I've got to make sure I take enough tools and bits and bobs to be able to get myself out of trouble if anything breaks or comes loose on the 120 mile trip up to Derby. The AA/RAC etc aren't interested in providing cover for an unregistered car...
And then it's 11am and time to go.
I stopped at Tesco (About 5 miles down the A14) on the way to fill up, and noticed that I could smell a hot fibreglass smell. The most likely source of the smell was the sidepod containing the hot exahust, so I checked the outside of the sidepod for temperature with my hand, but it was fine - pleasantly warm, but not hot at all, and I wondered why it was smelling so much.
Puzzled, I continued filling up. The smell persisted. I checked the sidepod again, in case it had somehow magically become hotter - but it was (of course) getting cooler. Then I slid my hand to the non-insulated area. Yeoowch! Super Toasty! (The exhaust in the Phoenix comes horizontally out of the engine, makes a swift downturn into the sidepod, and then heads off backwards through the pod. I'd insulated the sidepod except for the very forward portion (about 18") where the top of the sidepod is open, reasoning that the heat could escape upwards.
So the lesson was that heat radiates equally in all directions, even if air in between is free to escape upwards. Silly boy.
There was no way I could continue, so I resigned myself to returning home. I called Tim to see if he had any shiny insulation stuff I could purloin, but he didn't have enough. During this call, he established that I'd not opened up the front of the sidepod (just behind the wheel), which hugely increases the problem of retained heat. I'd assumed that air being sucked through the engine bay (which is pretty open) would be enough. Clearly I was wrong!
Tim posted my predicament on Cam7, and by the time I got home, I'd had several calls, texts and emails offering help and materials - thanks to all! In the end, Steve's offer won out as he was the only one actually able to both offer and deliver the insulation
So - I stuck the insulation in with some high temperature contact adhesive, stuck aluminium foil on the inside of the bonnet, covered over the open part of the sidepod with aluminium sheet and removed the front face of the sidepod, and drove back to Tesco. No toastiness - so off I went to Derby.
I arrived at STM at 16h30 - much too late to start fitting the exhaust kit, so I knew I'd failed the SVA 16 hours before even starting it!
April 17
- Investigating fuel lights -
The connector for the Suzuki fuel level sender has unclipped itself - so that was a pretty easy fix.
The proper sender, however, is a bit of a mystery. The sender itself seems to be OK - with the tank somewhere around half full, the impedance of the output is 70ohms - about what I'd expect. There's continuity all the way to the input into the CBTech dash - so my assumption is that the dash itself needs some attention.
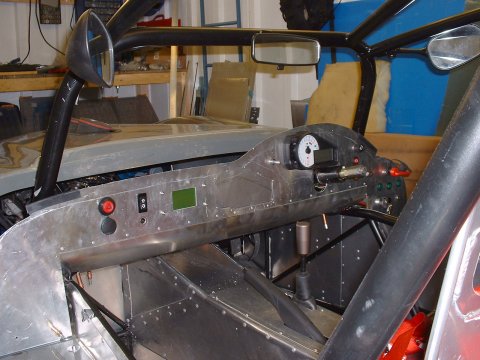
- Rip it all out... -
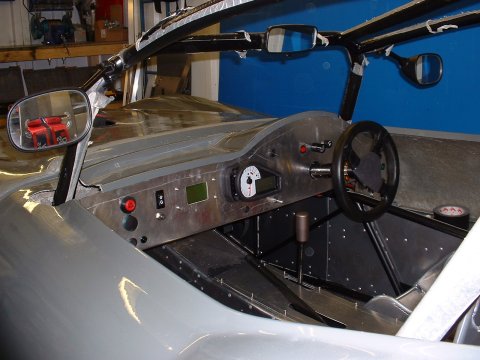
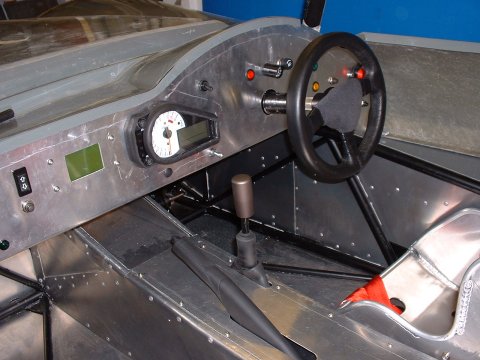
I disconnected all the switches and gauges, drilled out the rivets, took out the bolts, and Mr Dash was once again free to roam. A little while later, I'd made a new hole for the clocks to sit in (behind the wheel, in the zone excluded from radius checks). I'll no longer be able to read the rev counter, but I can see the speed and the indicator and main beam tell-tales, and that's all the SVA man will care about.
I also extended the hole for the steering column upwards, so that I can raise the column, which will maximise the visibilty of the speedo.
I'll have to find a new home for the brake warning light and the headlight switch, but that shouldn't be difficult. More difficult is the LED warning cluster. Since it doesn't do anything useful at the moment (being always on) then I'll probably just leave it off.
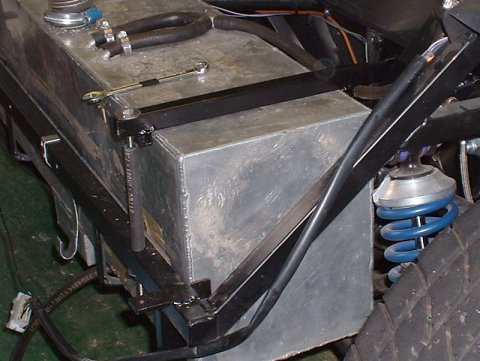
- Doing the tank properly -
I started work on a proper way of securing the tank today. I've made up a couple of arms that bolt into the chassis at one end. These swing down over the tank, and are secured to the back of the chassis by a length of M6 studding. They've also got a couple of stops welded on their underside, which locate on the edges of the tank - so hopefully, I've eliminated all the up-and-down and front-to-back degrees of freedom - side-to-side freedom was curtailed a long time ago, as that's the only one I thought I was worried about...
April 18
- Repairing the rear tub -
When DH2 and I pulled the rear tub off earlier in the week, I didn't bother to remove the little aluminium cover plates I'd made for the holes, and it was surprising how little I had to chop off them in order to get the tub off. I think the difference is that when 2 people do it, it's much easier to juggle the bodywork to the right angles until it just scrapes over the cage. When you have to do it on your own, you have to have much bigger holes so that you can do it all standing in one place.
So I decided that I'd make a go of repairing the holes to the point where the bloke down at the bodyshop can finish the job off. I appealed on Cam7 for help, and Dan Bromilow volunteered to pop over
And a jolly good job he did too. I learned all sorts of useful little tips, and next time this kind of job comes up I think I'll be able to tackle it myself.
April 20
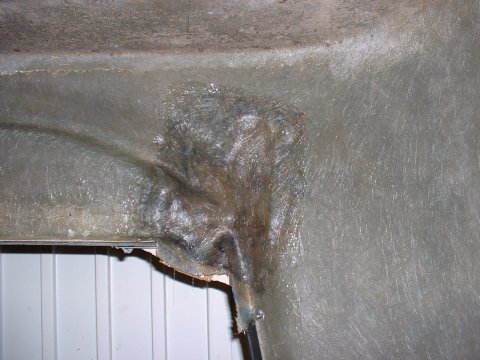
- Turret-tastic -
I'm not sure you can call them turrets if they're upside down - I guess they're sturrets, or something
Anyway, to cure the flapping rear bodywork, I've welded on a couple of sturrets, to which the return on the bottom of the rear tub will be bolted. I probably didn't need to use 3mm wall thickness tubing, but I wanted to be sure that the sturrets were as stiff as possible.
Picture shows first coat of Smoothrite drying, although I wouldn't bother to stare at it, William, because it'll never finish drying...
April 23
- Stick it back in -
First job of the day was to make the rounded bottom edge for the dash. I'd bought a 0.8mm thick piece of aluminium sheet for this, so that I could more easily bend it. I also bought a 1.5" tube, so that I could make the bend over it, just to help it all look nice.
0.8mm turned out to be a bit too thick for a smooth, even bend, but it still came out OK
Then I had to find some way to attach the bottom the dash to the chassis. The SVA tester's name was used as a profanity many times as I drilled upside down in the cramped confined spaces of the footwell, trying to hit a hidden 5/8" tube through a floppy piece of aliuminium.
Then was some time consuming moving of switches, which involved plenty of extending the loom.
And finally moving the steering column up to make sure that the speedo is visisble.
I'd mentally allocated 3 to 4 hours for this - not sure why. Pretty delusional.
I'd painted the clamps that hold the tank down a couple of nights ago, and they were ready today for deployment.
I've put some old fuel hose round the thread of the studding, on the off chance that whatever wiring ends up running along the back tube could chafe against it.
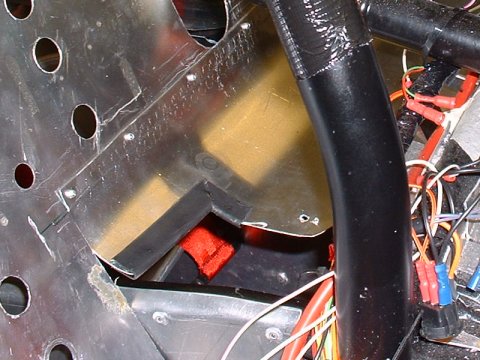
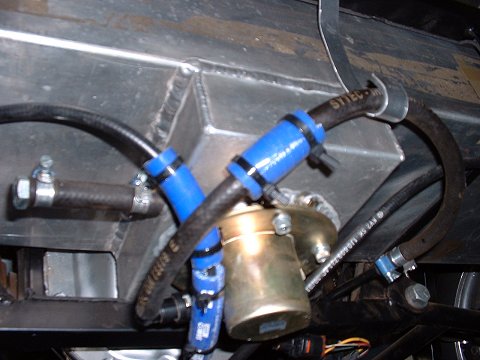
Whilst I was reconnecting the pump supply and fuel hose, I noticed that the handbrake cables can move and rub against the fuel hose, and the fuel hose itself can move enough to rub against the corners of the tank. Not only that, one of the handbrake cables is small enough to find its way up to push on the quick release fitting on the fuel hose. All round, a bit of a disaster waiting to happen. The SVA man must have been day-dreaming when he was looking in this area, and I wouldn't have noticed before because it only came about when I made the hook to stop the fuel hose dangling down below the line of the bodywork... So I cable-tied on scrap sections of silicone hose in the appropriate places (sorry for the picture - camera won't focus in the dark places under the rear of the car)
April 24
- Convolutions and ECU death -
Today, I have mostly been corrugating my car.
Yes, today was the day for me to address the concerns of the SVA man in the area of protection of my loom against chafing. So, I Dremelled off the glass fibre I'd used to hold various sections of loom in place (and discovered that the little spiral cutting tool attachment is great for routing through GFRP where access for a cutting disc is limited). Then I wrapped every bundle of wire I could see in convoluted loom tubing. This would have been easier if I'd ordered the pre-slit stuff...
Whilst I was fiddling about with 'lectric, I tidied up the routing of the wires to the fuel sender, and gave it a proper power supply (instead of the one that was only one when the brakes were on...)
I also fitted grommets to the number-light and fog-light holes, put some thermal wrap on the N/S indicator (it sits directly above the exahaust
Then I glass fibred everything back in place, changing the routing of the rear loom whilst I was at it, to allay the SVA man's fear about 'unsupported wiring' (the rear loom used to dangle from the rear tub down to the main connector - nothing it could swing into, or get caught in, but he didn't like it)
Finally, I blew up the ECU

I didn't mean to. A wierd fault had appeared at the SVA, which I was trying to fix. There is a connector on the loom that switches 'Dealer mode' on or off, depending on whether it is shorted or not. Dealer Mode is useful in that it displays any engine fault codes on the clocks where the Engine Coolant Temperature would normally be, which makes tracking them down a bit easier. At the SVA I'd removed the little bit of wire that I'd been using to short the connector, as the SVA man would have judged is as unsecured wiring.
Having not put the wire back in before the drive home, 'Dealer Mode' was off, which it never had been before. Formerly, when the ECU was powered up, then it reported no faults. Now that 'Dealer Mode' was off, then the ECU was reporting a fault by illuminating the FI Warning light. If 'Dealer Mode' was subsequently engaged, the fault was listed as being C46 - the Exhaust Control Valve Actuator Sensor.
Checking the manual today, I found that the ExCVA sensor is expecting to see a certain voltage from the Exhaust Control Value Motor. Which I don't have. Despite ages fiddling with resistors and turning the ECU on and off, I couldn't get the fault to clear, which was annoying. Then, the fault code vanished - but only to be replaced by 'CHEC', which roughly translates as 'ECU hath vanishéd'
The ECU doesn't have a separate fuse, and the clocks still work, so I'm left with the conclusion that I've somehow put the wrong sort of electricity up the wrong hole, and blown it all to pieces. I hate electricities. They also do their utmost to be wrong.
I shall mostly spend Monday looking for a 2nd hand ECU.
- Steve and DH2 have their say -
Steve said that if I were him he'd strap the oil tank against the chassis rail against which it abutts. Just to stop it from flexing the floor (even though I've attached it to the floor with flexible bobbins). So I have.
DH2 wasn't happy with one of the oil cooler pipes, which could chafe where it runs under the oild tank floor. So I've zip-tied some scrap silicone hose to the points where it could rub.
April 25
- Holes gone -
Today, I thought I'd check out Dan Bromilow's handywork, so I removed the cardboard and tape backing from the aluminium sheet, cut around the hole in the aluminium, and ended up with this:
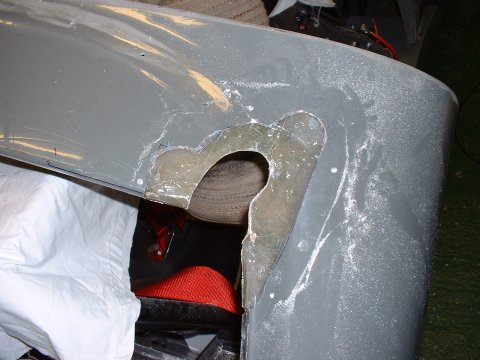
Once it's all properly sanded down (and no doubt re-filled) by the body shop, then it should be as good as it should have been the first time round.
- General SVA fixes -
- Rubber boot on the centre mirror : check
- Blunt edges on bonnet grill : check
I put some JB Weld to fix (I hope) a small leak from the fuel tank where the plate had been welded in at the top - obviously the welder had left a little hole, and fuel seeps out when it slops up to the top of the tank
April 26
- General SVA fixes -
- Anti-chafe rubber on bottom edge of scuttle : check
- Rubber hosing glued onto tubes under dash : check
And I spent quite a bit of time cutting bits of rubber to fit around the seat bolt in the back of the seat, in an effort to stop it digging into my back. I also discovered that none of the tim I've ordered from East Kent Trim fits the aeroscreen edge - and even if it did, it wouldn't go very convincingly around the corners. Bit worried now, as the SVA re-test is in 3 days...
April 27
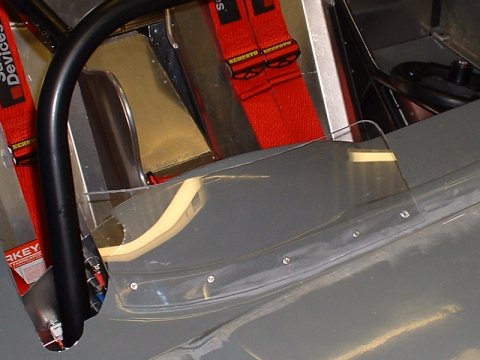
- General SVA fixes -
I had a stroke of inspiration for the aeroscreen - I drilled a 5mm hole near the edge of some scrap steel plate, then chopped off the edge of the plate so that only half the hole was left. This device I called a scraper, and I scraped it along the edge of the aeroscreen. Result? A 5mm radius edge along the edge of the aeroscreen - no need for trim. I was so pleased that I even wet and dryed and polished the edge to make it look nice, even though I'm ditching it for a proper aeroscreen as soon as I can
April 28
- Hmmmm -
IanG's exhaust kit arrived at work today, so I made my excuses and left
The kit is basically a combination of the following: a silencer with a catalytic converter built in; an electronic box of bits; tubes that connect to the air bleeds on the throttle bodies at one end and to some valves at the other; a lambda sensor; and a water temperature sensor
First difficulty was that I don't 'ave an 'ole for the lamdba sensor to screw into. Ian had thoughtfully provided a nut that I could weld to the exhanust, but the nut was steel, and the manifold is stainless steel. I did a practice weld on some scrap, and it seemed that it would probably work OK, but I worried a bit about residual stresses and having to re-do the whole thing in the future. SteveW agreed, and thereby talked himself into TIGing a stainless lamdba boss that he had lying around onto my collector.
Next problem - I couldn't see a way to connect up the air bleed hoses. A call to Ian sorted that out - the GSXR has 4 throttle body take-offs that feed to the inlet air pressure sensor, and a 5th on #4 cylinder that provides the vacumn feed for the PAIR valves. The trick is to use the 5th feed for the IAPS and the other 4 feeds for the cat kit.
Finally, the water temp sensor is zip tied to a convenient water hose (this apparently is to let the box of tricks know that the engine is up to temperature) and the earth and power supply leads are wired in.
I hope it all works...
Next... fitting the silencer. Aarrgghhh. The silencer doesn't have a bracket! I set about making one (it's now about 6pm, and the retest is tomorrow...). DH2 turns up and helps a bit. But it's a disaster - it isn't quite right, and the silencer sits too far out to allow the sidepod to be re-fitted. We try rearranging the 4-2 and 2-1 bits of the exhaust; we heave; we bend; we pray; but nothing works.
I realise that I'm in danger of throwing all my toys out of the pram, so I elect to call it a day, and cancel the retest.
- New ECU -
On the upside, the ECU Ian has lent me seems to work OK. Phew.
April 30
- Anniversary -
Today marks exactly a year since I picked up the kit from Ian. This causes me several difficulties, not least of which is that the XSLT I wrote to generate this website assumes that there'll only be one instance of any particular month during the build cycle. I'm going to have to invent new names for the months after this date. Maybe I can think of a sneaky trick...
- A new turret is born -
After much planning, I elect to support the new exhaust can by welding a turrent onto a convenient chassis rail, and using stainless steel zip ties to hold it on. To prevent it shaking itself to pieces, I use exhaust wrap around the can to cushion the zip ties, and sandwich a piece of scrap silicone coolant hose between the exhaust wrap and the end of the turret.
I can't see this as a long term solution, but it'll do for the SVA re-test (now rescheduled for Tuesday morning)
This page last updated on: Thursday, Aug 24 2006
Component
january 04
february 04
march 04
april 04
may 04
june 04
july 04
august 04
september 04
october 04
november 04
december 04
january 05
february 05
march 05
april 05
may 05
june 05
july 05
august 05
november 05
december 05
january 06
march 06
april 06
august 06