home
introduction
build
sva tests
links
latest updates
November 5
And so, now the fettling begins. There's plenty of things I've got to do to the car to get it to the point where it's not an embarrassment to me. The most important things are:
- find and fix oil leak
- drill drainage holes in bonnet (& rear tub?)
- remove bonnet hinge bolts and re-align bonnet
- make scuttle removeable
- Fit side impact bar
- drilling holes to let rear air out.
- fit bonnet bump stops
- fit big aeroscreen
- remove lockstops
- prepare bodywork for painting
- painting the bodywork
- drill drainage holes in floor (engine)
- change seat belt mount points
- move seats to proper place
- check rear toe
- move accelerator pedal forwards
- Replace suspension bolts with longer ones
- fit nylocs on hub retaining bolts
- Fit electric reverse
- make a new dash
- redo fusebox & relays (behind scuttle?)
Any questions? No? Then let's begin.
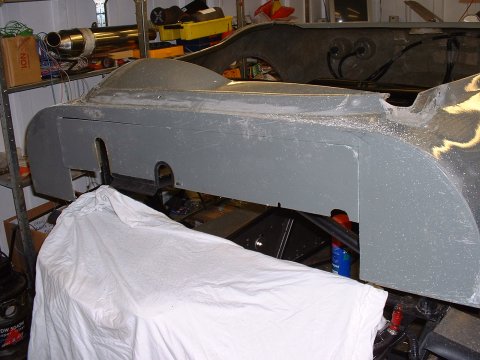
- realigning the bonnet -
When I put the bonnet on, I didn't get the hinge in quite the right place, and it ended up about 1cm too low. The symptom this introduced was to distort the bonnet, which is particularly noticeable where the bonnet is supposed to line up with the rear tub. This is rather hard to explain, so here's a picture of before and after
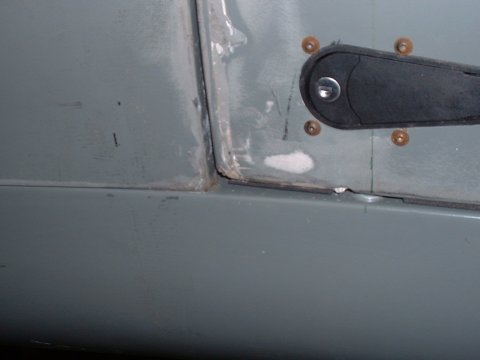
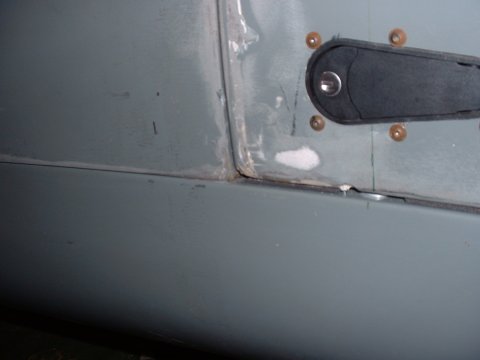
Actually, that's not really before and after. Moving the hinge made no difference at all. What I did find was that if I pressed down hard in the middle of the bonnet, near the rear tub, then the bonnet splayed into the right shape, which is what the pictures actually show. Thanks to William for providing the deadweight of the otherwise useless big diesel battery... 
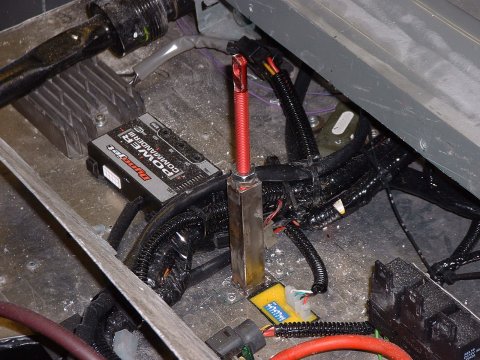
So, the current plan is to use another Aerocatch and use it to pull the center of the bonnet into line. Unfortunately, I can't use the ones I've already got spare, as they are the flush mounting type, and I'm not too confident that they'll be able to do the job without pulling the mounting screws through the (very thin) fibreglass of the bonnet.
To that end, I've made up a turret to mount the bonnet pin into (it's not long enough to reach otherwise).
- leak hunting -
Some weeks ago, on returning Tim's trailer to him after an emissions test, I noticed that the car had leaked (quite a lot of) oil onto one of ramps. This had happened presumably when the oil had become very hot and thin during the emissions testing.
So I got the engine up to temperature and wriggled around underneath looking for things to tighten up. There seemed to be three culprits : one of the joints on the feed hose from the tank to the sump - that was easy to tighten; One of the joints on the output side of the pump - that one was hard, as there was almost no access. In the end, I ended up making a cranked spanner from three others, and got it as tight as I could. The third was the joint where the feed to the oil cooler (or from; I don't know which is which) meets the block. This was as tight as could be, so I guess the little O-ring inside the joint must be damaged. This is only a tiny leak though, so I'll live with it for now.
I ran the engine back up to temperature, and the pump joints didn't leak anymore. I'm going to keep my eye on them though, as I think they could go tighter if I could get better access. The moral here, in case you'd not figured it out, is to double check all the fittings, nuts, bolts, screws and doodads on the engine before fitting it, even if you're sure you've already done it...
November 19
- realigning the bonnet -
Started and finished off the task of fitting the central Aerocatch today. It's successful, insofar as it pulls the bonnet into shape - but there's a bit of distortion around the catch itself. Can't win 'em all, I guess. Here's the turret
November 20
- moveing the pedal -
Not much to report here. I moved the throttle pedal forwards (away from my foot) by about 1.5". I had to cut a bit off the bottom of it to stop it hitting the back of the pedal box, but looking at the marks on the pedal, I wasn't using that bit of the pedal anyway.
- little jobs -
I wasn't in the mood to do too much else, so I just did some little jobs:
- Drilled drainage holes in the floor of the engine bay
- Removed the lockstops from the steering rack/LI>
November 26
- little jobs -
A gentle start to the weekend. I drilled (yet more) drainage holes, this time in the bottom of the rear tub and the bonnet. There's no real need to do this, but it didn't require much effort
Next little job was to fit some little blanking plates to the rear mud-guards, where they meet the body and sidepods. This is in an effort to stop road water getting up onto the sidepod. It won't work, but it made me feel better.
- moving the belt mounts -
Next: it is time to move the upper seatbelt mounts. Currently, they are too high, and the seatbelts have to describe a V shape to go down through the holes in the back of the seats, and then back up to my shoulders. Not brilliantly safe, as the natural thing to happen in a crash would be for them to try and straighten themselves, which would act to pull the seat up, probalby ripping through the floor and me with slack belts...
For the SVA, I just mounted the seat high and rotated forwards, which brought the holes in the back of the seats
But for real life, I'm going to move the mounts down, do give a belt path more like the dotted one below:
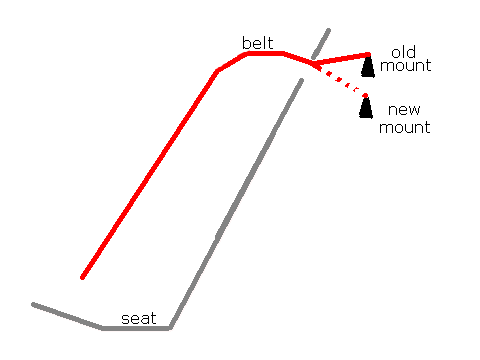
A worthy question at this point is 'Why no just do that for SVA?', and the answer is because there is a stipulated minimum distance of 45cm between the bottom of the seat and the top of the seat belt mount, which it's unlikely the new arrangement would have passed. It might have, said my ruler, but actually it's not that simple: the distance of 45cm is the vertical distance from the corner of a block of wood of a particular dimension placed in the seat bottom, to a line drawn horizontally from the seat belt mount. This must work brilliantly in a proper car, but in mine, the block of wood wouldn't even fit in the bottom of the seat properly, and I didn't have enough arms to hold everything in place whilst I took measurements. So I played it safe...
Anyway - the seat belt eye bolts normally screw into the top of a boss welded onto the chassis. I decided that the easiest way to achieve a lower mount point was to screw the eye bolts into the bottom of the bosses, which are about 2 " long. Except I found that the bosses are a larger internal diameter than the bolts, and must use some sort of insert - they only have thread at the top of the boss, and the bolts rattled around when I pushed them up into the bosses from underneath. To overcome this, I ended up welding some 7/16 UNF nuts onto the bottom of the bosses. (I subsequently found out that Demon Tweeks have some 2" long eye bolts in their 2006 catalogue, which would have gone all the way through from the bottom to the top, but never mind...)
- little jobs -
Whilst the bodywork was off to give me access for welding the seat belt mounts, there were a couple of little jobs that were easy to do: the bolts holding the hubs on to the upright are threadlocked, have a meaty spring washer and a normal nut. Ian mentioned some while ago that he thought it would be better if I used nylocs, as he'd seen plenty of these nuts loosen themselves. I couldn't be bothered to take the existing nuts off, and there is plenty of thread, so I just used some nylocs as locknuts on top of them. I hope I never have to take the hubs off - it's going to be a pretty tedious job...
The other thing I did was to remove the faulty (leaky) brake pressure switch, and replace it with a blanking plug.
November 27
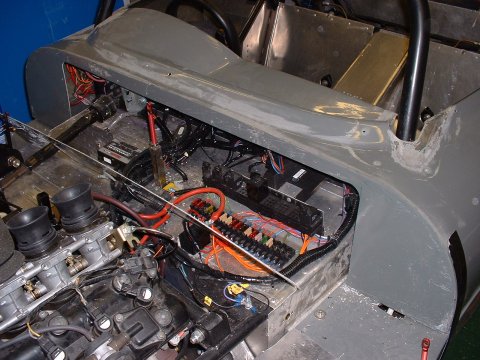
- improving access behind the scuttle -
I had a premonition that one day in the future, I shall find myself stuck at the roadside, needing to get access behind the scuttle to fix a problem with the electrics. However, the only way to do this, at the moment, is to remove the entire rear tub, which mostly prohibits a roadsdie repair.
So today, I set about making the front of the scuttle removeable. Originally, I was just going to chop a panel out, rivet an aluminium flange around the hole, and reattach the panel. But whilst it was all in pieces, I realised that I now had some flexibility to make the scuttle fit better than it had before, so I abandoned the original plan, and have set about making an aluminium panel to completely replace the panel I've cut out.
This page last updated on: Thursday, Aug 24 2006
Component
january 04
february 04
march 04
april 04
may 04
june 04
july 04
august 04
september 04
october 04
november 04
december 04
january 05
february 05
march 05
april 05
may 05
june 05
july 05
august 05
november 05
december 05
january 06
march 06
april 06
august 06