home
introduction
build
sva tests
links
latest updates
June 2
I'm struggling a bit for things to do at the moment, as Ian still has a large pile of bits to send me, some of which are pretty fundamental to onward progress:
- Fuel tank
- 1 x rocker arm pin
- rocker arm bearings
- front dampers
- top trunnions
- driveshafts & hubs
- front grooved discs
- electric reverse
- throttle pedal bushes
- oil cooler & pipes
- steering rack mounts
- light covers
- shifter kit
- front hubs, w. studs
- steering column with QR stud
- 1 x aluminium rocker arm bearing carrier
- adaptors, shims etc for Audi calipers, if needed
- dry sump kit
Still, I spent some time drawing up a plan of action, to figure out what the dependancies are throughout the build. This highlighted that I could get on with 2 things. Painting the front uprights, and planning the chassis and dash loom. I'll tingling all over with excitment about this 
June 5
- Wheels sourced -
This morning, at 6.30, some Barnby magnesium wheels, as used in the Caterham R400 race series last year, fell off a Team Parker Racing truck in Cambridge service station. Luckily I happened to be there to pick them up.
Boy are they light! 3.7kg for the front (13x6.5) and 3.9kg for the rear (13x8.5). Whilst this type of wheel was somewhat notorious during the race series for falling apart, this set have been crack tested, so should be fine. Team Parker have plenty more (the regulation wheel is different this year) so grab 'em whilst you can.
Later in the day, I did a quick search for tyres that might fit the rears. There aren't that many if you're not able to run racing slicks... So, my best bet for continued happiness is to contact Barnby Engineering and get them to supply me a new set of 6.5" rims - the centres and rims just bolt together, so it should be easy to change them over.
- Electrics - what goes where? -
With the help of Tim's wiring diagram for his Fury, a Vehicle Wiring Products catalogue, and some coffee, I had a good bash today at working out what parts I need to order for the dash, dash loom and chassis loom . I have just a few simple goals. The bodywork is going to be removable, so I need to position connectors in sensible places; dash switches should be at least splash proof; and the dash needs to be SVA friendly. I'd really like waterproof toggle switches, but I think that even with their rubber booties on, their radius of curvature isn't big enough . I'll go and measure Tim's sometime. On the other hand, the SVA regs say that the minimum radius is only a requirement for protrusions that are rigid - a rubber bootie is defintiely squishy.
In a vague concession to sensibleness, I'm going to stick as closely as possible to standard colours for the looms, so I've contacted Chris, who has a heeuuge stash of thinwall cable in a variety of sizes and colours.
- Painting the uprights -
|
The uprights look a bit manky in their natural state, so I've decided to paint them with POR-15. Unfortunately, they're a bit too shiney in places (POR-15 likes a good rusty surface to adhere to). Now you can but some proper stuff for treting bare metal before applying POR-15, but I've just done my banking for the month, and I 'm feeling a bit poor. So rather than spending whatever trivial amount it is on POR-15 pretreatment, I'm leaving the uprights in a bucket of salty water for a couple of days to rust them a bit., with some cling film arond the stub axle as protection , 'cos I want those bits to stay shiney... POR-15, by the way, as it tends to stick better to metal than Hammerite, and is less brittle. It's also less hassle than getting them powder coated. | 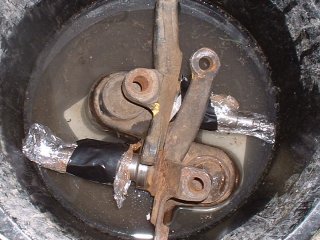
|
June 11
And life drifts slowly on by... I got a big box'a bits today from Ian, which reduces the list of stuff I'm waiting for to
- front dampers
- driveshafts & hubs
- electric reverse
- oil cooler & pipes
- steering rack mounts
- front hubs, w. studs & bearings
- adaptors, shims etc for Audi calipers, if needed
- dry sump kit
So, some progress can be made, but not a huge amount. In particular, I need the front hubs so that I can get the suspension set up to measure up for the dampers.
June 14
- Painting the uprights -
The uprights are nice and rusty by now, so I cleaned them with wire wool, degreased them with carb cleaner, and painted them.
June 15
- Painting the uprights -
The paint took really well, so a second coat shouldn't be necessary. I've given one of them a second coat, and we'll see in a couple of years time whether or not it makes any difference or not.
- Gear shift mechanism -
I painted the gear shift mechanism bits that Ian sent last Friday. I currently have no idea how they piece together - It's kind of like a jigsaw puzzle where you can see how all the bits might fit together, but when you try it, it doesn't seem quite right I think I need to get the propshaft and electric reverse into the mix, so that I can see what has to go where.
In a sequence worthy of a Buster Keaton movie, I also successfully covered my hands, face and hair in POR-15...
- -
Having received an order from Namrick including spring washers, and having bought some nutlock from Mackays, I degreased all the bolts Ian had provided, and them put them back in using the nutlock and washers. With no idea what torque to use, I just sort of leaned about as hard as I could on the end of the socket wrench
June 17
- Some investigation -
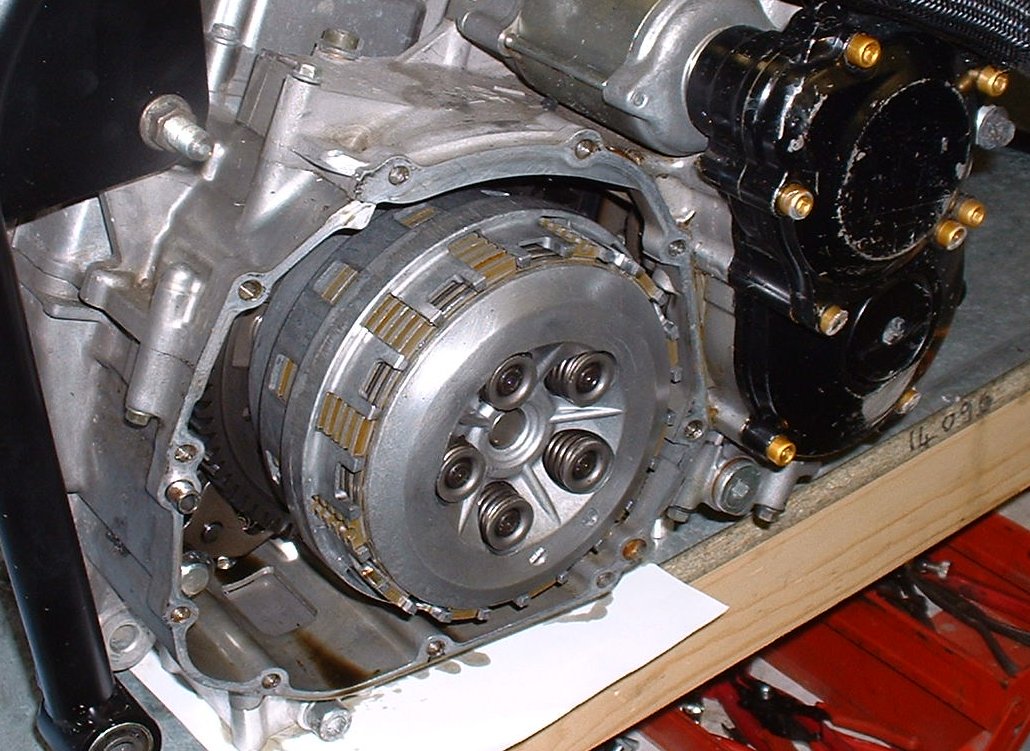 |
JB7 mentioned to me on the Butcher in the Borders tour that GSX R1000 clutch basket failures are not uncommon, and it's usual to upgrade them from the standard cast item, to a billet one - the fingers of the basket are quite thin, and casting thin sections is pretty difficult, leading to weakness in the fingers, with subsequent splaying and failure. I was hoping that as my engine had been sourced from a race bike that it would have this upgrade already, particularly as the clutch cover is an aftermarket one. Removing the clutch cover revealed the flywheel - doh! Wrong end Removing the real clutch cover revealed, what looks to me like a cast basket. Damn! Billet clutches are expensive... |
June 18
- WOO YAY -
I got another parcel from Ian today - he's really getting the hang of this The list of parts is now a much less critical:
- front dampers
- driveshafts
- electric reverse
- oil cooler & pipes
- steering rack mounts
- adaptors, shims etc for Audi calipers, if needed
- dry sump kit
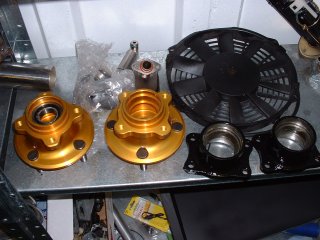
- Prepping the rear hubs -
It never really occured to me that Sierras were old cars until I got the rear hub beaing carriers from Ian. I bit of work with a stiff wire brush, a cold chisel to bash out the old bearings, and some POR-15, and they turned from heavy, rusty chunks of metal into something much nicer. A replacement bearing kit is on order from PartCo. I'm not sure if the kit includes the 41mm hub nuts or not, but we'll soon see.
The front hubs, by contrast, are light, gold anodised loveliness from Fisher Sportscars. I'm looking forward to putting all the bits together.
- -
I popped over to Hallens, the local Suzuki bikeshop, in the morning, and picked up some parts I had on order there - a rectifier, speedo sensor and the mysterious 'resistor' pack that connects to the connector that's not shown on any wiring diagrams for the bike.
- New Bits -
Whilst out at Hallens, I put in an order for some new gaskets for the clutch cover and flywheel cover - I 've not idea if they actually need replacing, but it seems to be a good general rule to replace gaskets when you can.
Looking at the ring that Ian has had welded into the bottom of the fuel tank, there's space for an O-ring. So, taking a bit of a flyer, I decided that it's probably for the same O-ring as used on the bike and ordered one. £10. Gulp. Still, I guess it's Viton or some other flouro-elastomer to resist attack by the petrol, so it's not going to be cheap-as-chips, but even so...
Must get round to looking into getting a fuel level sender sometime soon - the one built into the fuel pump gives a indication of 'just about to run out', but I don't yet know at how many litres that will be when in the Phoenix's tank.
- Tarting about with the Mags -
I'd managed to borrow a friend's car today, so I took the wheel shod with slick to Kingsway Tyres. They got the slick off for me free of charge, and said they'd be happy to put on the new tyres when I got them, for a fiver each.
I rang George Polley Motorsport, and got some prices for Yokohama A539s and A021Rs. The 539's are a bit harder wearing, and were great in the wet on the 21, and adequately grippy for road use in the dry. The 21's are softer, not quite as good in the wet, but more grippy in the dry. In the end, I decided I'd go with whatever was cheapest. Before I called, I'd settled on 185mm width tyres (as wider ones are more prone to aquaplane), and I wanted as deep a profile as possible, to get the ride height of the car up, and the revs down for motorway cruising. The choice, then was 185/60R13 in both tyres, and 185/70R13 in the 21s.
In the weird world that is tyre pricing (which I think is controlled by the same model as air travel prices, fluid dynamics and female reasoning) the better, bigger tyres, the 70 profile 21s, came out the cheapest at 35GBP a corner 
So, having got the tyres I wanted at maximum bargination, I took the Barnby Mag centres off to Morley Brothers in Milton to get them powder coated. Kevin quoted me 12GBP each for blasting and a gloss black coating. He's aware that they're magnesium, and is going to get the blaster people to do it gently. Somehow.
Then I rang Mike Barnby to ask if my hew rims had been dispatched. True to his reputation as being slightly tardy in actually delivering goods they haven't, but he assured me they would go off on Monday...
Then I cleaned up all the rims I have got, including the 8.5"s that I'm selling on.
Finally, to round off a pretty successful day, I looked in Google for a supplier of aero stiff nuts for when I put the wheels back together, and found Allscrews, a company in Slough that seem to stock just about any useful fastener you can shake a stick at. No indication of prices on the somewhat cheesy website, but they're definitely getting a call.
June 20
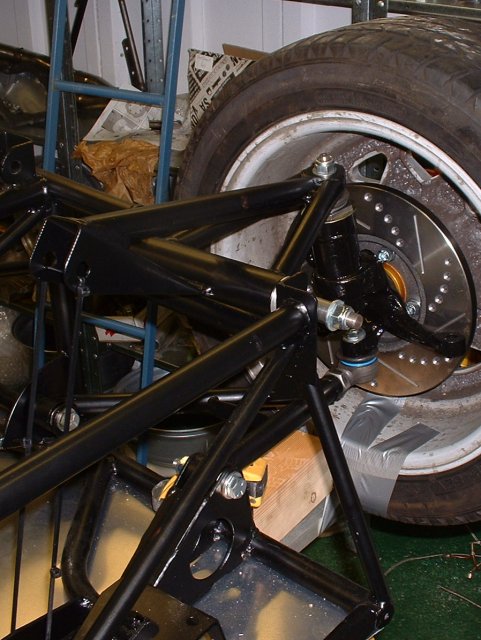
- Getting the front suspension bolted together -
This morning was spent bolting the front suspension together. A bit of copaslip here, a bit of judicious bashing with a hammer and it all went together quite easily. I'm not completely sure I understand metalastic bushes though. On the 21, I just used to do everything up about as tight as seemed sensible, and it was all OK. With these bushes, doing the bolts up tight traps the centres of the bushes betwixt the washers on either end, and wishbones get jammed in place - they can only move as far as the rubber in the bush can twist. Only by backing off the nuts a bit is the tension on the bushes reduced enough to allow the wishbones to be moved by hand.
So I have. There's no side to side play, and the nuts are still tight - they're just not TIGHT. Comments on a (virtual) postcard please...
As for the rocker arms - bearing carriers in the oven, bearings in the freezer, wait 30 minutes, and Bob's your uncle, the latter drops nicely into the former. No such luck with getting the bearing carriers into the rocker arms, and for the want of a hydraulic press, a 22mm socket and a large adjuster were pressed into service.
So that completed the assembly, all except for a missing 1/2" bush that Ian uses to space out the nuts on the rocker arm pins (I guess the pins just the same size as the rear ones, and it's easier to use the same part than to source one that's the right size.)
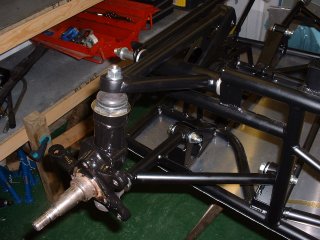
Then onto the hubs. These have studs that have to be pressed into place, and they cut their own splines as they go. For the want of a hydraulic press, a Heath Robinson arrangement of a 3x3 lump of wood, clamps and a medium adjuster were pressed into service.
Finally, the bearings. For the want of a hydraulic press, and after a bit of feeble thwacking with a large adjuster and the back end of a 41mm socket, I decided to give up. Tomorrow, I'll head into Mackays and see what offcuts of steel rounds they can provide for me to use as drifts. I need 1-7/8" and 1-1/2" for the fronts, and 2-1/2" for the rears.
- Undressing the steering column -
I pulled everything off the steering column this evening (is it just me, or are steering columns by far the most intricate piece of engineering on a modern car?), and offered it up to the chassis. I haven't got the slightest idea how that's going to attach I'll need to take a visit over to Tim's place and see what his looks like.
On the upside, the QR boss looks like it should be pretty easy to attach - it fits perfectly over the end of the column.
And I'm looking forward to taking the angle grinder to the lock casting
June 22
- Getting the front suspension bolted together -
Thanks to all you mailed me to comment on the metallistic bushes. Seems crazy to me that they do work by being clamped and relying on the twistiness of the rubber, but there we go. I spy a future upgrade
Today's excitement was using some old socket of Tim's as drifts to bash in the wheel bearings and seals. I overdid one of the nearside fronts and had to bash it back out a bit again, which wasn't very mechanically sympathetic. Bet I know which one fails first.
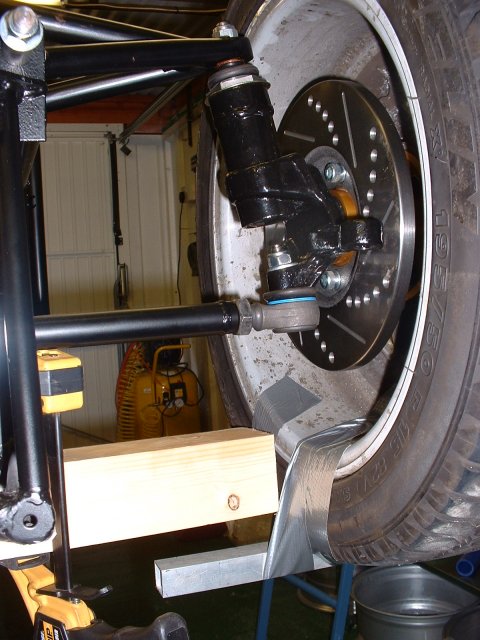
- Getting the front disks on -
Before I bolted the hubs on, I wanted to get the discs attached to the hubs. This led to the discovery that I didn't have any long enough bolts to do the trick. Namrick and some courier or other will be getting a bit more of my money tonight...
- -
Then I turned my attention to bolting the rear hub bearing carriers on. Yet more money to Namrick needed.
June 26
Hmmm. Getting a bit behind, aren't I. Problem is, there's all this beer to drink, and parties to go to...
- Getting the front suspension bolted together -
Managed to spend plenty of time in the garage today. The main job was to get some some dimensions off to Ian for the front dampers. He's allowing for the fact that this is to be mostly a road car rather than a race car, so he wants me to set a front wheel up at my prefered ride height and measure the damper length at that position. I haven't yet figured out why my dampers should be any different to his - the damper has to have a long enough open length to accomodate the suspension at full droop, and the closed length needs to enough to stop the suspension crashing at maximum travel.
With the right length bolts having arrived from Namrick, I attached the brake discs to the hubs and plonked them onto the stub axles. I haven't got any stub axle castle nuts, and the local Ford place say they can't get hold of them any more, but they measure up the same as 5/8 UNF, so I'll see if I can get hold of some from somewhere.
Nonetheless, I borrowed a spare 15" wheel off my housemate Alex, and used some mole grips to hold it in place (no wheel nuts either!), and then set up yet another Heath Robinson arrangement (using gaffer tape and cable ties, of course) to set the suspension to the 'correct' height. As to what is correct; the maximum permissible speed bump height is 100mm, so I chose a ride height of 110mm. This matches with my expectations based on Caterham 7's (they are factory set to 140mm and this always looks just a bit too high when you follow them), and will give a ride height height of 100mm if I change to lower profile 12" tyres, and will raise it to 115mm on my current tyres.
The total wheel travel is 120mm, and set at this position, there is 30mm of down and 90mm of up travel, which seems fine to me. Well, if it were a mountain bike, that would be fine, as 3:1 ratio is how you normally set those up. Guess it's gotta be kinda the same for a car.
- Calipers on -
This turned out to be suspiciously easy. Aside from the fact that I needed to go out and buy 4 M12 bolts to attach the calipers to the uprights, and had to run a tap through the threads to clear out the old rust and new POR-15 (oops) they just bolted right into place. The discs sit right in the middle of the calipers, the pads fit, nothing went wrong. Cautious "woo-hoo"'s were emitted.
- Tighten it all up -
Now in a good frame of mind, I went round and copasliped up all the rear suspension bolts, fed in padding washers where needed, fitted the 2 rear rose joints and generally made myself busy. It's not clear to me at this point now the bearing part of the rose joints should be restrained. I'll take a squizz at Tim's when he's not racing in the RGB series at Brands Hatch tomorrow.
I also got a call from a friend Rob to say that he'd been in a nut and bolt emporium in Bury St Edmunds, and had found me some 5/8 UNF castle nuts. Yay!
- -
Then some planning - I need bits'n'bobs so that I can attach the calipers to the master cylinder. I sat down with a beer and a Think Automotive catalogue and figured every single nut and adaptor I'd need. This turned out to be a surprisingly long and expensive list. Moving over to whisky half way throught the planning session didn't help. I'll try again tomorrow.
June 27
- Tighten it all up -
Grrr. It seems that the Escort axle nuts aren't 5/8 UNF at all. I call Ian, and he confirms that "it's a weird thread - no idea what it is. We always make sure we get them with the uprights." So, if you're reading this and you're planning on buying Escort uprights - get the nuts with 'em...
I'll call Tendring Spares tomorrow and see what they can do
June 30
Called in at STM today on the way back from a meeting the list of stuff I'm waiting for reduces to
- driveshafts & hubs
- electric reverse
- oil cooler & pipes
- steering rack mounts
- dry sump kit
So, I'm running out of excuses to not be building
This page last updated on: Thursday, Aug 24 2006
Component
january 04
february 04
march 04
april 04
may 04
june 04
july 04
august 04
september 04
october 04
november 04
december 04
january 05
february 05
march 05
april 05
may 05
june 05
july 05
august 05
november 05
december 05
january 06
march 06
april 06
august 06