home
introduction
build
sva tests
links
latest updates
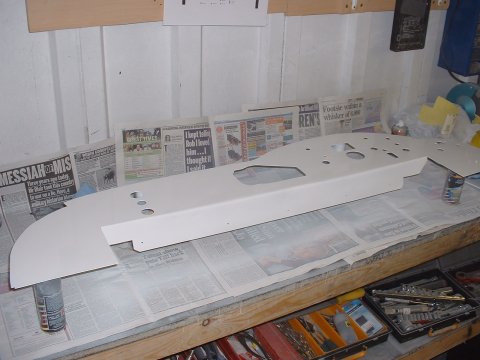
March 5
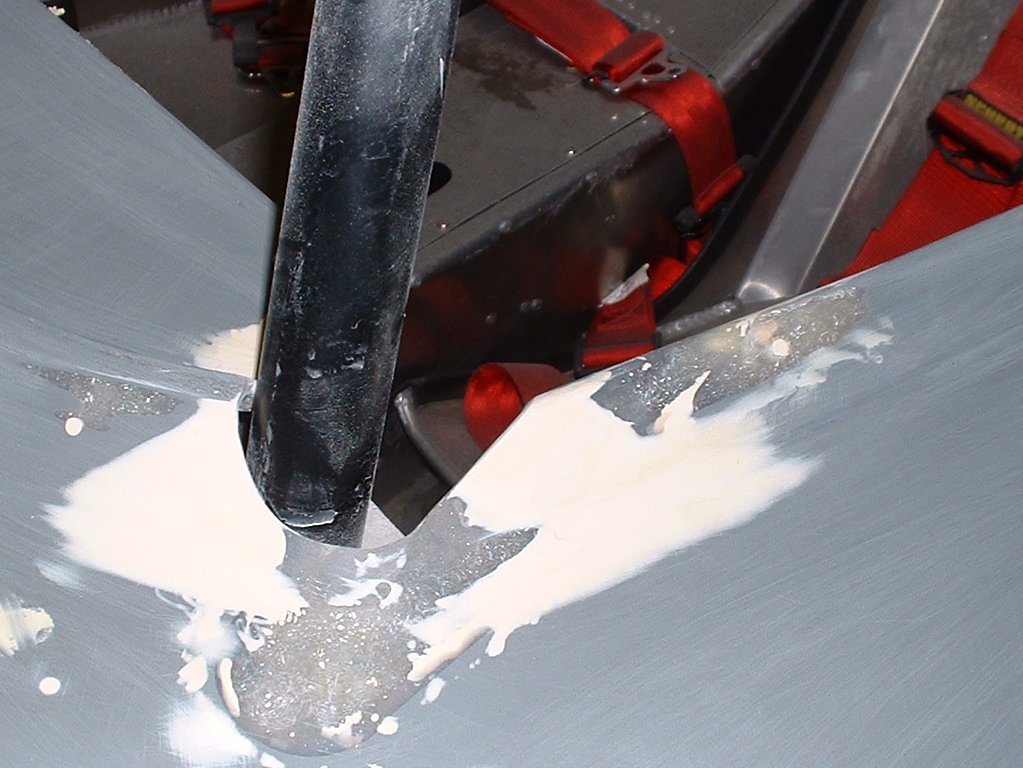
- filling and sanding and filling and ... -
Today I sanded down the bodywork in preparation for painting. Over the past couple of weeks I've been filling and sanding various bits. Here's a picture of where the cage goes through the rear tub on the nearside. Primer grey is the original gel coat, the pinky grey is the repair that Dan Bromilow helped me with (replacing the GFRP where I'd cut too much away, the yellowy bit is where sanding has gone down through the gel coat as I've been making the surface flat, and the white stuff that looks like paint is the filler
Of course, sanding everything revealed a few more defects that need filling (mostly air bubbles in the surface gel coat that have collapsed). Overall though, the flatness of everything has been good, so I'm hoping that I can get away with just a bit of high build primer in soime key areas, and do a final sand with 240 grit sometime in the week, work permitting.
March 17
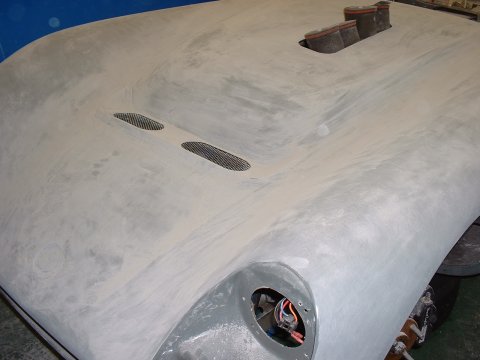
- Sanding all finished -
Last night and this morning I finished off the last of the sanding, which was of the sidepods. If all goes to plan, Steve will come over at lunchtime today and we'll take the bodywork for painting at Densley Charles Coachworks on Ditton Walk. Hopefully it'll look something like this when it comes back:
March 21
- New dash -
Whilst the bodywork is off being painted, it's a good time to redo the dashboard, and put everything where it's supposed to be. I've also decided to remove a whole bunch of things that I thought would be useful, but were actually just clutter - such as the ignition light, coolant pump switch, fuel pump switch, etc.
First step, clearly, is to make up a new blank, and here it is
I've taken a bit of a leap of faith and assumed that I can just use the old one as a template, and it'll magically line up with the bodywork when the time comes. Of course it's not that simple, as I've gone back to using the original mounting points instead of the ones that I had to use for the SVA friendly dash. Watch this space...
March 22
- New dash -
Today I drilled, filed, jigsawed and emery clothed the various holes needed in the dash for the instruments and switches. I also spent a considerable amount of time cycling round Cambridge looking for a shop that sells sticky back plastic, as I have decided, wisely or not, that the dash is going to look fantastic in white, and I figured that sticky back plastic was the easiest way to achieve that goal.
But I guess no-one in Cambridge watches Blue Peter, because there was none to be had. So I bought primer and paint instead.
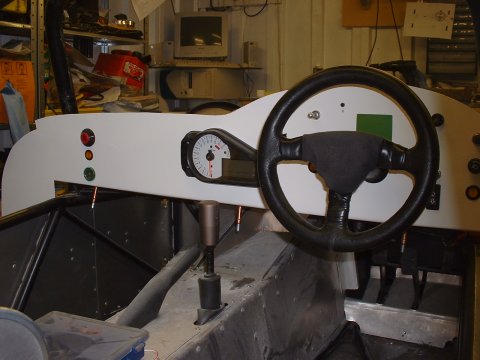
March 26
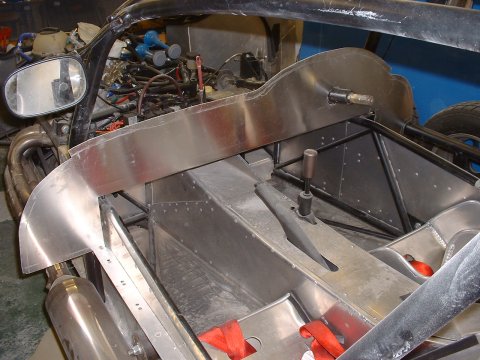
- New Dash -
Over this weekend I fitted out the dash and attached it with Clekos to the chassis. Of course, it looks fantastic, as this photo doesn't show very well
March 27
- New Dash -
Not such a productive evening. On Saturday, I'd found that I'd put the hole for the CBTech dash too close to the hole for the steering column, and had to make it bigger, leaving an unsightly hole. So today I made a little rubber insert to fill the hole. I also made a little bracket under the scuttle panel to hold the remote garage plipper. If only everybody worked this hard.
March 28
- Bit of painting here, bit of welding there -
I never got round to painting the bonnet hinge before the SVA, so I did that today, as well as the turret holding the center bonnet catch pin. 'citing this, isn't it... I did have to do a bit of welding and grinding as well, but we'll not go into the details of that here.
- Checking the rear toe -
Something I didn't do before SVA was to check that the rear toe was OK - I did a visual check by laying a piece of angle along the tyre and tweaking the toe in until the angle just touched the front tyre. So today I set about making sure it was OK, with the help of an old laser pointer of Dad's. Here's the picture that speaks a thousand words.
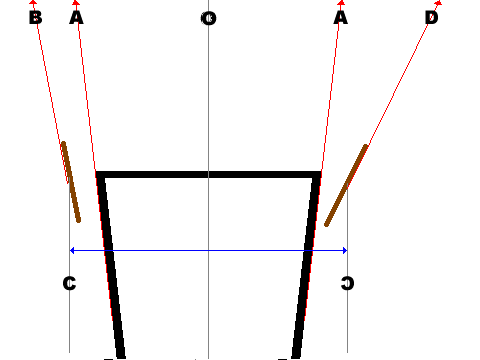
So, I projected the bottom chassis rails against the garage door, and found the centre point - this of course assumes that the garage door is perpendicular to the chassis (although this isn't critical), and that the chassis is in some way symettrical about its centre line
Next, I projected the brake disc faces back to the garage door. By a miracle, the projected points D and B ended up equidistant from the centre line, meaning that either that the discs are equidistant from the center of the chassis and have the same toe, or that they are not, and they don't. It's pretty to hard to tell, so I assumed the former 
Finally, I measured the separation of the discs (131cm), the separation of the projected points (134cm), and the distance from the discs to the garage door (175cm), giving an arctan of total toe-in of 3/175, which is 1/58. And as everybody knows, in radians, arctan of small angles is just about equal to the angle itself, and as everybody also knows, 1 radian = 57 degrees, so I calculate a toe-in for each wheel of 0.5 degrees.
I've since been told that I should be aiming for something closer to 10 minutes, and not with the suspension at full droop (which the smart amongst you will realise must be the case if I'm taking projected lines off the discs...)
But it will do for now!
March 29
- General stuff -
A half day off work and plenty to do whilst I wait for the bodywork to come back from the paint shop
Sorry, it's just a list, but beggars can't be choosers...
- reattach bonnet hinge
- wash everything - to remove all the dust from sanding
- fit seat covers - trickier than it sounds - had to dismantle the Schroth belt mechanism to get it through the hole in the cover
- cable tie air filters on
- fit electric reverse cable through under scuttle panel - well it's fitted, but the leverage ratio is waaaaay not enough, so that'll need some attention later
- refit mudguard and dash edge trim
- reattch front light wires
March 30
- General stuff -
General fiddle-faddling today:
- Bind, tie-wrap the loom. I also put yet more convuluted tube on in vulnerable areas. This was mostly behind the scuttle.
- Cut and glue down rubber mats in the boot and glove boxes - just to stop stuff clattering around.
This page last updated on: Thursday, Aug 24 2006
Component
january 04
february 04
march 04
april 04
may 04
june 04
july 04
august 04
september 04
october 04
november 04
december 04
january 05
february 05
march 05
april 05
may 05
june 05
july 05
august 05
november 05
december 05
january 06
march 06
april 06
august 06