home
introduction
build
sva tests
links
latest updates
July 1
- Oh dear -
I woke up this morning with the realisation that I've put my front hub bearings in the wrong way round. I mean, not just in backwards, but the whole assembly in the wrong way, bearing first, and held in place with the races. This has the disadvantage, as I found out last week, that the bearing clearances have to be set with a hammer, rather by gently turning the hub nut...
I'm glad my brain worries about this stuff in the background, and lets me know about it when it feels the time is right 
July 3
- Lets do them properly this time -
After a trip out to PartCo this morning, I've got a replacement set of bearings, as I'm sure that bashing out the old ones is going to damage them. Mark at Fisher Sportscars who supplied the hubs assured me they were standard Mk2 Escort bearings. However, after some considerable faffing at PartCo, it turns out that they are in fact Mk1 Escort bearings. The seal, however isn't the right size - maybe it's a Mk2 seal.
The old bearings came out with some help from a medium sized adjusting device, and the new ones popped in quite nicely, using the old races as drifts.
Then some good luck. I measured and re-measured the axle thread, and it still matches up with 5/8UNF. The nuts that Rob got me are quite soft, and the axles hard, so I thought I'd see what happened if I wound them on with a bit more force than I'd been willing to use before. Having spent many years dealing with delicate threads on aluminium bicycle components, I like to think I've got a feel for 'good', 'not too bad', and 'stop now' when tapping out a damaged thread. And miracle of miracles the axles tapped out a new thread in the nuts, with only a tiny amount of swarf coming out of the nuts. The nuts are secure, don't wobble, and wind on and off freely, so I'm pretty happy to use them.
So, on they went with a washer, a split pin to secure them, and they're all done.
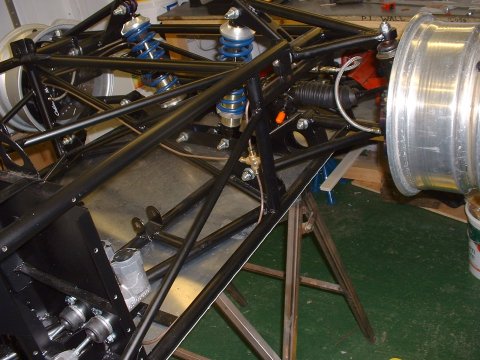
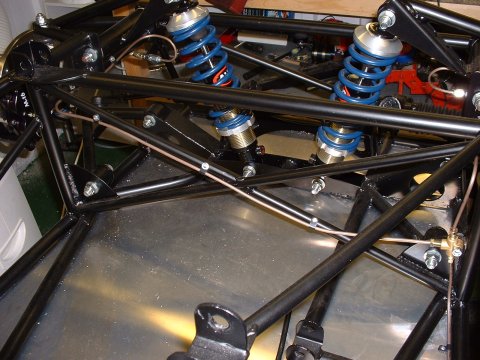
Next job was bolting in the dampers I got from Ian on Wednesday.
- Moquip hoses -
My plan for brakes today was to do all the hard lines for the front and back, and the flexible hoses at the front. Things were rather stymied when I realised that I needed a different adaptor at the master cylinder than I had thought.
So I gave up, and the sum total of my hardline success was attaching the front T piece to a suspension plate at the front, by tapping an M8 hole in the T piece's mounting hole, and bolting it in place.
The next job was to make up and loose-fit the flexible hoses at the front. Not much to say here, other than the best way to cut the hoses without fraying the ends was to use a dremel. The hoses I got have a PVC coating on the outside of the stainless steel braiding, and this has to be removed to fit the Moquip end fittings over the hoses.
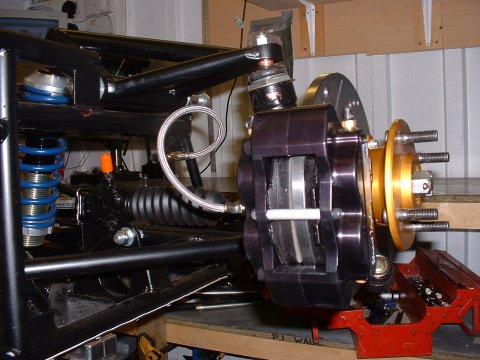
The final brake job for the w/e was to measure up for the adaptors on the Audi calipers. It's a female thread, so hard to do, but my best guess was an M12x1.0, which seemed like an odd size to me. A few minutes with the Think Automotive catalogue though and I was out to rights - plenty of M12x1.0 adaptors in there, and some of them eye wateringly expensive. I'd initially hoped to go for a banjo at the rears to make sure there were no clearance issues, but at £25 each side for the adaptors, I elected instead to go for somewhat cheaper 45° Moquip swivel fittings.
- Getting parts in -
I spent hours in the evening going over various catalogues looking for components for the fuel system. I settled in the end on using an aluminium hardline for the majority of the run from the tank to the engine, with conventional injection fuel hosing and hose clips to join the ends up. FWIW, aluimium tubing is half the price at Demon Tweeks that it is at Think.
I also ordered a lockable fuel cap, funnel and connection hose, a breather valve and some bits of tubing. One problem I gave up trying to resolve was how to deal with the requirement that the filler neck mustn't be any wider than 23.6mm for SVA, which I assume is to permit the nozzle of a lead free pump in, but not one for leaded petrol. I'm hoping that someone's going to tell me I can braze any appropriate sized hole in place. 23.6mm doesn't conform to any normal sized thing though, so I'm sure this is going to come back to annoy me some time in the near future.
July 6
- Centres back from Morley Bros -
I picked up the mag wheel centres from Morley Bros today. They've come up lovely (and I guess so they should - his quote went up to total £80  ). The one that was originally already powder-coated had to be stripped by hand apparently, as magnesium reacts with the stripping agent that they'd normally use to remove in-situ powder coating. This process involved pouring a tiny bit of stripper on, and scrubbing it off as soon as broke through the powder. For the entire wheel. Ye-owch. There's a guy someone near Bury St Edmunds (where the stripping was done) who no doubt would like to meet me in a dark alley somewhere for a bit of a word in my shell-like
July 12
- Rebuilding the wheels -
There's been quite a bit of work getting the wheels back together. First problem was that they didn't fit over the hubs anymore, because there was powder coat on the inside edge of the central hole and on the stud holes. Mr Dreme dealt with the first problem very nicely, and a small round file the latter. Next problem was one that I've heard people whine about, but never really thought anything of until it happened to me: magnesium is a very soft metal, and as you put the wheels on and off the studs, little shards of magnesium get scraped into the stud threads, and act to block the wheel nuts going on. Completely. So, a lesson learned there - I'll remember to carry a little brush around with me if I ever get this car on the road. Oh, and a deep 19mm socket, because the standard 19mm wheel wrench is too fat to fit in the holes that the wheel nuts sit in.
Then a somewhat more fundamental problem. With the nuts done up all the way, there is a gap a little over 6mm between the back face of the wheel and the hub. After considering all sorts of options (different studs, nuts, cutting down all the existing studs and nuts, big fat washers under the nuts etc etc), I've decided that the best thing to do is get a couple of 7mm spacers made up.
Unfortunately nowhere stocks spacers of 7mm depth; 6mm and 8mm are easy to come by though
Fortunately, Jonathan Rarity, aka JB7, a friend from Tour7 has just set up a business Artistic Engineering doing (amongst other things) CNC routing. So he's making me some
Satisfied that the centers all sit on the hubs OK, the next thing to do was to bolt them back into the rims. The two older sets of rims were all ready to go, so 32 capheads, washers and nylocs later, they were done. The new rims were supplied in two halves, inner and outer, and they needed to be siliconed together to make them air-tight. I bought some clear drying silicone in a convenient pressurised container, and put a bead all round the outer edge of each mating surface, so that when they squeeze together, the sealant will tend to squeeze into the rim rather that out and over the centres. This should ensure air-tightness.
Another 32 capheads, washers and nylocs later, the job was done.
July 16
- Putting in the hardlines -
Not as easy as I thought it was going to be this, and I didn't find out why until the very last pipe... I'd ordered Kunifer tubing rather than the other option, plain copper. I couldn't tell you why, other than it was there. As it turns out, it's much stiffer, and therefore more difficult to bend by hand. And it work hardens much faster than plain copper, meaning that it fast becomes impossible to bend by hand at all.
It is much thinner though, which has 3 advantages. First, it's quite noticealby lighter; the tube nuts can slide round tighter radiuses, so it's easier to move them out of the way when making the flared ends; and there's a bit more tolerance on the angle that at which they can go into the tube nuts when you're trying to tighten the nuts up.
I found all this out when I ran out of Kunifer and had to use a spare piece of normal copper tubing I had lying around...
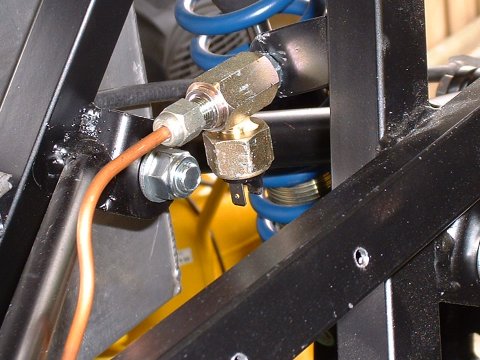
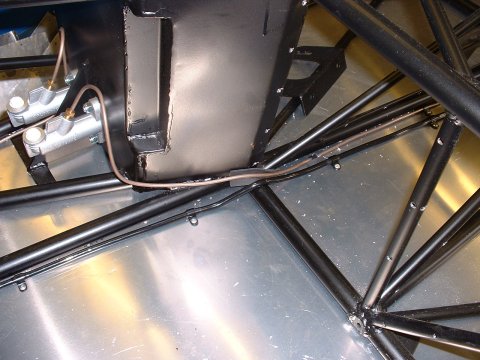
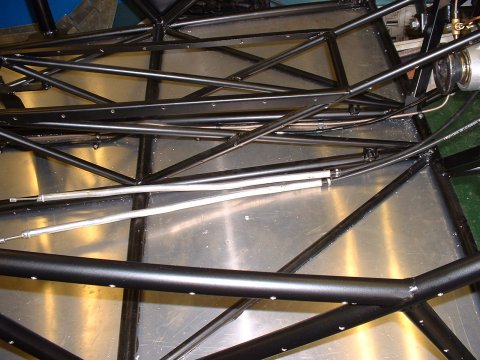
Ahm. What else. Oh yes, the cursèd brake pressure switch adaptor. Despite DH2's bad experiences using a brake pressure switch, I'd ordered one from Think Automotive. It's yet to arrive, but I do have the T-piece adaptor for it. Unfortunately, the adaptor, whilst listed as M10, in fact has a tapered thread, and doesn't have proper conical seats, so it doesn't immediately lend itself to a brake pipe application. After lots of head scratching, and literally hours scanning through Think Automotive's catalogue, I found that if I screwed the female end of it directly into the rear bulkhead adaptor (where the hardline would meet the flexible line), then I didn't need a conical seat at that end. You can just see the adaptor in the top right hand corner of the second picture below. At the other end, which is male, there is a very slightly convex surface. But tightening a tube nut onto the thread, I found that taper of the thread stops the brake pipe tube nut screwing down far enough to seal the brake pipe against the end of the adaptor. So, I cut down an M10 brake pipe nut to be short enough to allow the end of the brake pipe to meet the end of the tapered thread, and it seems to be able to form a good seal. The proof, as they say, will be in the pudding.
At least, I think they say that. Doesn't make much sense on the face of it.
Postscript: Dad has emailed to say that the proof of the pudding is fact in the eating, which does in fact make much more sense

Final job of the day was to disconnect and remove the master cylinders. I'd bought from Caterham a couple of AP master cylinder caps with built in fluid level switch, but when I fitted them, I didn't like the fact that they more or less completely fill the reservoir, which doesn't leave an awful lot of fluid in there. I knew that I could get some near identical master cylinders but with with a take off for a remote reservoir, instead of the integral one that I've got. A bit of digging around on the internet found me somewhere that could both those and remote cylinder with built in fluid level cap. It's got 3 outlets so I'll be able to do the clutch fluid from it too.
The only downside is that the somewhere that's got all these goodies is HiSpec Motorsport. Given their reputation for tardiness of delivery of their brakes, I'm not holding my breath.
July 19
- Well, knock me down with a feather -
The Hispec delivery came this morning. A quick session in the garage sees the new master cylinders fitted, and a plan formulated to fit the remote reservoir, which ran along the lines of 'That's the best place. Hmm - close to where the steering column would be if I could fit it. Better leave it for now'.
July 21
- Spacers arrive -
The spacers have arrived from JB7, and they fit a treat - just very slightly on the loose side of an interference fit, needing a light tap with a mallet to bed them down. And the wheels fit too. The only problem is that on the off-side, the spacer forces the one of the wheel stubs out to be slightly non parallel. All the spacers do it, so it must be a slight tolerance problem with the hub. What I'll need to do is modify one of the spacers slightly to be a looser fit.
![]()
- Welding practice -
He he - fun. Tim lent me his MIG welder, and I spent a happy hour practicing welding bits of steel to each other. I managed to do a couple of good ones, but the rest were pretty awful. I'll take the resulting sculpture along to the Cam7 pub meet tomorrow for diagnosis.
July 23
Called Ian this morning looking for an ETA on the crucial missing parts. The call went something like this:
Ian: 'OK, so what are after?'
Me: Steering Rack mounts
Ian: They're done - I just need to pick them up from the guy,
Me: Electric Reverse
Ian: That's done too. I need to pick that up too
Me: Driveshaft bits
Ian: The guy is bringing those up at the weekend
Me: Engine cradle
Ian: Yes, that's done. It's just being powder coated
Seems a reasonable exchange to the outside observer, eh? However, I had a near identical conversation with him a week beforehand, and a very similar one a week before that. Ian's not exactly the master of managing customer expectations. I guess I don't mind, given as at least some of these (un)deliverables are due to continuing development work on the Works cars - it's just very frustrating.
July 24
- Finishing off the lines -
I spent the lion's share of today tightening up all the brake line fittings and clipping the lines down. That took far longer than I'd have guessed! I was also able to fit the brake pressure switch, which Think delivered during the week. Mysteriously, they've omitted to send me all the other things which I added to the order whilst the BPS was on back order. Must remember to call them!
Whilst I fiddling with the brakes, I noticed that the handbrake mechanism is going to require the handbrake cable to pass right through the a rear suspension tube. A quick post on Cam7 and it was decided that I should swap them from left to right and mount them upside down. This puts the bleed nipple at the bottom, but there is plenty of precedent for this in the kit car world, so I'll just have to put up with the inconvenience of disonnecting the calipers when I bleed them. Oh, and the bits I've ordered from Think will be wrong as well.
The alternative plan is to detach the mechanism and rotate it round to a better place, which is easy, and possible. The only difficulty is that to reattach the mechanism requires drilling and tapping a hole in the body of the caliper, and there's no way to tell if that will go into, or near to , a fluid channel. A future fettle? Most likely not unless I get really annoyed with having to do the detachy bleedy thing.
- Fitting the main line -
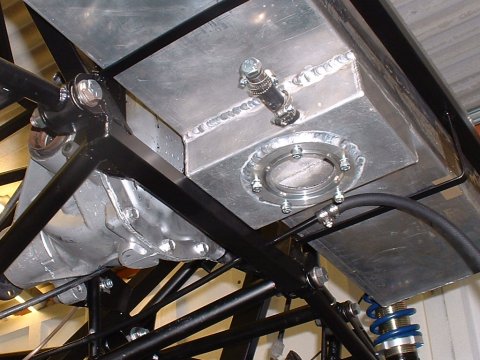
I thought that whilst I was clipping down the brake lines I'd do the main fuel feed as well. I'd borrowed another flaring tool off Steve, so after straightening the tube and cutting it to length, I put a flare in the end (I mean, what else would I have done with a flaring tool?) and ran the tube down the tunnel next to the brake line. A little bit of drilling and clipping later, and it's all neatly in place. I also fitted the flexible hose to the tank end, and cut down some bolts to allow me to bolt the fuel pump into the bottom of the tank. Weirdly, whilst the O-ring has a groove to sit in on the tank, it doesn't have a groove to sit in in the pump itself, but careful perusal of the service and parts manuals reveals that that seems to be the case on the bike as well.
I didn't actually bolt the pump in because the tank is full of residual water from when I tried to clean all the crap out of it a few weeks ago - shards and flecks of aluminium from the mods that were done to the tank, and my subsequent fettling to do the mods properly (grumble, grumble). As I know I have to drill at least one more hole in the tank for the fuel sender (which is a capacitance type, on order from Fozmula), then I'm in no rush to try and clear the current detritus out ot the tank, as it's going to be a major effort.
My final job of the day was to attempt to do something with the breathers on the tank. The tank has 2 baffles, which split it roughly 25/50/25, and I assume that the 2 breather tubes allow air to 2 of the chambers. Why the 3rd smaller chamber doesn't have one, or in fact why the first one does have one is a mystery at this time. There's no point asking Ian as he didn't even think that the tank was baffled when I asked him...
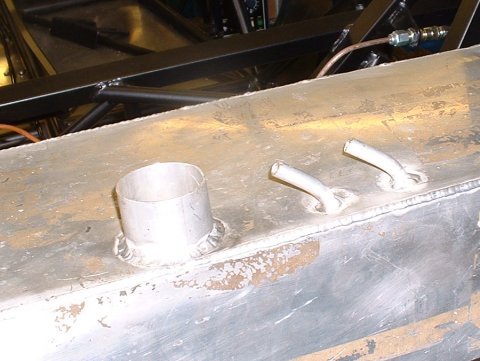
Anyway, the tubes are rather inconveniently large at 10mm O/D, as ultimately I need to connect them to a 6mm breather valve. I fiddled with bits of pipe for a while and decided that my best plan was to find a small enough pipe for the breather valve and ream it out until it could just squeeze over the 10mm T connector.
Seemed just one boring job too far for the day, so I went round to Pete's place for a party
July 25
- Routing the handbrake lines -
I lost most of today in an enforced party recovery mode. The late afternoon saw me routing the handbrake cables. As supplied for the A3, the handbrake end of each cable is shrouded in aluminium tubes, which are bent to some mysterious A3 fitting shape. These turned out to be very easy to bend straight, so I did, and I laid them out in a sensible looking route. Fingers crossed, it looks like I'll be able to use them exactly as they are, without any modifications. How I just need a handbrake. I've won a Mondeo one on eBay for the princely sum of £1...
July 26
- More welding practice -
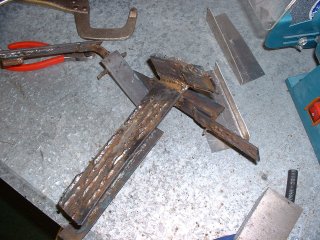 More welding practice today. I've definitely getting better, having had my previous attempts diagnosed. Still need practice though, as the picture shows! Tim reckons it takes 6 hours to get to a reasonable standard, and I've only done 2 so far.
July 29
Got the oil cooler in the post today from Ian. Now; if only I had something useful to attach it to...
This page last updated on: Thursday, Aug 24 2006
Component
january 04
february 04
march 04
april 04
may 04
june 04
july 04
august 04
september 04
october 04
november 04
december 04
january 05
february 05
march 05
april 05
may 05
june 05
july 05
august 05
november 05
december 05
january 06
march 06
april 06
august 06