home
introduction
build
sva tests
links
latest updates
May 1
No William, I haven't done anything on it today, and no it isn't finished. Had some nice bacon butties round at DH2's though 
May 6
Tim has brought me round his chassis stands, and I've cleared all Alex's cr stuff out of the garage. Surely I can start this thing soon?
May 7
- Getting Started -
It occured to me tonight that it'd be nice to know where I'm supposed to be drilling when I start drilling holes in the panels. More specifically, I'd like to make sure that when I drill a hole that it goes square into a chassis rail, rather than into thin air, or scraping down the side of the tube.
Which you'll remember is round, rather than square, which makes the task a little bit harder.
Lots of people have solved this problem before, of course, but I've no idea how they did it. My current favorite idea is to use lickle magnets - clamp the sheet down on the chassis, and then thrown magnets on it - they'll stick to the aluminium only where there is a chassis rail underneath.
I've got some magnetic stick things from a geometry construction game thing, and this is what I got when I tried with those:
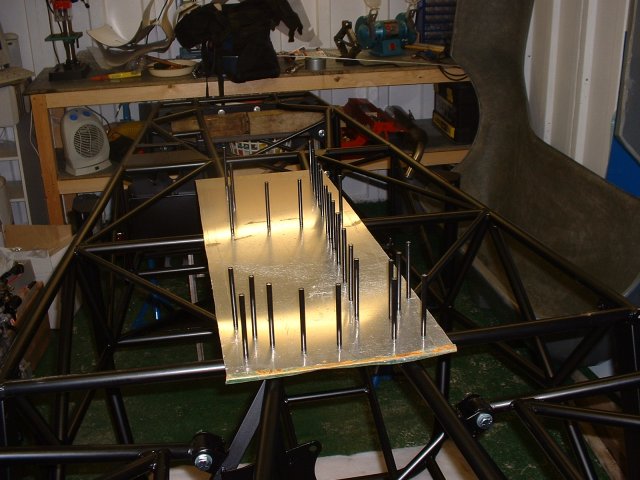
I'm so brilliant, I often wonder why the world needed Einstein.
May 8
- Panelling the floor -
Went out this morning to buy an automatic centre punch, and some connectors so that I could get the air compressor up and working. Seems to go OK - a bit noisy, and I can't get it it to pressurise to more than 6 bar, whereas it's supposed to go to 8. I must be doing something wrong, but it's not clear from the insructions what that might be.
Just before lunch I started on the floor panel. It turned out to be a much simpler operation than I was anticipating - lay the aluminium out on the chassis, mark off the outsides of the chassis on the sheet from underneath, lay it out on the floor, use a drill powered nibbler to trim to size, and then aviation shears to trim down to the line. One thing I learned is that it's worth leaving a good 1/2" or so when trimming to size. I actually left about 3 to 5 mm, and when I started to trim it with the shears, the offcut curled up on itself and kept getting in the way.
Then I spent an hour or so getting the webcam up and working properly, and setting up an email address that I can use for Messenger and Cam7 when I'm out in the garage. Then I remembered that I was supposed to be building a car...
Next stage was to mark out the positions of the chassis tubes. Most of the major tubes were actually quite easy to do, just by eye, and lifting up the panel where necesary. The smaller diagonal tubes I resorted to the magnets trick.
It seemed to work though - I punched and drilled a set of test holes in the middle of each length of marked line, just deep enough to pit the suface of the underlying chassis tube. When I removed the panel, every pit was in the centre of its tube. So I clamped the sheet back in place, and centre punched the remaining holes at 3" centres. It's become a bit late though to fire up the compressor and start drilling all the holes, so I'll leave that till tomorrow. If I'm a good boy, I'll use the time now to go back out and tidy up the garage.
P.S. Has anyone else noticed that I'm unable to maintain use of a consistent tense throughout these little reports? It's annoying me, and I apologise if it's annoying you as well...
May 9
- Panelling the floor -
Today mostly went OK. Drilling all the holes was OK, except that I was going through drill bits way too fast - they weren't getting blunt, but kept snapping. I think the problem was that as the bit broke through the inside of the chassis tube, the swarf would jam into the flute; if I didn't stop quick enough, the bit would snap. I soon developed the technique of stopping! A bit of reverse would clear the swarf and then I could drill the last tiny bit out. I suppose I should have tried using a normal electric drill - the air drill I was using was a 'all-or-nothing' kinda fella.
Holes drilled, I took the panel off and deburred the other side with a countersink drill bit, and cleaned the debris off the chassis - and got a first look at the damage I'd just inflicted on the single most expensive part of the hole car...
Next, on with the sealant. This helps to attach the panel to the chassis, and takes some of the shear load off the rivets, which hopefully means that they won't start making bigger holes for themselves over time. Needless to say (although actually I am going to) I used an air caulking gun for this - not because I needed to, but because I wanted to. It was great - just squeeze and draw a line 
Then the first realization of impending difficulty - I was going to have to get the panel back on fairly exactly, if I didn't want to smear that sealant everywhere. I nearly got it right... Then more difficulty - the holes no longer seemd to line up quite properly, and the sealant made it difficult to adjust the position of the panel. To cut a slightly dull story short, I cajouled, levered and bashed everything around until a satisfactory number of holes lined up, and I used a cordless drill to make the others fit properly where I couldn't tap the rivets in. Weirdly though - mostly the drill just seemed to go straight through, without actually removing any material at all, and then the rivet would fit fine.
But then, the thing which made it all worth while - the air riveter. This tool rocks! I've done a bit of riveting by hand before, and had decided that I'd get an air riveter, and that inevitably led to me needing a compressor, and then all the other air tools, that I didn't actually need, but as I had a compressor...
Ahm, anyway. bang fssssss. bang fsssssss. bang fsssssss. repeat until done - so easy, and very very satisfying. If you think you might be able to make use of one, then gwan gwan gwan get it  .
.
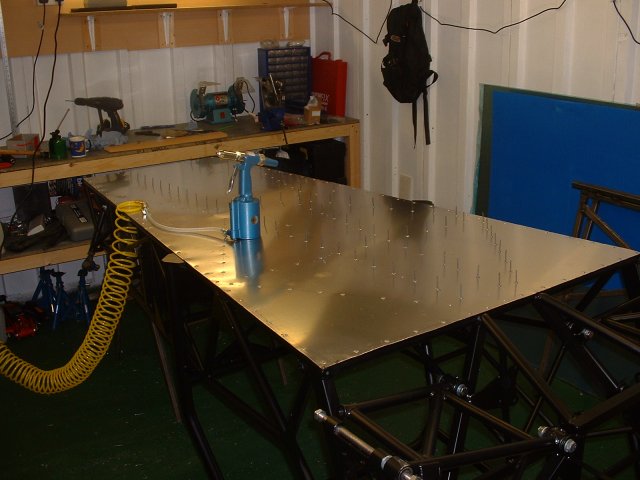
The last thing to do, was to bend the edges of the panel over to curve round the chassis tube
Now, the question is - do I do the side panels on the outside, or the inside? Outside will be much easier, but inside will look neater. I'll sleep on it, I think.
May 10
- Panelling continues -
Not much happened today - DH2 came round and helped Alex and I turn the chassis the right way up, and put it on Tim's stands. We pondered for a while why the side panel templates are shorter than it seems they should be - we couldn't figure it out, so I'll give Ian a ring tomorrow. I spent a couple of hours marking out a couple of panels to be cut - the templates Ian supplied are close, but not exact, so there's a lot of to and froing to get them right. More to do tomorrow...
May 11
- Panelling continues -
Spoke to Ian on the phone, and he said that they'd tried various different flavours of panelling for the main side panels - the laziest option and the one he preferred is to not panel the sections of chassis forward of the footwells at all. Seems fair enough to me - it'll make precious little difference to chassis stiffness, and will much improve access to the engine compartment.
- News from STM -
On the phone, Ian mentioned that there'd been a bit of a development on the engine front - Martin Brooks has blown up his GSX R1000 again, and Ian now thinks that the engine could benefit from dry sumping.
It's beginning to look expensive  On the bright side, he is going to refund the money on the baffled sump, so I'm some of the way there...
Ben, evo_him on the BEC list, recommended posting on the sidecar list, to see what they reckon. I may as well - nothing to lose!
May 14
Marked out all the panels ready for cutting tomorrow. Except for the scuttle, which I don't understand the shape of, so I'll leave it until I need it; and the upper rear bulkhead, as I want to make a little boot above the fuel tank, so putting a bulkhead in the way would be tantamount to foolishness.
May 15
May 16-25
Getting bored now. Over these few days I've cut all the panels and deburred the edges with an assortment of files. I know that you're about as interested in this as I am, but I'm trying to keep an accurate track of the build time as I go, so when I do something, I write about it...
I also have been on the se7ens.net Butcher in the Borders Tour - 4 days in the Lake District and Scottish Borders in a variety of se7enesque cars, blatting about and having fun. Having spent a day each in a K-series Caterham, a V8 Dax, a Zetec Dax, a Blackbird Fury and a VX Lotus Europa, I know I've made the right choice picking a BEC - I enjoyed the ride in that the most by far.
Suitably motivated, I make my way back to the garage...
May 26
Today, as I started drilling the panels to fit, I realised that after 26 hours in the garage, I'm at just about the stage that most people start their build. I'm on schedule in terms of time taken, but 2 weeks behind in terms of time elapsed. Today's stint saw the driver's side panels all drilled.
I spoke to Ian to try and get hold of the bits he still has that I need, but he was mid way through doing his V.A.T. return, so not much joy there. I've got quite a few more hours panelling to do anyway, so no rush really.
I note with mild envy that Tim's Fury is nearly finished
- Some inspiration -
During the Butcher in the Borders tour, during a conversation about something or other, Richard pointed out that the hero's battleship in Battle of the Planets was called the Phoenix. In need of a colour scheme, and a fan of the series, I decided there and then that I may as well get my Phoenix painted up in the same colours as the BotP one.

The BotP Phoenix has a habit of transmuting into a fireball, making it invincible. I'm hoping to avoid that with mine, as I'm not sure that the invincibilty part will hold true.
May 27
- Panelling continues -
sigh More panelling. More broken drill bits. Just the footwell and forward passenger panel left to do...
May 29
- Panelling finishes! -
Well, nearly, anyway. All holes are drilled and deburred. Phew!
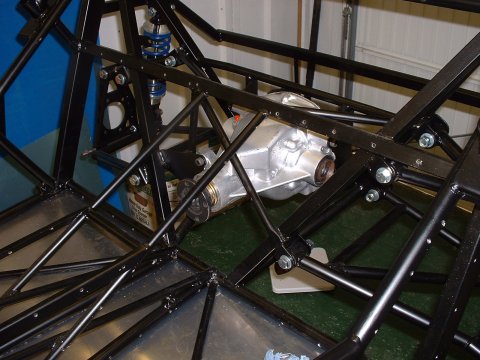
- Dry fitting the diff -
I dry fitted the diff, so that I can take measurements for a propshaft. It lines up quite nicely with the engine output, but then again, it should, as the chassis has been designed around this diff and engine combination...
- Dry fitting the engine -
DH2 came round and helped me lower the engine in place. I put on the (now defunct) shallow sump, as the floor would have been in the way of the standard sump, but even so, the sump was resting on the floor. A small dent would accomodate it, but I'm sure the dry sump is going to be deeper, so it looks like a small hole is in order. It'll be nice to get a bit of cool air flowing over the sump, though, so I don't really mind. What I do mind is that I'll probably have to rig up some sort of sump guard, as it will be the only exposed item underneath the car.
At that point I realised that I don't have a propshaft adaptor to replace the bike's output sprocket, so I can't measure up for a prop anyway. I have a vague memory of Ian saying that it was included as part of the electric reverse, but I've been wrong before about things I thought I heard Ian say 
- Dry fitting the pedals -
Before I had to finish for the day, I fitted the pedals. The accelerator one seems to be missing some bushes, but otherwise all seems in order. I started to cut down the push rods in the master cylinders to fit, and then called it a day.
DH2 pointed out that the brake master cylinder resevoirs don't have fluid level switches on them. So that'll need sorting.
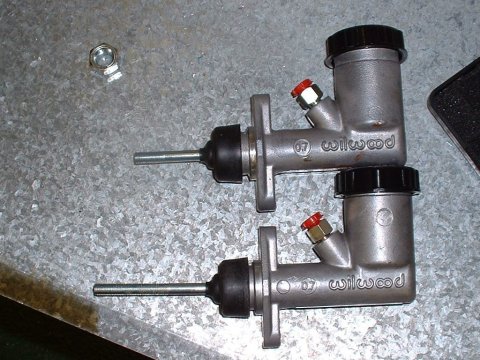 |
| One of the push rods cut to size |
May 31
- Dry fitting the pedals -
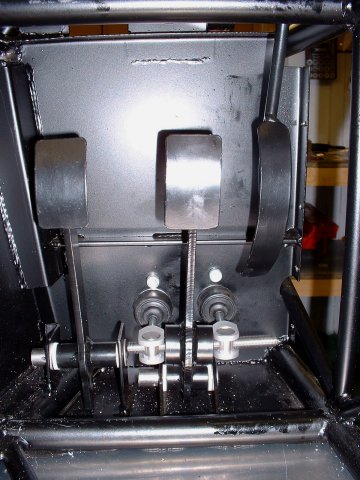
Today I finished dry fitting the pedal set. It took about 3 times as long as it should have to figure out how to screw all the rods and doodads together in the correct order, but I've never previously claimed to be the brighest cookie in the barrel, so that's to be expected. Well, the Einstein comment springs to mind as a counter example, but I guess we all have our good days.
This page last updated on: Thursday, Aug 24 2006
Component
january 04
february 04
march 04
april 04
may 04
june 04
july 04
august 04
september 04
october 04
november 04
december 04
january 05
february 05
march 05
april 05
may 05
june 05
july 05
august 05
november 05
december 05
january 06
march 06
april 06
august 06
