home
introduction
build
sva tests
links
latest updates
September 3
- Finishing off the sump installation -
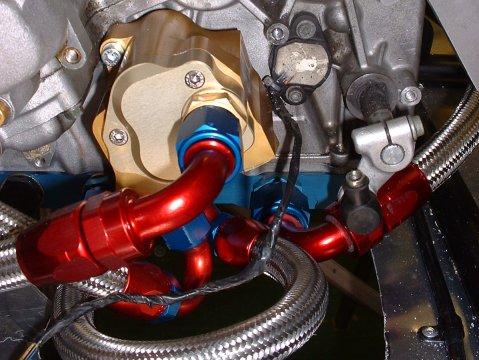
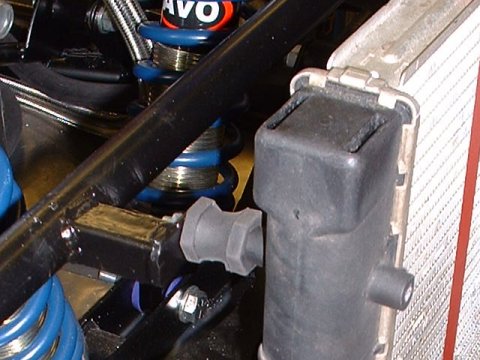
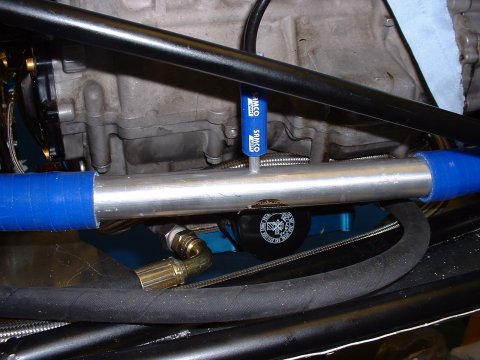
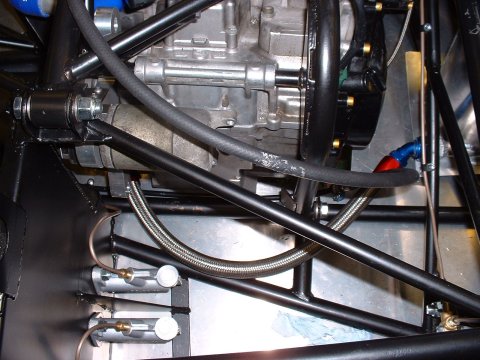
Karl sent through a 120° fitting today, so I made up the low pressure feed pipe and screwed it on. It's the one on the right below. Other than fixing the dry sump tank down to the floor, that's the sump finished. Yay!
- Fiddlin' about -
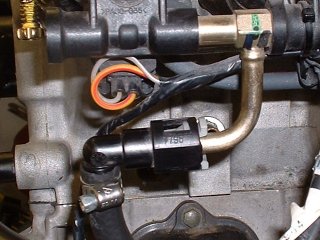
With the engine in place, I was able to cut the fuel hose to length, and fit it. With a bit of effort it was possible to cut the hose off the original fuel rail fitting and re-use that. It doesn't need it, but I put the hose clip on for paranoia's sake.
- Fitting the electric reverse -
Not much to do here except bolt it on. The bracket Ian supplies is, I think, a Fireblade one, with a couple of extra mounting holes in it to mount it on the GSX-R 1000. As such, the bracket has a couple of huge arms sticking out which aren't necessary. I've left them on for now, in case I find them useful for bolting something else to.
Well actually, I did have to slot one of the holes a bit, as one of them had been drilled 1mm out. There's no way to tell which one is the wrong one, of course, so let's hope I got the right one to slot, else the reverse won't engage properly in the ring gear when the time comes...
- Checking everything lines up -
And it doesn't quite. I bolted the steering rack in place, put the steering column and intermediate shaft in roughly the right place, and noticed 2 things. First, I don't know what the donor is for the UJ to join the 2 splines together, and second is that even if I did, I'm pretty sure that whatever it is I need to use isn't going to be able to make this angle! (It's hard to tell in the picture, but the two splines are aligned with each other in the vertical plane. The shaft is hard up against a chassis tube).
Comparing with pictures of Ian's car the steering rack angle is the same, so the only thing I can think of is that the chassis tube is in a different place on my car than on the earlier ones. Ian is giving it some thought.
Me too.
I guess one option is to get an extra UJ into the intermediate shaft, but I don't fancy the extra play that will introduce. I could chop out the chassis rail  . I could get Ian to make up some steering rack mounts at a lower angle, but that would turn the whole steering column into something closely resembling a spear pointing at my chest, which neither I nor the SVA man are going to be very comforatable with!
- Figuring out the cooling hose routing -
The GSX-R 1000 cooling system from the service manual looks like this:

So nothing unexpected, but the diagram omits a (small diameter) feed that goes from the top of the thermostat housing and off to some unknown place. The top of the radiator has 2 small feeds, one of which must be to the reservoir, which would seem to suggest that the other feed is the one from the top of the thermostat. But why would there be 2 feeds from the thermostat to the radiator? Is the small one a bleed that ensures that some coolant is always flowing past the thermostat? If this was a K-series in an Elise, that would be a splendid idea, to eliminate the infamous thermostat bounce problem, but in this engine the thermostat is on the hot side of the engine, not the cold, so it shouldn't be an issue. Ideas anyone?
To complicate matters, the Polo rad I'll be using only has one small feed to the GSX-R's 2, and I have no idea how many inlets and outlets the GSX-R reservoir tank has, nor how many my tank will have, once I get around to finding one.
So, for the time being, my plan is this. Thermostat goes to top of radiator. Bottom of radiator goes to electric water pump. Pump goes to block. The bypass feed from the cylinder head is going to feed into the top of the reservoir tank, and the reservoir tank will feed into the top of the radiator. The little thermostat feed is also going to the top of the reservoir tank, tee-ing into the bypass feed.
This arrangement uses the minimum number of adaptors and joins, but increases the pipe run of the bypass from about 10" of narrow gauge pipe to something more like 3ft of narrow gauge pipe, and 4ft of fat pipe. So I want someone to discourage me really, as I'm not convinced that the little Corrado VR6 water pump is going to deal with that very well.
September 4
- Looking for driveshafts... -
Went to 2 scrapyards today - there were a couple of 2.0l Sierras, but both had Lobro joints. I guess I'll have to use one of those 'Contact 00's of breakers at once' websites. I don't fancy my chances though, since I can't exactly describe what it is I want! Ian's on the lookout for me too.
- Mounting the radiator -
Whatever, the hoses turn out to be, I'll need to mount the radiator, so I got on with this.
The top mounts I made from a spare bit of aluminium tubing, cut and bent as needed, and one of the lower mounts I made from a scrap of steel left over from my welding practice. It's all nice and firm, although I note from the picture that the lower mount adaptor hasn't quite sat properly. The nuts are just washers, by the way, until I find myself a little section of tube to make a spacer from.
I can't figure out a way to do the final mount in a way that would make any difference to the integrity of the setup (it's in a bit of no man's land), so I'll leave it for now to see if inspiration strikes me.
September 5
- Figuring out the cooling hose routing -
A-hah! I found a parts diagram in the parts catalogue
The little blighter I've been worried about is the purple one. It's described as "Water Bypass No.2" I wonder what it's bypassing? Inside the thermostat housing, the feed is tapped off the same place as the main radiator feed. The main feed goes to the bottom of the radiator, and the bypass goes to the top.
September 8
- Front suspension back together again -
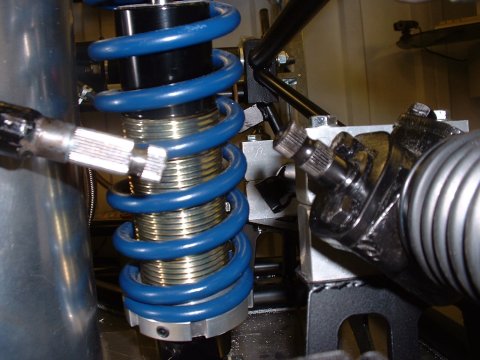
With the parts I got from Ian today were the replacement lower ball joints, so I reassembled the front suspension and brakes, and put the wheels on. He'd also remembered to include the spacer that goes on the rod that runs through the rocker arm, so that's now in place too.
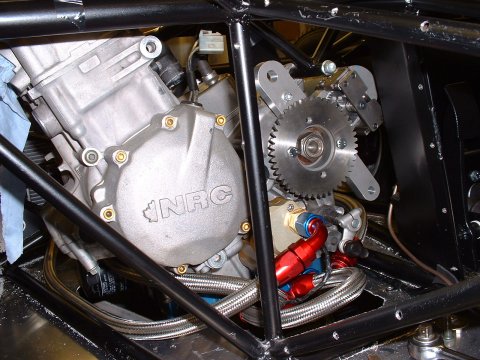
- The right adaptor -
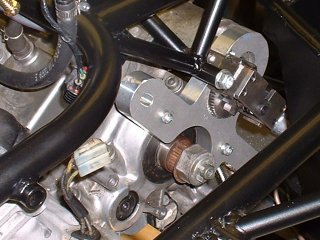
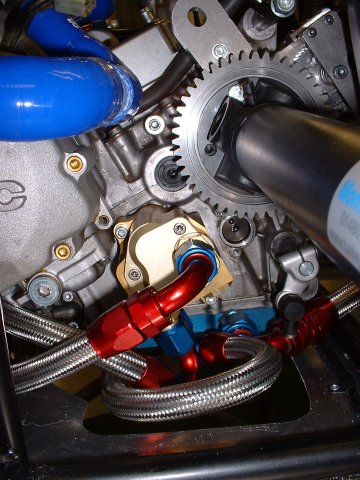
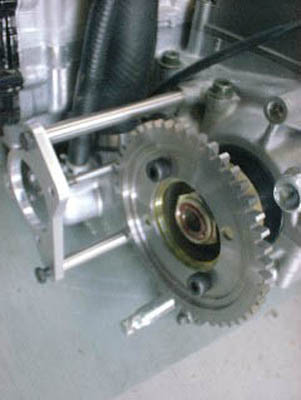
The prop adaptor (or drive flange as it's more properly known) was indeed a Honda one - the parts delivery today included the correct adaptor, so I bolted it and the ring gear for the electric reverse on, just to check that the electric reverse is in the right place. It seems OK, but the pinion on the reverse is only a gnat's todger behind the ring gear when fully disengaged, so I may need to space the prop adaptor forwards 1mm or so to give it clearance.
Once I've bolted the engine in place (not entirely sure why I haven't yet) then I can measure up for the propshaft.
September 11
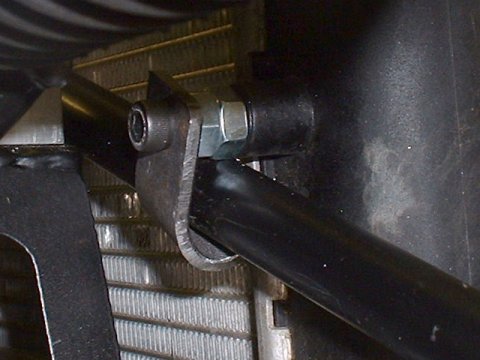
- Proper radiator mounts -
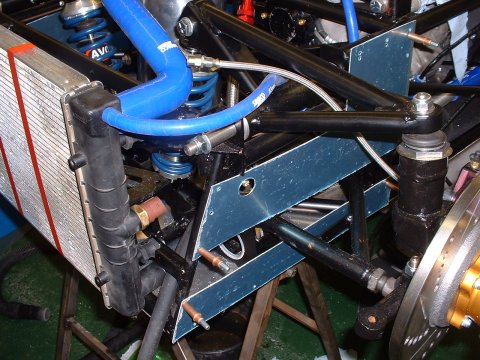
This afternoon I did proper welded-on brackets for the radiator instead of the pop-riveted aluminium ones. I took the opportunity to space the radiator out slightly from the chassis, on small exhaust bobbins, which gives me room to mount the fan behind the radiator instead of in front. This has the primary advantage, for me, that I can mount the oil cooler in front of, and close to the radiator, but it also, apparently, presents less of an obstruction to airflow through the radiator when the fan isn't spinning.
- Must be getting serious -
The Mighty Hackett came round, and helped me to bolt the engine in place - it takes 2 as none of the mounting points on the engine cradle are in quite the right place, so it's helpful to have 1 person levering, bashing and clamping whilst the other tries to whack the bolts through the holes.
There's two more left to do, but the bracket for one of them has to be welded on, so I'll do that tomorrow; and I need to get hold of a 70mm M10x1.25 bolt for the other mount. According to my measurements I need a 200mm M11 bolt for the welded on mount. I suspect I'll get an M10 one instead, as it's just a clamping type of bolt rather than a threading into something type.
September 12
- Grrr - I forgot that I'd forget that -
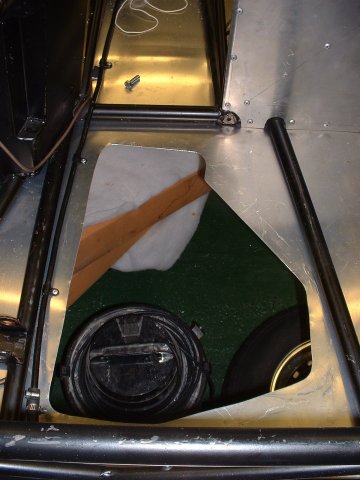
I forgot that I'd need to rivet the passenger footwell panel in place before bolting the engine out. Fortunately Dave was free, so he came over and helped me take the engine out again and I riveted the panel in place.
Whilst I did that, Dave made an attempt to tidy up my tools, but failed because he was so upset by the mess. As consolation, I let him help me finish up the edges of the hole in the floor, which he really enjoyed 
For the record, the next (and final?) time we bolted the engine in, it was much easier than other times, so I conclude that the order we did the bolts was better - top front, bottom front, top foward front and top rearward front.
Dave looked at the electric reverse, and suggested bolting the drive flange in the other way around, to see if that helped with the clearance problem. It did, but reduces the engagement of the teeth when actually in the reversing position. Should be enough though, so I'll leave it that way round.
September 16
- Thumbs up to Bailey Morris -
After bodging up a tool so that I could torque the drive nut up to Suzuki's recommended torque of 115Nm, and with the engine finally in place, I ordered my prop on Tuesday afternoon from Bailey Morris - basically you tell them you want a 2 piece prop for a bike engined car, and they fax back a drawing with blanks on it for the measurements. It took a little digging on their website to find out which of the 2 centre bearings on offer was the one I wanted, and the standard options for the diff and engine flange weren't the ones I needed, but they seemed to understand my scribbles about 'Small English' and 'Freelander', because on Wednesday afternoon they rang me to say it was ready - did I want to collect it or to have it posted?
Sure enough, on Thursday it arrived, the paint not quite fully cured in a few places - it might have been better if they'd left it a day or so before strapping it vigarously into its packaging, but hey - no-ones going to see it the missing paint once it's in situ.
I wonder when Ian will manage to get my replacement steering rack mounts and driveshafts to me?
On top of that - it actually fitted when I did a trial fit - yay!

In the pub later on, I asked some of the Cam7 elders what they recommended in the way of bolts, and the universal opinion was something along the lines of a 12.9 grade, with as little thread as possible - just enough for the nut. This just helps to prevent the threaded part of the bolt getting loaded in shear.
September 18
- More hose fiddling -
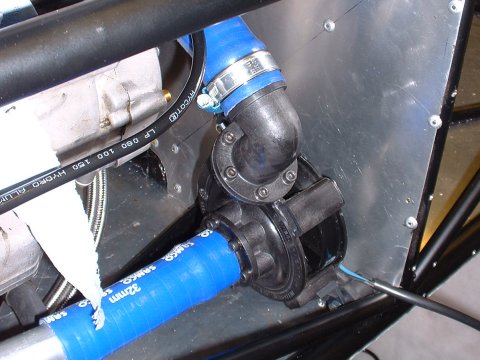
I received my Davies Craig electric water pump yesterday. bought off an ad on the Westfield Boardroom (thanks Paul ), so I spent a couple of hours fitting it, and associated hoses. In the end, the best place to fit it, for good pipe runs, was to mount it vertically on the passenger footwell panel, on some small metric exhaust bobbins.
I also spent a little while making up the bits I'd need for the T-piece where the thermostat bypass (#1) comes into the bottom hose before the pump.
It was roughly at that time that I figured I could actually make the whole bypass pipe from the flexible 8mm aluminium tube I had left over from making the fuel pipe.
So I did! Took a couple of goes to get it right, but I'm pleased with the result. I borrowed Steve's brake flaring tool again to put some bulges in the end, and it all looks jolly spiffing. You'll have to take my word for it, as I haven't got any good pictures of it.
I sort of got bored after that, and before I can much more on the hoses I need to wait until mid week when my coolant tank (a Passat one, bought off eBay) arrives, so I decided to move onto something else. Oooh - one useful tip though. Silicone hose is really really hard to chop to length square, even if you wrap masking tape round it to give you a line to cut to. But if you put a scrap of aluminium tube up the middle of the hose to cut against, then it's really easy. I used a cheap bread knife - the serrated kind - gave a nice clean, quick cut. A Stanley blade is hopeless.
By the way, if anyone knows somewhere where I can get my 32mm aluminium hose joiners swaged (to put a hose retaining bead around each end) then drop me a line. Frost do a nice machine, but it's a bit pricey
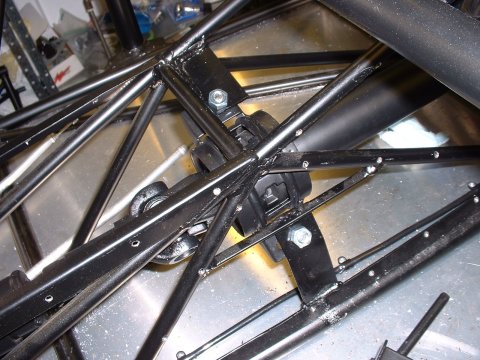
- Baffled by the gear change mechanism -
Next, I spent about 30 minutes trying to figure out the gear shift mechanism. And failed. I'm seeing Ian on Thursday, so hopefully he'll elucidate. In the meantime, if you're passing, and fancy a go at figuring it out, then call in
To add to the difficulties, there's not really much room left now...
- Fitting the oil cooler pipes -
Oh joy of joys. Some helpful soul plugged up the oil cooler outlets in the block with chewing gum (presumably to stop crap getting in there, but surely they could have chosen something else?). After some time scraping it all out and getting my hands covered in chewing gum, I came to trial fit the oil cooler hoses only to find that they get in the way of just about every other pipe and hose I've already fitted. Sigh. And they've got annoying swaged ends, meaning that you can't rotate them to where you want them. Double sigh
After some huffing and puffing, and a rethink of the bottom radiator to pump hose, I found a way to get everything to fit. I really need to get the collant tank and dry sump tank fixed in place before I can get it all finalised though.
- Wrong O-ring in the sump -
Karl from Extreme Engines rang me last week to ask about the o-rings he'd supplied. Apparantly his machinist had decided to improve the design of the standpipe, but didn't pass the information onto Karl in quite as speedy a fashion as required. Consequently, Karl had provided me with a thin skinny O-ring on the engine end of the stant pipe, where as the modified design requires the original fat red o-ring from the oil strainer fitted to the standard engine (that the stand pipe replaces in the dry sump). I never had the original strainer (presumably it's on a shelf somewhere at STM), so Karl sent me an o-ring that he had of the right size. Dropping the sump off to replace it wasn't the easiest task in the world. with the multiptude of hoses and pipes getting in the way, but it wasn't too tricky either.
- Steve makes a mistake -
In a related, but peculiar incident, when I was round at Steve's and mentioned that I was going to have to buy a MIG welder to replace the one that I had had on loan from Tim, he offered to sell me his. As anyone that knows Steve will know, this was a difficult statement for me to grasp. Straight after he'd said it, you could see the confusion in his little piggy eyes as, perhaps, he realised the enormity of what he had said. "Gosh, if I successfully sell one thing, then maybe, just maybe, I could...sell others too. Supply and demand, and I got be the supply bit instead of the demand bit. It's not the natural way of things, but perhaps. Perhaps... "
I left him ruminating on this fact outside his front door. For all I know, he's still there.
- Remote mounting the oil pressure sender -
Onto a nice easy job - making up the flexible hose so that I can mount the OP sender off the block (where it'll get shaken apart by vibration). Now, you'd have thought that as the sender is a 1/8NPT thread, and the hole in the block is a 1/8NPT thread, then the adaptor would be relatively simple wouldn't you?
But no - this is the world of Thinkauto, where all jobs, no matter now simple, will require twice as many adaptors as you might have originally thought, at least one of which will make your wallet bleed. So the 1/8NPT needed a male to male converter to 1/8 BSP, as that's the only sort of connector that's available in a 90° bend (to come out of the block at a sensible angle) to go into a -3 hose. At the other end of the hose, there isn't a -3 to 1/8NPT female adaptor, so I had to get a male 1/8NPT fitting and a 1/8NPT female to female adaptor. In aluminium. Sigh.
September 19
- Panelling the engine bay -
I've been fretting for some time now, about the engine bay panelling. There must be a reason why Caterham panel their engine bays, even to the point of making future maintenance more difficult. The most useful things I can think of are that it contributes to the front end stiffness of the car, and that it stops the wheels filling up the engine bay with stones and water.
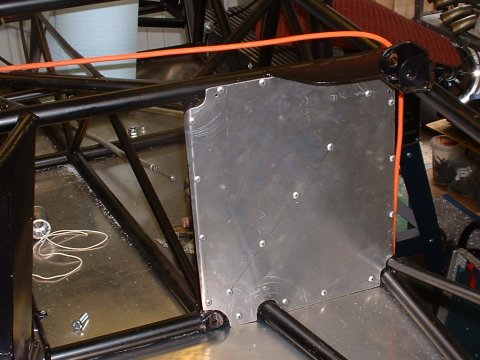
Having spent quite a few hours faffing about with cooling hoses, I am convinced that permanent panels would be a bad idea - there's no access to the cooling, oil cooler or sump pipes with the passenger side engine bay in place, for example. So, I've decided to fit a small permanent panel at the very front of the car, and a removable one, and use something like Dzus fasteners to hold it in place.
The front panels look a bit like this - by the time you've left holes for the steering rack, brake pipes, and wishbones, there's little point trying to make a complete panel, so I made it up from 2 sections.
September 21
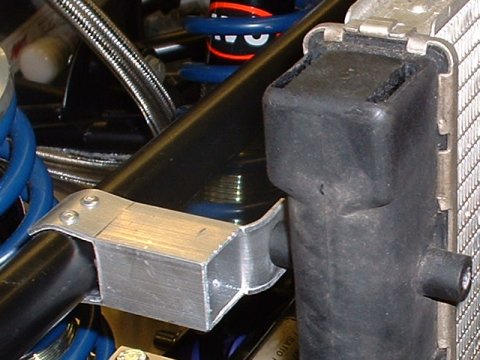
- Changing the dry sump tank location -
Nothing too dramatic, but as the amount of stuff in the engine bay increases, I realised that the dry sump tank was going to have to shift over just far enough to make the straight connector on the bottom feed unworkable. So, on with a new 45° connector. Gosh, they're expensive Here it is, on the right. An observation - wherever the original fittings were from, the Goodrich ones from Demon Tweeks are not as nice. It's hard to say exactly what it is about them, but they're not as good.
September 23
- Another quick visit to STM -
Today I had a meeting in Sheffield, and on the way back to Cambridge I called in at Stuart Taylor, to drop off some parts that I'd promised to Ian, and also to have a squizz at some bits on his car.
I asked Ian what we were going to do about the driveshafts, so neither he nor I knew exactly what the donor was. We consulted a Brakes catalogue, but there was no hint in there of a fatter driveshaft (the standard one is ~24mm, and the ones used in the Phoenix are 28mm.) In a fit of enthusiasm, he volunteered to take me over to his local scrappy to see what we could find.
To which the answer was nothing. There were only a couple of Sierras, and they were the wrong sort. A quick conversation with the owner of the yard and he confirmed what Dan Bromilow had hinted at weeks ago, which is that the fatter driveshafts are only available on 2.0l cars, and then, only those with the DOHC engine fitted. The scrappy also said that he didn't have many Sierras in because they are worth more to him as scrap than for parts - he takes out the really high value parts, such as the diff, and scraps the rest within a week - so kit car builders everywhere beware!
On our return to STM, Ian gave me Classic Conversions number - they are his suppliers for the custom driveshafts. If they couldn't help, then no-one could.
Chatting to Ian, it became clear that the kit he'd provided wasn't ever intended for my car - he'd prefer to see it with the paddle shift. Which is why there's not obvious place for it to fit
However, he's switched over to using a push-pull cable for his paddle shift cars, and gave me one to try.
Whilst I was lurking around STM, the guy that builds Ian's chassis' turned up. He had with him my new rack mounts - turns out that there was nothing actually wrong with the angle of the old ones, but he'd drilled the mounting holes through the wrong face...
I asked Ian for a look at his clutch conversion kit, having more or less failed to figure out an easy way to make the existing cable actuator work in the confines of the Phoenix chassis. The conversion kit uses a '99 Honda Blackbird slave clutch cylinder, mounted about 10cm away from the engine on a machined aluminium plate. The plate also has holes to accept a couple of long bolts that screw into the GSX-R's existing clutch mechanism mounting points.
This image purloined from the STM site shows it quite well.
It's a well thought out kit, and an easier option than fiddling about with cables, so I took it.
September 24
- Classic Conversions -
Spoke to Richard at Classic Conversions today. He did have some Sierra shafts in of the right size - yay! It got a bit confusing after that, as he would normally only supply driveshafts complete, but I had 80% of the bits from Ian already. In the end, we agreed that I'd just send him everything I had, and that he'd build up the shafts for the difference in price. Now I've just got to figure out what Ian owes me, as I've paid for the shafts twice over now.
My recommendation (and Ian's, for all I know) to anyone thinking about doing this same build is to go to Classic Conversions direct!
September 25
- Welding woe -
I spent an unreasonable amount of time today making up some turrets on which to mount my Passat cooling tank (£4 off eBay ) Making the turrets themselves was OK, but welding them onto the chassis was a good deal of trouble. The welds initially looked OK, but when I realised that one of the turrets wasn't quite straight and hit it with a large hammer, it just fell off. The other one followed suit.
I blamed the welding machine, but in retrospect it seems rather more likely that they didn't take because I made no effort to clean the metal before welding it...
This page last updated on: Thursday, Aug 24 2006
Component
january 04
february 04
march 04
april 04
may 04
june 04
july 04
august 04
september 04
october 04
november 04
december 04
january 05
february 05
march 05
april 05
may 05
june 05
july 05
august 05
november 05
december 05
january 06
march 06
april 06
august 06