home
introduction
build
sva tests
links
latest updates
Choosing the Brakes
- Early January -
HiSpec! Everyone, everywhere said HiSpec Motorsport are the dog's danglies for BEC cars: light, affordable, well made, and soon a proper handbrake version of the rears, to help with getting through those pesky SVA and MOT inspections.
But there was always the proviso - "If you can actually get hold of them". It seems that HiSpec are somewhat better at making brakes than actually delivering them. Still, it seemed that Martin at The Kitcar Workshop, as a distributor, was able to get hold of them with a reasonable degree of success, so I thought I'd try them
Choosing the brakes
- February 10 -
STM are distributors for Outlaw M-16 Billet front calipers, which, naturally enough are a perfect fit for the Escort Mk11 based front uprights on the Phoenix. They weigh more than the HiSpec ones, but they are available a lot more easily, being just sat there on the shelf, and they're cheaper too. It only took a moment of indecision before I plumped for the Outlaws instead of the HiSpecs.
The discs I hadn't really made any decisions on up to this point, except that I was pretty sure I wanted some  . As my decline into making my life easier continued, I just asked Ian what he could supply. So I ended up with some grooved fronts and standard Sierra rears.
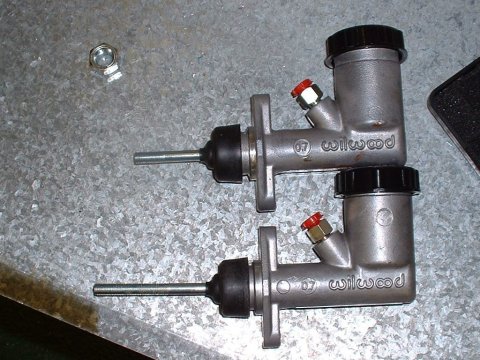
STM are fitting the new Phoenix chassis with a custom lightweight pedal set with Wilwood master cylinders and bias system. Seemed alright to me on the cars they were building, so why fight it?
Change of plan
- February 16 -
I bought some Audi A3 rear calipers today. Despite having seen, and held, the new handbrake version of the HiSpec rears at the Autosport show, I didn't really feel up to the amount of hassle that others have had trying to actually get hold of anything from them, so I wanted another option. The Sierra rear calipers seem to be universally used and universally loathed (on account of their weight and handbrake mechanism), so I didn't want those either (I'm just too fussy, aren't I).
Then a little detail I'd been told at the Autosport Show filtered into my conciousness. Westfield are starting to use VAG parts on their cars (must be something to do with the VAG engine they've put in the XTR4) and had found the Audi A3 rear calipers very satisfactory. They are aluminium, and therefore hopefully lighter than the Sierra iron ones, and maybe they've got a better handbrake mechanism too.
I submitted a request to an online parts locator (can't remember which one now) and had a reply back from Sanburne Autos. They had an 3000 mile A3 just in, and could do me the calipers and handbrake cables. Yay!
Oops
- February 16 -
I contacted Sanburne and bought the A3's rear brake carriers today - seems that you need something to hold the pads in place. Doh.
2nd visit to STM
- Mar 16 -
IanG was impressed with the Audi calipers - they are about 1lb lighter than the Sierra ones, which isn't a great deal, but nonetheless noticeable when you heft one in your hand - no doubt the effect is even more marked when you're bouncing them up and down as part of the car's unsprung mass. In a trial fitting on one of the cars without brakes, we found, much to our surprise and delight that the mounting holes are in exactly the same place as the Sierra ones, and the gap for the disc to fit into is nearly right as well - so no custom bracket will be needed - just some sort of jiggery pokery with spacers.
I'm left the calipers with Ian, in the hope that he'll have time to dry fit them and investigate and other problems. He also seemed keen to try out the routing for the handbrake cables - as standard they've got a hard outer casing at one end, and it looked like this might just fit through the Phoenix chassis in a convenient way.
Collection time
- April 30 -
No news on the rear calipers yet - Ian's not had a chance to play with them. I tried to take them away, and he wouldn't let me, so I guess he's still keen He's got some Compomotive CX-R wheels in at the moment, which are one of my current prefered choices, so he's going to test those for clearance over the calipers. He'd not got any front discs in either, so those will come later.
Dry fitting the pedals
- May 29 -
Before I had to finish for the day, I fitted the pedals. The accelerator one seems to be missing some bushes, but otherwise all seems in order. I started to cut down the push rods in the master cylinders to fit, and then called it a day.
DH2 pointed out that the brake master cylinder resevoirs don't have fluid level switches on them. So that'll need sorting.
 |
| One of the push rods cut to size |
- May 31 -
Today I finished dry fitting the pedal set. It took about 3 times as long as it should have to figure out how to screw all the rods and doodads together in the correct order, but I've never previously claimed to be the brighest cookie in the barrel, so that's to be expected. Well, the Einstein comment springs to mind as a counter example, but I guess we all have our good days.
Getting the front disks on
- June 22 -
Before I bolted the hubs on, I wanted to get the discs attached to the hubs. This led to the discovery that I didn't have any long enough bolts to do the trick. Namrick and some courier or other will be getting a bit more of my money tonight...
Calipers on
- June 26 -
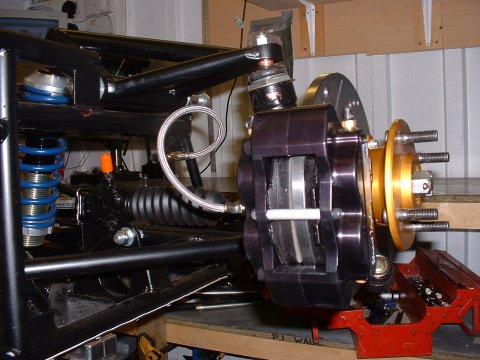
This turned out to be suspiciously easy. Aside from the fact that I needed to go out and buy 4 M12 bolts to attach the calipers to the uprights, and had to run a tap through the threads to clear out the old rust and new POR-15 (oops) they just bolted right into place. The discs sit right in the middle of the calipers, the pads fit, nothing went wrong. Cautious "woo-hoo"'s were emitted.
- June 26 -
Then some planning - I need bits'n'bobs so that I can attach the calipers to the master cylinder. I sat down with a beer and a Think Automotive catalogue and figured every single nut and adaptor I'd need. This turned out to be a surprisingly long and expensive list. Moving over to whisky half way throught the planning session didn't help. I'll try again tomorrow.
Moquip hoses
- July 3 -
My plan for brakes today was to do all the hard lines for the front and back, and the flexible hoses at the front. Things were rather stymied when I realised that I needed a different adaptor at the master cylinder than I had thought.
So I gave up, and the sum total of my hardline success was attaching the front T piece to a suspension plate at the front, by tapping an M8 hole in the T piece's mounting hole, and bolting it in place.
The next job was to make up and loose-fit the flexible hoses at the front. Not much to say here, other than the best way to cut the hoses without fraying the ends was to use a dremel. The hoses I got have a PVC coating on the outside of the stainless steel braiding, and this has to be removed to fit the Moquip end fittings over the hoses.
The final brake job for the w/e was to measure up for the adaptors on the Audi calipers. It's a female thread, so hard to do, but my best guess was an M12x1.0, which seemed like an odd size to me. A few minutes with the Think Automotive catalogue though and I was out to rights - plenty of M12x1.0 adaptors in there, and some of them eye wateringly expensive. I'd initially hoped to go for a banjo at the rears to make sure there were no clearance issues, but at £25 each side for the adaptors, I elected instead to go for somewhat cheaper 45° Moquip swivel fittings.
Putting in the hardlines
- July 16 -
Not as easy as I thought it was going to be this, and I didn't find out why until the very last pipe... I'd ordered Kunifer tubing rather than the other option, plain copper. I couldn't tell you why, other than it was there. As it turns out, it's much stiffer, and therefore more difficult to bend by hand. And it work hardens much faster than plain copper, meaning that it fast becomes impossible to bend by hand at all.
It is much thinner though, which has 3 advantages. First, it's quite noticealby lighter; the tube nuts can slide round tighter radiuses, so it's easier to move them out of the way when making the flared ends; and there's a bit more tolerance on the angle that at which they can go into the tube nuts when you're trying to tighten the nuts up.
I found all this out when I ran out of Kunifer and had to use a spare piece of normal copper tubing I had lying around...
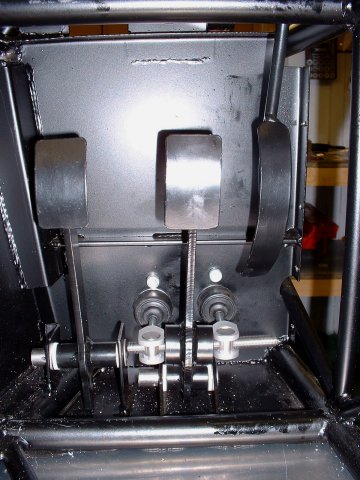
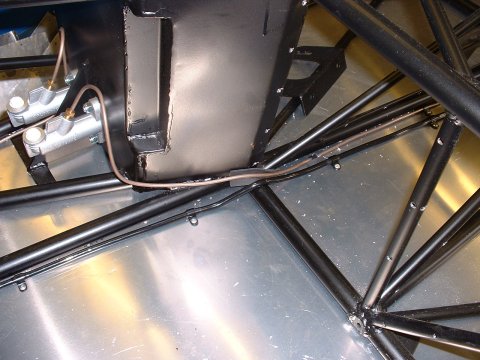
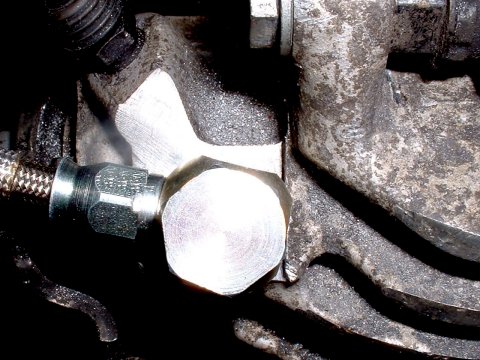
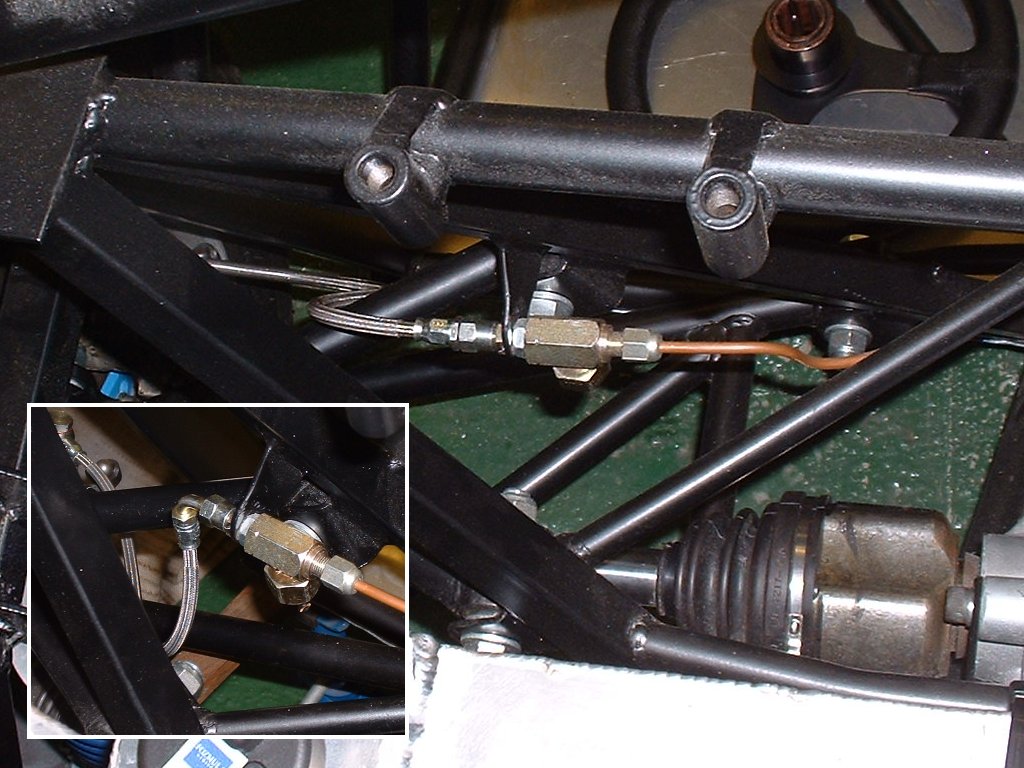
Ahm. What else. Oh yes, the cursèd brake pressure switch adaptor. Despite DH2's bad experiences using a brake pressure switch, I'd ordered one from Think Automotive. It's yet to arrive, but I do have the T-piece adaptor for it. Unfortunately, the adaptor, whilst listed as M10, in fact has a tapered thread, and doesn't have proper conical seats, so it doesn't immediately lend itself to a brake pipe application. After lots of head scratching, and literally hours scanning through Think Automotive's catalogue, I found that if I screwed the female end of it directly into the rear bulkhead adaptor (where the hardline would meet the flexible line), then I didn't need a conical seat at that end. You can just see the adaptor in the top right hand corner of the second picture below. At the other end, which is male, there is a very slightly convex surface. But tightening a tube nut onto the thread, I found that taper of the thread stops the brake pipe tube nut screwing down far enough to seal the brake pipe against the end of the adaptor. So, I cut down an M10 brake pipe nut to be short enough to allow the end of the brake pipe to meet the end of the tapered thread, and it seems to be able to form a good seal. The proof, as they say, will be in the pudding.
At least, I think they say that. Doesn't make much sense on the face of it.
Postscript: Dad has emailed to say that the proof of the pudding is fact in the eating, which does in fact make much more sense

Final job of the day was to disconnect and remove the master cylinders. I'd bought from Caterham a couple of AP master cylinder caps with built in fluid level switch, but when I fitted them, I didn't like the fact that they more or less completely fill the reservoir, which doesn't leave an awful lot of fluid in there. I knew that I could get some near identical master cylinders but with with a take off for a remote reservoir, instead of the integral one that I've got. A bit of digging around on the internet found me somewhere that could both those and remote cylinder with built in fluid level cap. It's got 3 outlets so I'll be able to do the clutch fluid from it too.
The only downside is that the somewhere that's got all these goodies is HiSpec Motorsport. Given their reputation for tardiness of delivery of their brakes, I'm not holding my breath.
Well, knock me down with a feather
- July 19 -
The Hispec delivery came this morning. A quick session in the garage sees the new master cylinders fitted, and a plan formulated to fit the remote reservoir, which ran along the lines of 'That's the best place. Hmm - close to where the steering column would be if I could fit it. Better leave it for now'.
Finishing off the lines
- July 24 -
I spent the lion's share of today tightening up all the brake line fittings and clipping the lines down. That took far longer than I'd have guessed! I was also able to fit the brake pressure switch, which Think delivered during the week. Mysteriously, they've omitted to send me all the other things which I added to the order whilst the BPS was on back order. Must remember to call them!
Whilst I fiddling with the brakes, I noticed that the handbrake mechanism is going to require the handbrake cable to pass right through the a rear suspension tube. A quick post on Cam7 and it was decided that I should swap them from left to right and mount them upside down. This puts the bleed nipple at the bottom, but there is plenty of precedent for this in the kit car world, so I'll just have to put up with the inconvenience of disonnecting the calipers when I bleed them. Oh, and the bits I've ordered from Think will be wrong as well.
The alternative plan is to detach the mechanism and rotate it round to a better place, which is easy, and possible. The only difficulty is that to reattach the mechanism requires drilling and tapping a hole in the body of the caliper, and there's no way to tell if that will go into, or near to , a fluid channel. A future fettle? Most likely not unless I get really annoyed with having to do the detachy bleedy thing.
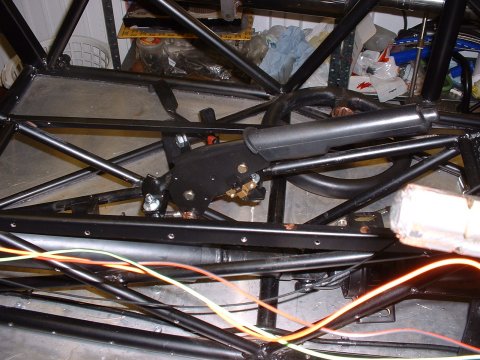
Routing the handbrake lines
- July 25 -
I lost most of today in an enforced party recovery mode. The late afternoon saw me routing the handbrake cables. As supplied for the A3, the handbrake end of each cable is shrouded in aluminium tubes, which are bent to some mysterious A3 fitting shape. These turned out to be very easy to bend straight, so I did, and I laid them out in a sensible looking route. Fingers crossed, it looks like I'll be able to use them exactly as they are, without any modifications. How I just need a handbrake. I've won a Mondeo one on eBay for the princely sum of £1...
Fitting the Audi calipers
- October 13 -
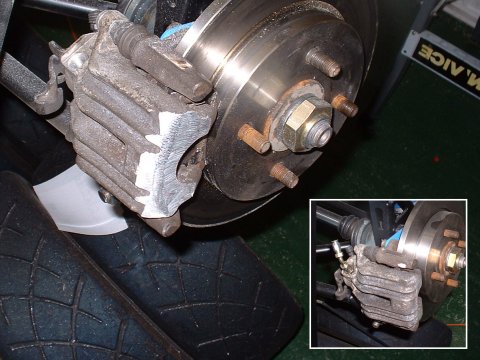
Now that the driveshafts are on the car, it's possible to see now well the rear calipers fit. And it turns out, better than I thought. By removing, heating, bending and reattaching the bracket to which the handbrake cable attaches, it's possible to route the cable away from the suspension arm, which means that I can use the calipers the right way up. In the picture below, the bracket in the middle is normally straight - actually, this is slightly over-bent.
With the wheel just clearing the lower wishbone, the next obstacle to an easy fit revealed itself as the claw part of the caliper. After a considerable amount of angle grinding (around 7 or 8 mm) there was eventually enough clearance to get the wheel on. The contact point is the tops of the bolts holding the rims together; rotating the wheel in place causes them to score a mark on the caliper, so I just kept grinding until the scoring stopped appearing. I guess that once the car is on the ground and moving, and everything is flexing around there'll be more contact - we'll see.
The wheel weight also was catching a bit - I'll make sure that they get attached further out on future occasions.
- October 14 -
Yesterday was the offside, today was the nearside. No complications, but just as time consuming.
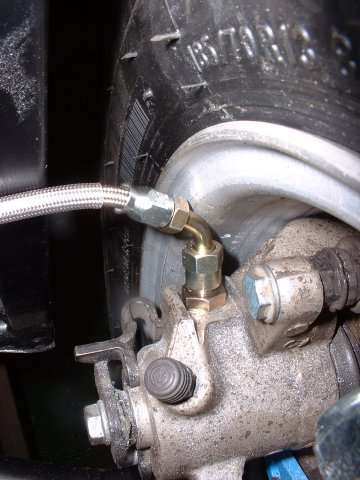
After that I made up the rear flexible hoses, and found that with the simple fittings I'd bought (a 45° M12x1.0 to -3) it wasn't easy to route the hose in such a way that it would both keep clear of the suspension arms, and be long enough to allow the brake pads to be changed (which is most easily done by undoing one of the claw retaining bolts and swinging the claw around). Even more importantly they only cleared the wheel rim by a few microtinyamounts. So I ordered some banjos from Think Automotive.
Banzai! Banjos!
- October 15 -
The banjo fittings came today - and they were too big to fit. Mr Audi must use some special ones. However, after giving them a bit of attention from the grinding wheel, and hacking some more bits off the calipers (the picture shows a hacksaw, but I soon came to my senses and got the angle grinder out...) they fitted bootiful like.
Welding on handbrake mounts
- October 24 -
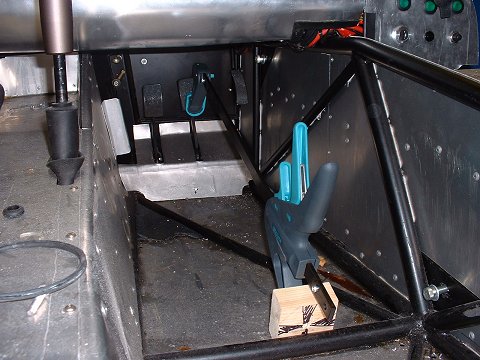
I welded on some mounts for the handbrake this afternoon, which was time consuming, but uneventful. On a Fury, the handbrake more normally lives on the steeper forward chassis tube in the prop tunnel, but I felt that put the lever a bit far away when the driver is trussed up in a harness, so I've mounted it nearer the back of the car.
Brake Reservoir fitted
- October 28 -
Fitting the brake reservoir took a little longer than I thought - the clutch hose (which I'm running off a spare outlet on the reservoir rather than using a seperate clutch reservoir) is a lot larger than the brake hose, so for want of a better idea I slid one inside the other and clamped them up using the original bike clamps. It's only a gravity feed, so it shouldn't leak. If it does, I guess I'll just block off the outlet and use the original bike reservoir instead.
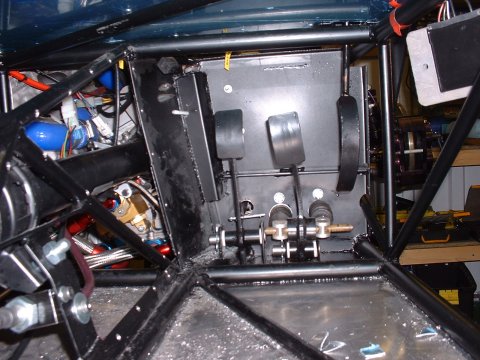
Fitting the handbrake
- November 12 -
Today I approached a job I'd been putting off for a while, which was figuring out and implementing the gubbins need to attach the handbrake to the handbrake cables.
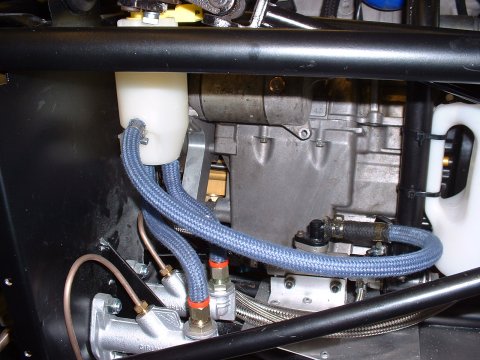
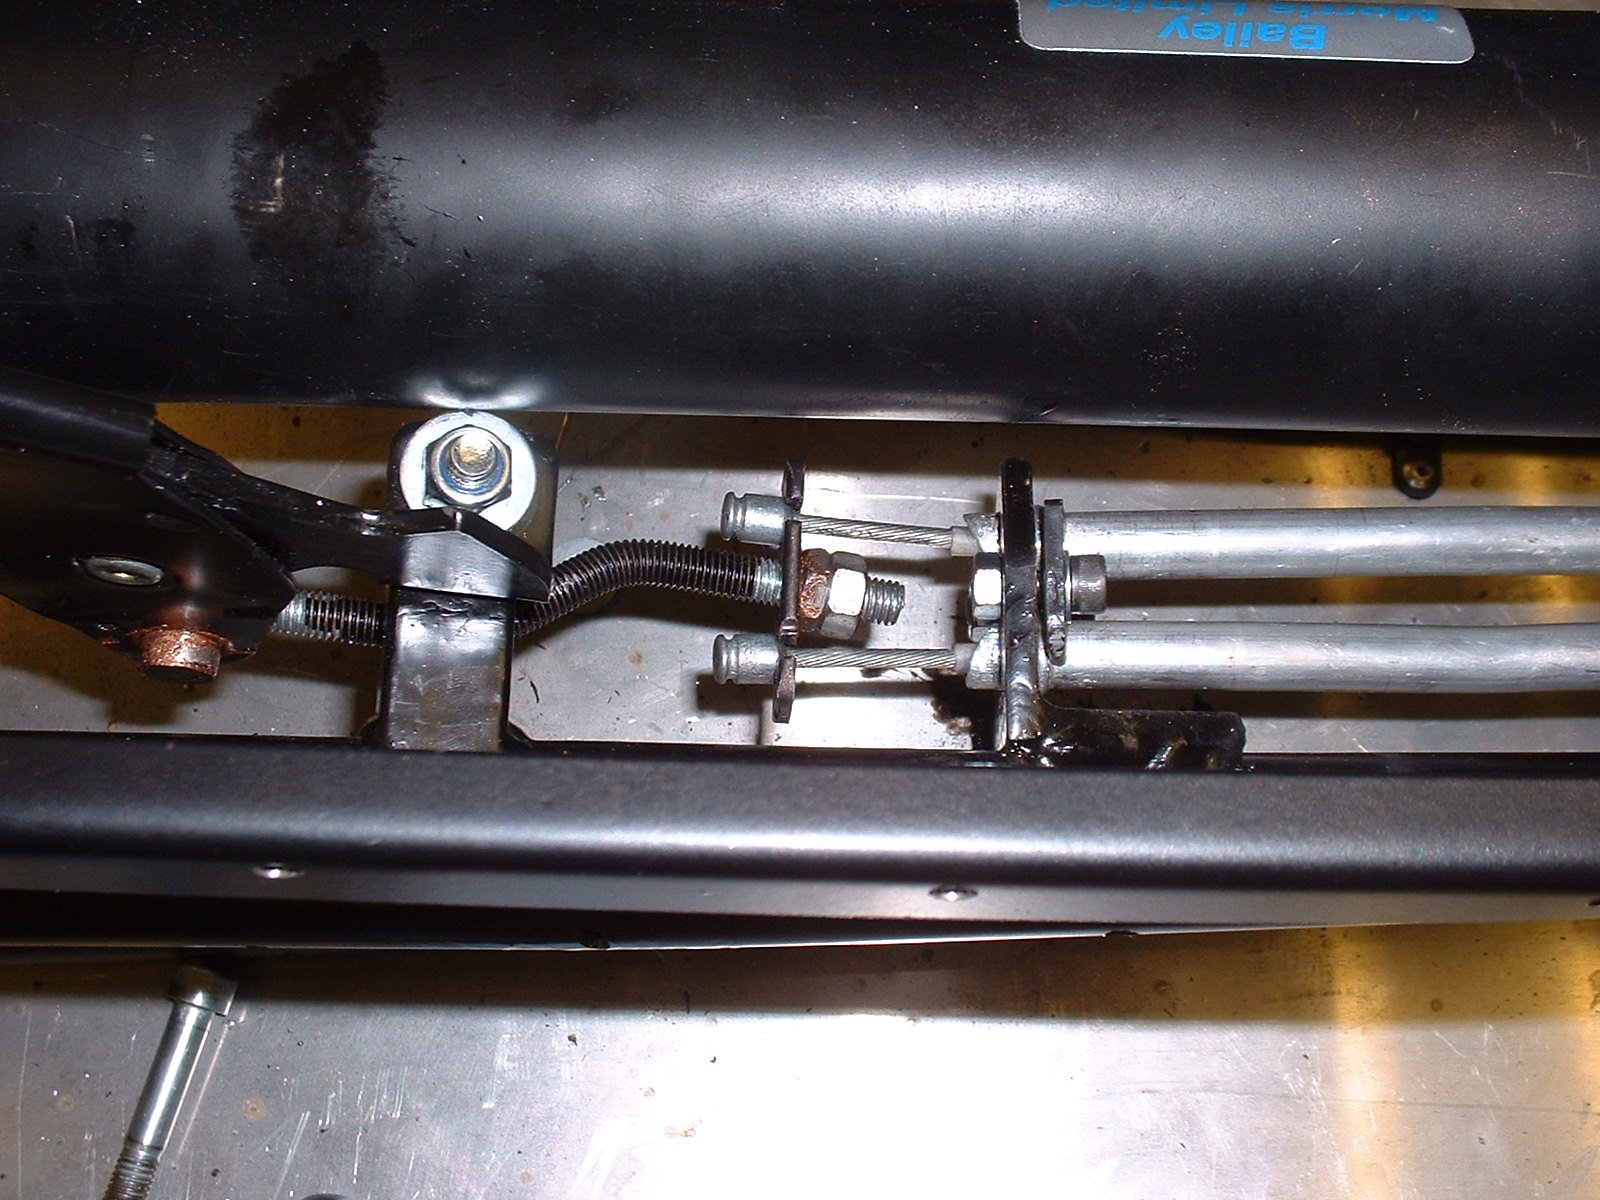
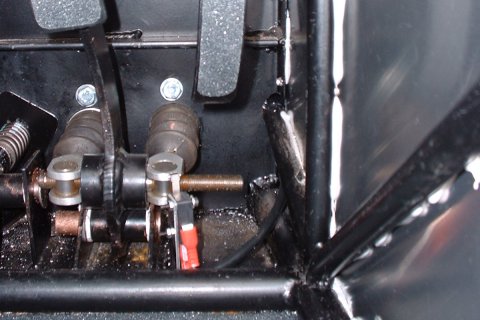
A picture says 1000 words so here's the result, and since I've had complaints that this website has too many words, here are some pictures instead:
 | |
 |
 |
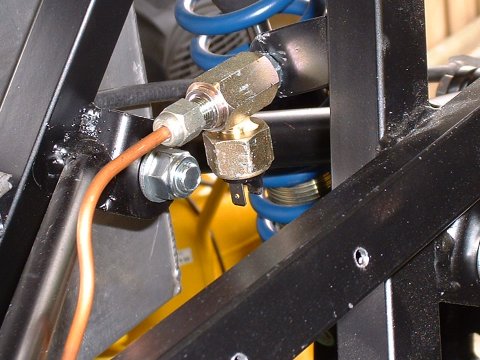
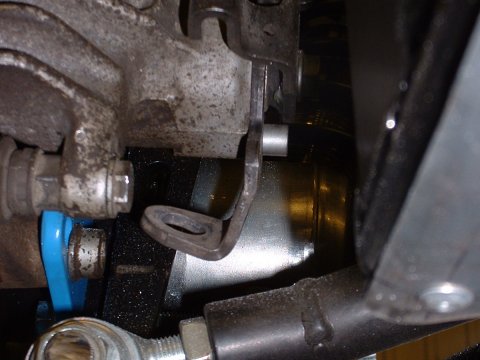
By my calculation that's 3000 words saved, but perhaps a little explanation is permitted? The copper-grease covered nut roughly dead centre of the upper picture has been rounded, and hardened, on the face butted against the cable puller plate, in order to allow it to swivel. In combination with the kink in the threaded puller rod (which is free to rotate), this allows the cables to balance themselves when the lever is pulled.
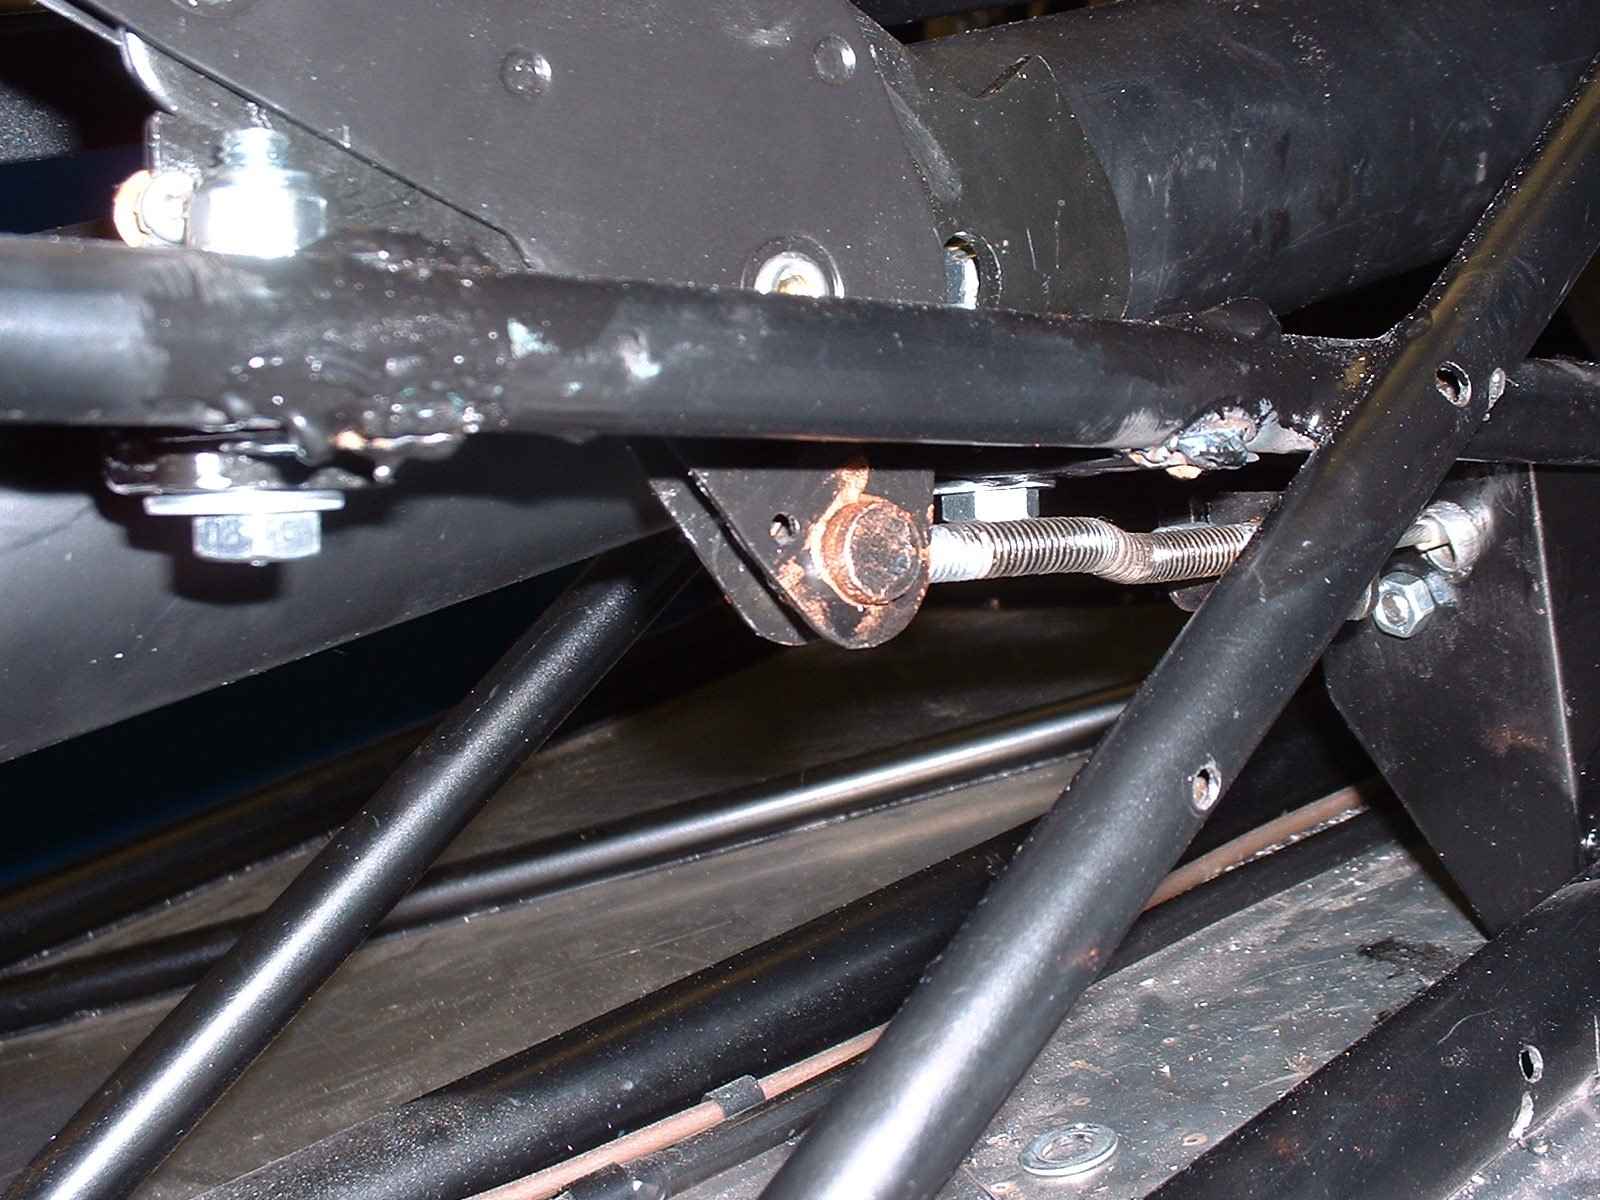
The second picture shows this arrangement from the back, and the cable clamp plate that stops the cables falling out of the cable stop plate that's welded to the chassis.
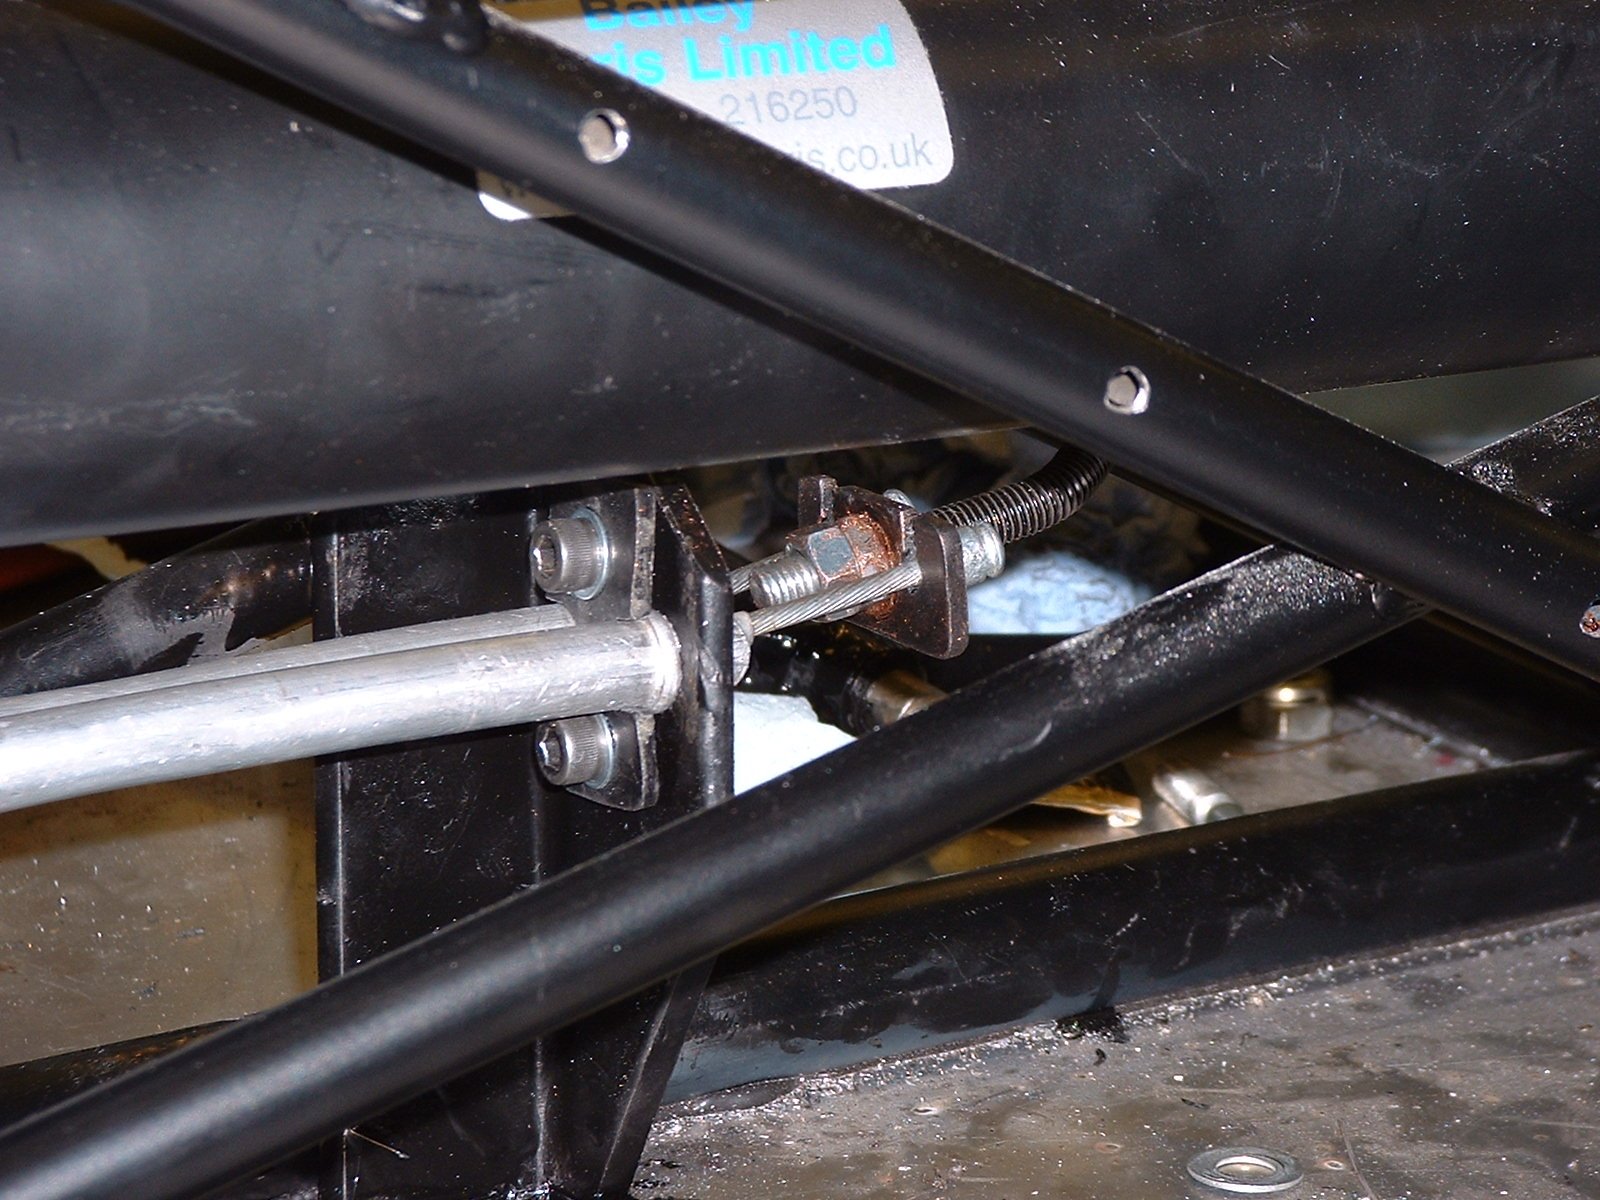
The third picture shows where the threaded cable puller threads into the 1/2" pivot I fitted into the handbrake lever. I had to seperate the 2 halves of the lever a bit to accomodate the puller rod, but nothing too extreme.
All in all, I'm pretty happy with how it's worked out (that's a line straight from Paul Jr of American Chopper isn't it?) - the only bit that I'm not sure about is the plate in which the cable barrels sit - I can't tell whether or not the cables can vibrate out through the slots in the plate. I think a better solution would be to find some circlips for the grooves in the barrels, and get the plate to pull on those instead. We'll see!
Making a bit more room for my feet
- December 5 -
Having fitted the throttle pedal, it was now clear that there wasn't enough clearance between it and the brake pedal. So I heated up the brake pedal with a blow torch and bent it over by a bit. I know it looks a bit wonky, but now they're spaced so that I can press either pedal independantly, or both together if I choose - which is much better than having to always press both at once
Leaky bits
- December 8 -
Silly stupid brakes. I left them pressurized overnight (via a complicated set of clamps and levers) and was greeted this evening by lots of little leaks. Most were trivial (the 1/8th NPT fittings on the front brakes weeping a bit as I was afraid to overtighten them; one of the rear brake hoses also weeping a bit because I'd not fitted the end properly) and these were easily fixed, and the reason after all that I'd done the pressure test.
The stupid leaking banjos though filled me with the sinking feeling of doom - when I'd filed off the top of the calipers to allow the banjos to fit, I'd obviously not got the surface flat enough, as fluid was dripping out of both sides. Not a lot mind, as there was still pressure in the system, but enough to need fixing...
- December 10 -
Well, in the end it didn't take that long to fix the brakes. I taped some emery (Emery?) paper to a 1" scrap of aluminium tube, and rubbed until I'd got the caliper surface flat. The N/S caliper still has a bit of an imperfection in it, but it's right on the edge of where the banjo sits, so it might be OK.
- December 11 -
Yay! O/S caliper seems fine - the N/S has a very slight seep, so I guess that imperfection does count. It's not enough to stop a test run of the car over the weekend, but I'll need to address it later.
After the first test run
- December 12 -
Now, to look at that rubbing brake. It turns out that the ouside edge of the disc is rubbing on the inside edge of the caliper. Although I'd drilled the mounting holes as close to where they needed to be as I could, this put them very, very close to the original holes for the Sierra calipers in the adpator plate, this tuens out to have not been quite close enough - there's about 0.75mm between them, and there needs to be 0.25mm. I can't drill to that accuracy, so I have 4 choices:
- Enlarge the hole sideways
- Get a new undrilled adaptor plate from Ian
- File down the inside edge of the caliper
- File down the outside edge of the disc
Fixing the brakes
- December 18 -
IanG suggested that I phone Classic Conversions about the adaptor plates; they told me that they only make them up every 3 months, so I'd have to wait before I could hold of an undrilled one. So, I decided today that I'd have to grind down the disc to fit. This turned out to be pretty easy in the end - car up on axle stands, engine running, first gear engaged and the angle grinder doing its thing.
Whilst I was in the area, I filed, sanded and polished the N/S caliper body to stop the banjo leaking, but I couldn't test it as I don't have any DOT4 brake fluid left.
Re-routing the rear hoses
- December 29 -
I noticed a few days ago, now that the car is on the ground and the suspension is no longer on full droop, that the rear brake hoses would rub on the upper wishbones, so I replaced the chassis end of the hoses with a 90° fitting to route the hoses down through the wishbones instead of over them
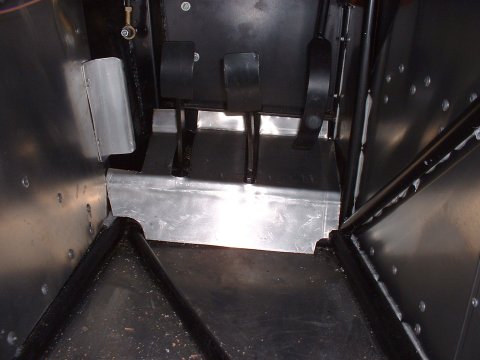
SVA Cover
- March 22 -
Tonight I made a cover for my pedals so that I can convince the SVA man that my brake bias adjuster can't be fiddled with. It's not exactly a quality piece of work, but I'm not exactly going to be using it for very long
I'll need rivet it on place once I've had an MOT and been able to set the bias bar to a sensible place.
Gripping stuff
- April 2 -
Earlier on today I bought some skateboard grip tape, which seems to be just sandpaper with an adhesive backing. This I cut to shape and stuck on the pedals and on the floor in front of the pedals to ensure there's plenty of grip - this is for SVA, but also because I think it's a good idea, having experienced slippy pedals in the 21 a couple of times. And a slippy floor is not that great for levering yourself out of the car either!
Doom. Despondancy. Brake Pressure switch has failed.
- April 6 -
Last night, after DH2 left, I thought I'd test all the lights, and I found, to my dismay, that the brake lights weren't working. I checked each part of the system, and realised that it was the pressure switch that was broken. Already! I've not even used it in anger yet!
Despite not being very sympathetic in an "I told you so" way, DH2 came round, again, and helped me fit a roller microswitch that is actuated directly by the brake pedal balance bar.
It works quite nicely - I'd resisted doing it before, because there was nowhere for it to act on, but I must have made that decision before I'd fitted the balance bar.
Here's a badly out of focus picture
Microswitch broken already
- April 9 -
I noticed after I got back that the microswitch that DH2 and I put in the other day has already stopped working. Upon investigation, it turned out that a little too much Hackett mightiness had been applied to it, and it was flopping about in a broken state. Dave came round and helped me fit a new one (after giving me a lift to Maplins to get a new one)
replacing the brake pressure switch
- January 14 -
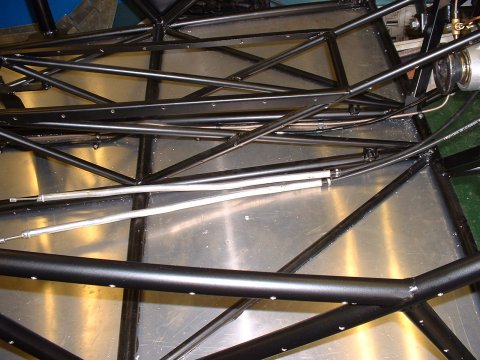
As a result of my plan to fit a boot box behind the seats, I've had to slightly re-route the rear brake hardlines. Whilst I did this, I removed the adaptor that used to hold the brake pressure switch, and re-bled the brakes. It's probably my imagination, but they seem firmer now. Here's a picture of my ingenious idea to keep pressure on the brakes overnight to test for leaks:
This page last updated on: Sunday, Jul 16 2006
Date
aeroscreen
body
boot
brakes
chassis
cooling
clutch
dashboard
electrics
emissions
engine
exhaust
final drive
fuel system
gear shift
lubrication
mirrors
panelling
propshaft
reverse
seats
steering
suspension
throttle
trim
wheels
garage