home
introduction
build
sva tests
links
latest updates
Choosing the seats
- Early January -
Absolutely no idea what to choose at the moment, as I don't know the size of the Phoenix's cockpit. STM offer some GFRP ones that must fit, and other possible choices are a CFRP or GFRP Tillet from Caterham, a Tillet from Tillet, a Kirkey aluminium or a foam seat. I'm not so keen on foam seats - all those I know that have them swear they are the comfiest seats they've every used, but I think they look a bit untidy. Chrispy G has offered to skin one in CFRP for me if I do make one, so that could solve that particular problem.
2nd visit to STM
- Mar 16 -
I took a seat in the most complete car, which is fitted with STM's own GFRP seats. Now, I'm no fatty, but that is a squeeze! I see why so many Striker's are modified to have a wider driver's side than passenger side. With the seat in place, there is no way for me get comfortable - the sides of the seat make it too narrow. Hmmm. Looks like a foam seat might have to be the way forward.
Inspiration
- Mar 17 -
As I was looking at the Kirkey seats in a Demon Tweek$ catalogue, I realised that I don't actually need a seat at all - if I can manufacture a squab to support my legs and a back to support my, erm, back, then I've basically got something that looks a lot like a Kirley, except that the sides are the side of the car, and the tunnel. Steve 'Goat Fiddler' Wiseman suggested that I could add a bit of Yoga mat as padding, and that seemed like a remarkably good idea.
More Inspiration
- Mar 18 -
Another catalogue - this time the Encyclopedia, which contains all sorts of cycling esoterica. I noticed that lots of the recumbant bikes have seats that might just work in the Phoenix, such as this one:
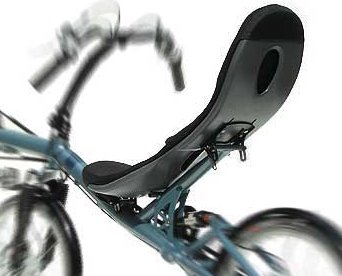
They're light, supportive, certainly narrow enough, fairly cheap, and weatherproof - could be perfect! The only downside I can see at the moment is that most of them are raked back too far - car seats tend to have a back at 15-20°, whereas recumbants are at 35-45°.
Perhaps what I'll do is make a foam or aluminum seat initially, and then investigate using a bike seat when I can take the car to the bike shop and try one in-situ
Gosh, isn't the Phoenix teeny tiny
- March 17 -
My Kirkey High Back Kart seats arrived today. They are the 14" version, meaning that if your hips are wider than 14" you ain't getting in my car. I'm not a bloater, and I only just fit - when the padded covers are on, I can't actually get out of them without an effort.
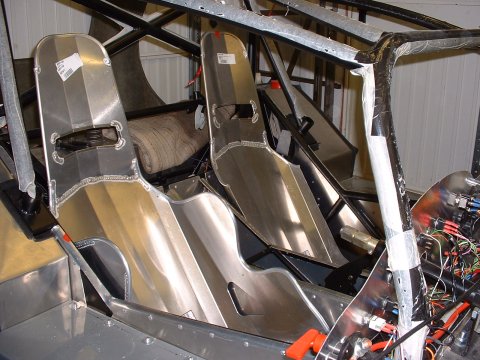
And of course, they don't fit! I was expecting this, but I wasn't quite expecting the amount butchery I was going to have to do to get them to in. The driver's side needed almost an hour of careful angle grinding before I could get it to fit, but it looks unscathed. The passenger side took another 1.5 hours on top of that, and as you can see in the picture below, looks a little more like it's had a bit of work done to it...
seat mounts
- March 19 -
I spent about half of today making blocks for the seats to sit on (otherwise they'd have to balance on a single diagonal chassis tube), drilling holes and finishing off the edges left by the angle grinder attack of the last couple of evenings.
Seats are too low
- March 20 -
Actually, the seats aren't too low, but the holes for the seat belt shoulder straps are. Actually, they're not, but they are in the view of the SVA man, by about 20mm. I've thought about several options, but the easiest, and the one that requires the least amount of butchery, is to rotate the seat forwards so that the shoulder strap holes move forwards and upwards. This unfortunately raises my eyeline to coincide exactly with the front bar of the rollcage, so the drive to and from the SVA test is going to result in a major crick in my neck. A triumph for the SVA system, I say 
Next little job is to make some stiffeners for the seat mounting bolts to botl through underneath the car. They're not required for SVA (as the floor pan is metallic), but I think they're a got idea.
G e t . . . I N !
- March 26 -
Oh what a miserable day. I've got a sore back from all the bending over yesterday binding the loom (therapeutic, pah!), and I can hardly move. But today's task is to fit the seats and seat belts, which involves a lot of heaving and hoisting of seats that are remarkably reluctant to come in and out of the car, and jumping in and out of said seats to check that the belts are correctly adjusted.
In the end i get so fed up with the driver's seat's reticence to ACTUALLY FIT IN THE DRIVER'S SIDE, that I twat it repeatedly with a 4lb club hammer until it fits.
It fits beautifully now. I'm much happier.
Ultimately though, the seats win the battle. Not only are the bolts I've bought not long enough to go throught the wooden mounting blocks, but even if you pretend that they are, and fit the nice expensive padded covers, and sit in either seat, it's impossible to fit in. So the covers are history (Although I may be able to convince my Mum to modify them to be just cushions.) There's absolutely no chance of flogging the on eBay either, as having spoken to all 3 Kirkey distrubutors in the UK to get hold of these seats, I'm pretty sure I'm the only person in the entire country to have them.
My advice, by the way, to anyone else fitting seats to a Phoenix, is just to get some standard GFRP ones and to cut the sides off - it'll be easier, I promise.
So, an extra (another extra) task has crept on to the 'list-of-things-to-do-that-continously-changes-but-never-actually-gets-shorter', which is to somehow cover the 'dangerously rough' edges of the seats so that they're not so dangerously rough.
The seat belts go in mostly OK, but I've got to figure out some clever thing for the crotch straps, as the route they're supposed to take from mounting point to buckle currently goes straight through the wooden seat mounting blocks...
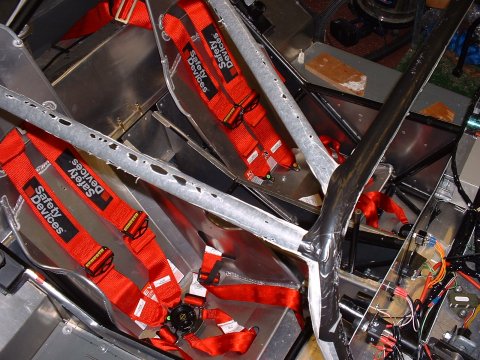
To try and cheer myself up, I go and read the post from Marc Birtles on the BEC list that describes this site as a 'top job'. Thanks, Marc - but it's a just a thin veneer on a story of continuing doom and pain where seats come to life and make themselves into a different shape than they were before, and where bolts that used to be long enough aren't anymore and (etc etc)
Still - here's a picture for y'all that makes it look like everything is in much better shape than it is...
Finished
- April 2 -
I had some inspiration last night, and I realised that I don't have to weld brackets onto the chassis for the anchor points for the crotch strap eye bolts - I can just bolt them through the floor, so long as I put some spreader plates in to spread the load a bit.
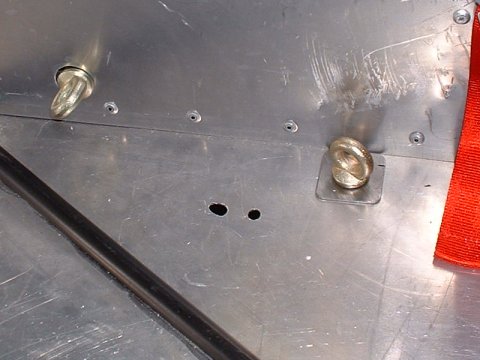
That done, the seats dropped in nicely, the belts went in nicely, and that's the job all done - aside from gluing some trim around the edge of the passenger seat.
moving the belt mounts
- November 26 -
Next: it is time to move the upper seatbelt mounts. Currently, they are too high, and the seatbelts have to describe a V shape to go down through the holes in the back of the seats, and then back up to my shoulders. Not brilliantly safe, as the natural thing to happen in a crash would be for them to try and straighten themselves, which would act to pull the seat up, probalby ripping through the floor and me with slack belts...
For the SVA, I just mounted the seat high and rotated forwards, which brought the holes in the back of the seats
But for real life, I'm going to move the mounts down, do give a belt path more like the dotted one below:
A worthy question at this point is 'Why no just do that for SVA?', and the answer is because there is a stipulated minimum distance of 45cm between the bottom of the seat and the top of the seat belt mount, which it's unlikely the new arrangement would have passed. It might have, said my ruler, but actually it's not that simple: the distance of 45cm is the vertical distance from the corner of a block of wood of a particular dimension placed in the seat bottom, to a line drawn horizontally from the seat belt mount. This must work brilliantly in a proper car, but in mine, the block of wood wouldn't even fit in the bottom of the seat properly, and I didn't have enough arms to hold everything in place whilst I took measurements. So I played it safe...
Anyway - the seat belt eye bolts normally screw into the top of a boss welded onto the chassis. I decided that the easiest way to achieve a lower mount point was to screw the eye bolts into the bottom of the bosses, which are about 2 " long. Except I found that the bosses are a larger internal diameter than the bolts, and must use some sort of insert - they only have thread at the top of the boss, and the bolts rattled around when I pushed them up into the bosses from underneath. To overcome this, I ended up welding some 7/16 UNF nuts onto the bottom of the bosses. (I subsequently found out that Demon Tweeks have some 2" long eye bolts in their 2006 catalogue, which would have gone all the way through from the bottom to the top, but never mind...)
final postion
- January 28 -
The seats are now in their final position - as far back and as low as I can get them. Only time will tell if it's enough...
This page last updated on: Sunday, Jul 16 2006
Date
aeroscreen
body
boot
brakes
chassis
cooling
clutch
dashboard
electrics
emissions
engine
exhaust
final drive
fuel system
gear shift
lubrication
mirrors
panelling
propshaft
reverse
seats
steering
suspension
throttle
trim
wheels
garage