home
introduction
build
sva tests
links
latest updates
Choosing the Exhaust
- February 10 -
I took the easy option here as well - STM could supply one. I took it  It should ensure compatibility later on with STM's emissions kit as well, which I'm almost certain to need to get through SVA, although hopefully not after that, as the car will almost certainly end up as a Q plate (the emissions test on a Q plate is 'visiible smoke only'. So I'm told)
Dry fitting the exhaust
- November 13 -
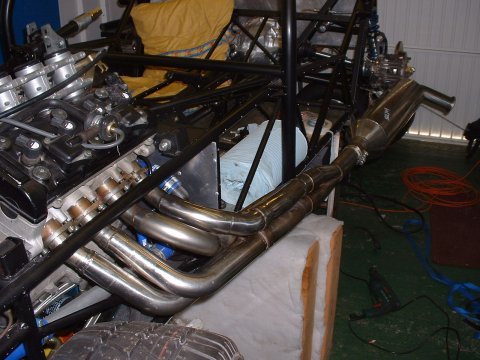
With the time rapidly approaching to fire up the engine for the first time, I thought I'd better check that the exhaust fitted. After diassembling it and bolting the headers on seperately, I found, much to my surprise that it does. It sits about 1ft from the chassis at the back end - I guess it become obvious what to attach it to once the side pods are on...
No room for exhaust
- February 9 -
I discovered yesterday that the exhaust won't fit inside the side pod - the back corner of the silencer is 10" from the side of the car, but the pod is only 9" wide... I rang Ian to ask him if I was missing a trick and he didn't seem to think so. "Hmmm. Mine doesn't do that. You'll have to cut and shut it. I don't use that exhaust guy anymore..."
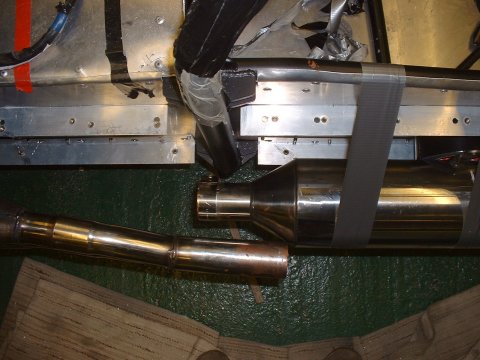
Sigh. I'll have to cut a wedge out of one section and get it re-welded. ChrisG on Cam7 has volunteered, but he lives many miles away. I'll ask Tim as well, as he's just round the corner. The picture shows both where the can should be, and where the pipe into actually is...
Cut...
- February 13 -
I cut a wedge out of the exhaust pipe - taking lots of care to mark it all up nicely, trying to get a symettrical flat cut. I nearly managed as well. Now I just need to corner Tim to do the welding. He's making some sort of excuse about having lots of work to do. PUT YOUR PETTY CONCERNS TO ONE SIDE - I'VE GOT A CAR TO BUILD, MAN. Sheesh.
Oh woe is me
- March 2 -
Well, I returned to the exhaust this evening, with a view to taking it over to Tim's for welding. I'd had an idea which was to put a double kink in the pipe leading up to the silencer, as a way of maximising the exhaust's parallelness to the side of the car. But the more I looked at the situation, the more I came to realise that it was never going to be satisfactory. Tim came round to have a look (I must have sounded pretty despondent on the phone) and agreed that it was plainly rubbish. I decided to quit the garage and made a note to phone Ian the next day for some sort of resolution.
New exhaust
- March 3 -
I sent Ian an email telling him where he could see a picture of the exhaust problem, and he agreed that it was pretty hopeless. On the phone he started to suggest options like slackening the 4-2 section and the 2-1 section. When I told him that that wasn't possible because the whole assembly was welded up in to a single piece, he was quite taken aback. After a bit more discussion, he suggested sending me the exahust of his GSX-R 1000 car from last year, to see if that fitted better. Worth a go, I thought!
New exhaust arrives
- March 4 -
Ian's exhaust arrived today, and it is a much better fit. Not quite perfect, but close enough to not matter. Yay!
Rear mountings
- March 5 -
I got bored of wiring, so I made up some mounts for the rear section of the exhaust. Conventionally in se7en type vehicles, the silencer is attached to a bracket on the chassis of the car using a rubber bobbin. The Phoenix, of course, has to be a bit different. It's got 2 mounting points on the silencer, the lower of which could probably receive the traditional treatment, but there's no bracket down there, and I'm not about to weld one on. I can't just use rubber bobbins direct into the side panels of the car, as the silencer is a good 3" away from the panels, and a bobbin is only 1" long...
So instead, I made up some extra long bobbins using some valve springs (taken from the VHPD engine parts bag on my shelves) welded onto some penny washers and M8 bolts. Tim did a similar thing with his exhaust - I can't remember whether it worked or not
What's that funny smell?
- April 11 -
Well, it's the day before SVA, but I've only got a few hours before I have to set off - I need to get to STM by late lunchtime in order to fit the cat equipped exhaust
Most important remaining job is to make up some covers from thin aluminium sheet, to cover the humunganormous holes that I made in the bodywork where the front portion of the rollcage is. That doesn't take as long as I thought, and then when I check the list, I find that the only thing left to do is stick a 'brake' sticker on the brake test light (an SVA requirement)
Gosh. All done.
It then takes ages to pack for the trip - I've got to make sure I take enough tools and bits and bobs to be able to get myself out of trouble if anything breaks or comes loose on the 120 mile trip up to Derby. The AA/RAC etc aren't interested in providing cover for an unregistered car...
And then it's 11am and time to go.
I stopped at Tesco (About 5 miles down the A14) on the way to fill up, and noticed that I could smell a hot fibreglass smell. The most likely source of the smell was the sidepod containing the hot exahust, so I checked the outside of the sidepod for temperature with my hand, but it was fine - pleasantly warm, but not hot at all, and I wondered why it was smelling so much.
Puzzled, I continued filling up. The smell persisted. I checked the sidepod again, in case it had somehow magically become hotter - but it was (of course) getting cooler. Then I slid my hand to the non-insulated area. Yeoowch! Super Toasty! (The exhaust in the Phoenix comes horizontally out of the engine, makes a swift downturn into the sidepod, and then heads off backwards through the pod. I'd insulated the sidepod except for the very forward portion (about 18") where the top of the sidepod is open, reasoning that the heat could escape upwards.
So the lesson was that heat radiates equally in all directions, even if air in between is free to escape upwards. Silly boy.
There was no way I could continue, so I resigned myself to returning home. I called Tim to see if he had any shiny insulation stuff I could purloin, but he didn't have enough. During this call, he established that I'd not opened up the front of the sidepod (just behind the wheel), which hugely increases the problem of retained heat. I'd assumed that air being sucked through the engine bay (which is pretty open) would be enough. Clearly I was wrong!
Tim posted my predicament on Cam7, and by the time I got home, I'd had several calls, texts and emails offering help and materials - thanks to all! In the end, Steve's offer won out as he was the only one actually able to both offer and deliver the insulation
So - I stuck the insulation in with some high temperature contact adhesive, stuck aluminium foil on the inside of the bonnet, covered over the open part of the sidepod with aluminium sheet and removed the front face of the sidepod, and drove back to Tesco. No toastiness - so off I went to Derby.
I arrived at STM at 16h30 - much too late to start fitting the exhaust kit, so I knew I'd failed the SVA 16 hours before even starting it!
Hmmmm
- April 28 -
IanG's exhaust kit arrived at work today, so I made my excuses and left
The kit is basically a combination of the following: a silencer with a catalytic converter built in; an electronic box of bits; tubes that connect to the air bleeds on the throttle bodies at one end and to some valves at the other; a lambda sensor; and a water temperature sensor
First difficulty was that I don't 'ave an 'ole for the lamdba sensor to screw into. Ian had thoughtfully provided a nut that I could weld to the exhanust, but the nut was steel, and the manifold is stainless steel. I did a practice weld on some scrap, and it seemed that it would probably work OK, but I worried a bit about residual stresses and having to re-do the whole thing in the future. SteveW agreed, and thereby talked himself into TIGing a stainless lamdba boss that he had lying around onto my collector.
Next problem - I couldn't see a way to connect up the air bleed hoses. A call to Ian sorted that out - the GSXR has 4 throttle body take-offs that feed to the inlet air pressure sensor, and a 5th on #4 cylinder that provides the vacumn feed for the PAIR valves. The trick is to use the 5th feed for the IAPS and the other 4 feeds for the cat kit.
Finally, the water temp sensor is zip tied to a convenient water hose (this apparently is to let the box of tricks know that the engine is up to temperature) and the earth and power supply leads are wired in.
I hope it all works...
Next... fitting the silencer. Aarrgghhh. The silencer doesn't have a bracket! I set about making one (it's now about 6pm, and the retest is tomorrow...). DH2 turns up and helps a bit. But it's a disaster - it isn't quite right, and the silencer sits too far out to allow the sidepod to be re-fitted. We try rearranging the 4-2 and 2-1 bits of the exhaust; we heave; we bend; we pray; but nothing works.
I realise that I'm in danger of throwing all my toys out of the pram, so I elect to call it a day, and cancel the retest.
A new turret is born
- April 30 -
After much planning, I elect to support the new exhaust can by welding a turrent onto a convenient chassis rail, and using stainless steel zip ties to hold it on. To prevent it shaking itself to pieces, I use exhaust wrap around the can to cushion the zip ties, and sandwich a piece of scrap silicone coolant hose between the exhaust wrap and the end of the turret.
I can't see this as a long term solution, but it'll do for the SVA re-test (now rescheduled for Tuesday morning)
monster bobbin
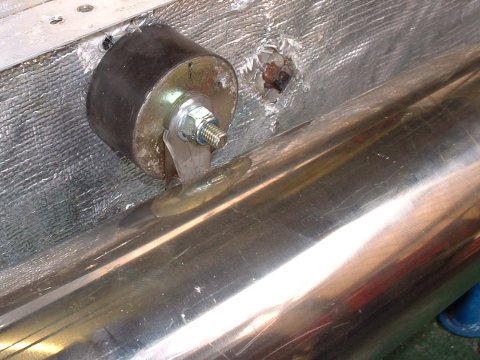
- August 27 -
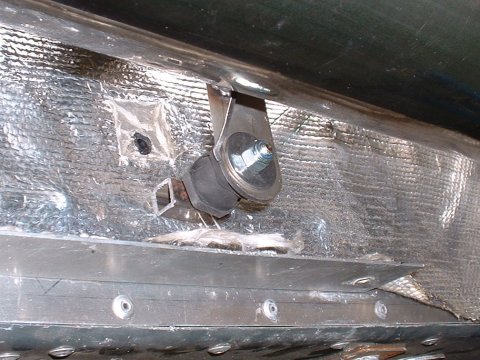
Today, for the first Saturday in as long as I can remember, I headed out to the garage instead of the office. 2 hours later, the exhaust was mounted using a monster bobbin I'd snaffled from Steve's Emporium. The bobbin is bolted directly to the passenger side panel, and does a pretty good job of restraining the exhaust, but I thought there was a bit too much flex in the panel (which is only thin aluminium), so I used a conventional bobbin with a little foot on the end to stabilize the exhaust via the bottom mounting hole. It just rests on the side of the car, but should be just enough to stop the can rotating about the top mount.
This page last updated on: Sunday, Jul 16 2006
Date
aeroscreen
body
boot
brakes
chassis
cooling
clutch
dashboard
electrics
emissions
engine
exhaust
final drive
fuel system
gear shift
lubrication
mirrors
panelling
propshaft
reverse
seats
steering
suspension
throttle
trim
wheels
garage