home
introduction
build
sva tests
links
latest updates
Choosing the suspension
- Early January -
This bit was easy - rather than try and figure out the best spring rates and correct damper lengths, I just bought the ones offered by STM - 2.25"AVO Adjustable Shocks and Springs.
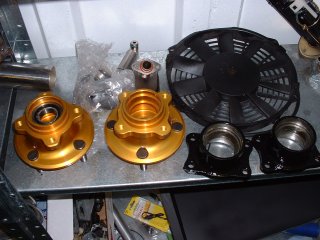
As for the hubs - STM's price for alloy hubs is very reasonable at £50 each, so I picked those - I'd really like to keep the unsprung mass as low as possible, as this car is so light that it'll be difficult to keep the wheels on the ground if they are not proportionately light
- February 10 -
I hadn't seen any options for anti-roll bars on the Phoenix. Ian said that he didn't think they were necessary, even on a track orientated car, so I left it at that. If I want to try them later on, I can.
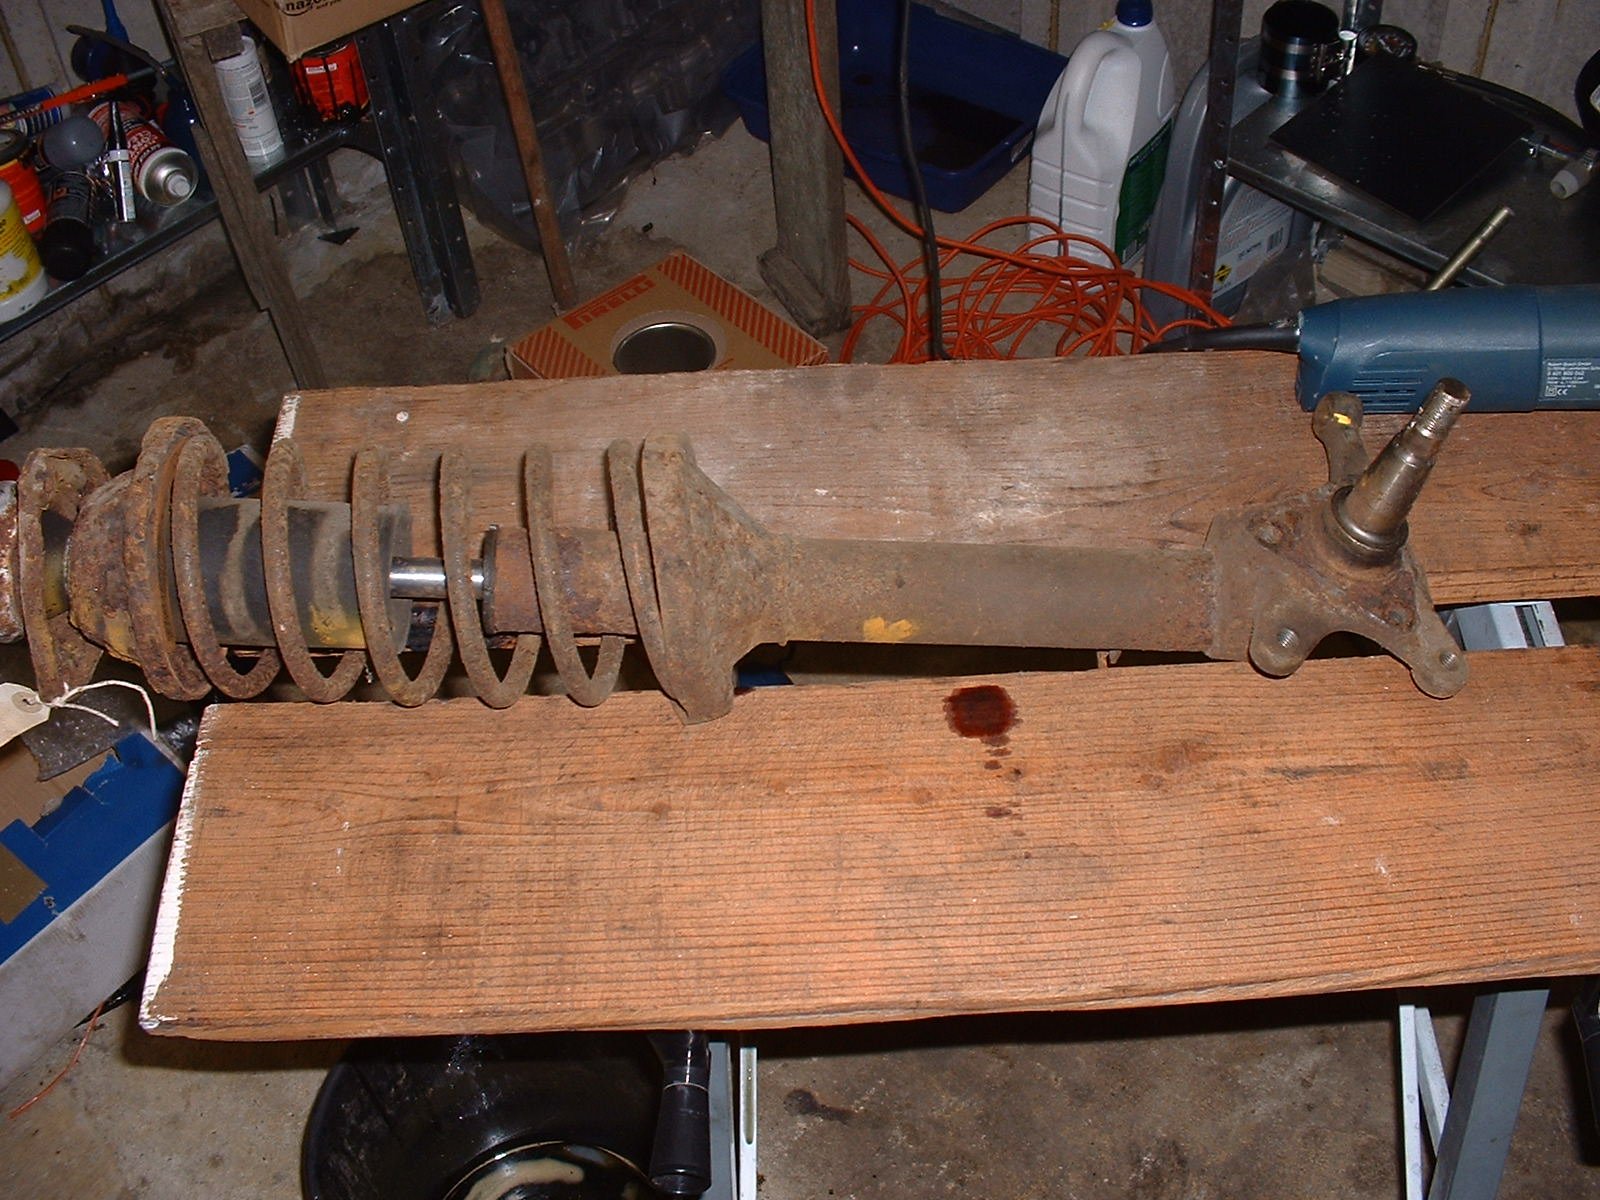
Front uprights
- February 16 -
I bought the front uprights today, from Tendring Spares. They are MkII Ford Escort front uprights. STM modify them for the Phoenix by welding a doodad on the top for the top wishbone to attach to.
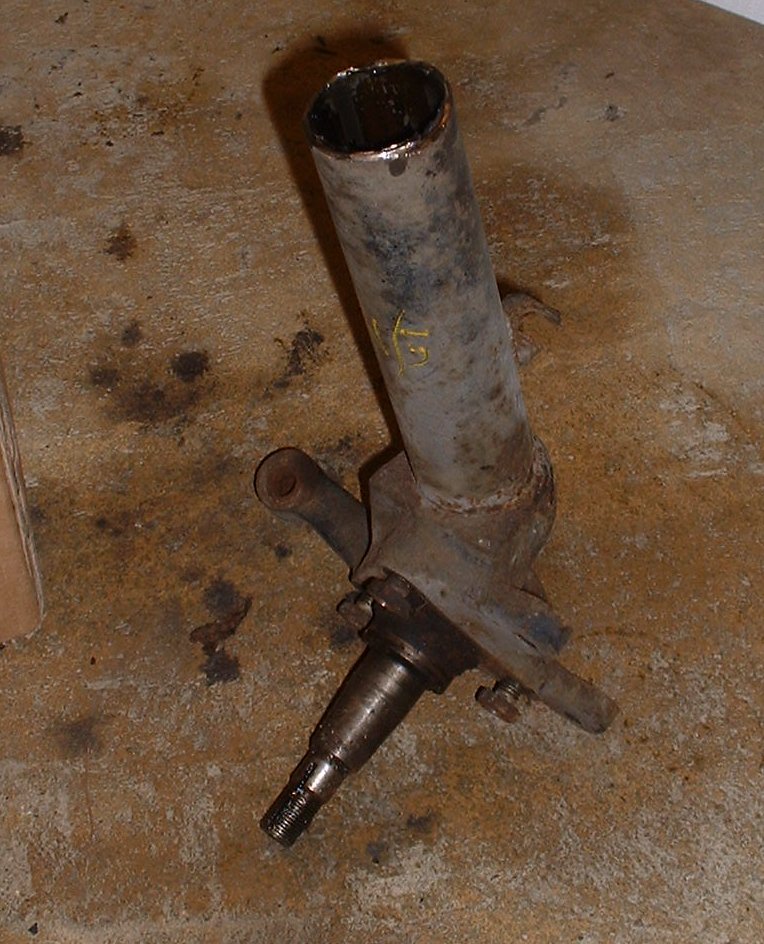
Modifying the front uprights
- March 3 -
Before taking the uprights to STM, I need to remove the top section - thanks to the notes on Chris Bradley's website I got it pretty much right first time - I didn't cover myself in oil, and didn't try and chop through the nice hard inner strut. - Thanks Chris 
A bit of GUNK later, and they're about as shiney as a 20(?) year old lump of steel can be,
 |
 |
|
| Before | After |
2nd visit to STM
- Mar 16 -
I gave Ian the uprights. He mocked me for cleaning them - perhaps I've caught some sort of nasty infection from DH2.
Collection time
- April 30 -
IanG and team are experimenting with different damper lengths at the race next weekend at Brands Hatch - once they've figured out what's best, they'll send me on my front shocks. The rears are attached to the car already.
The front uprights have had their modifications, but I think I'm missing something, as there is no way to attach them to the upper swingarms. Also missing is one of the long bushes that run through the swingarms
Painting the uprights
- June 5 -
|
The uprights look a bit manky in their natural state, so I've decided to paint them with POR-15. Unfortunately, they're a bit too shiney in places (POR-15 likes a good rusty surface to adhere to). Now you can but some proper stuff for treting bare metal before applying POR-15, but I've just done my banking for the month, and I 'm feeling a bit poor. So rather than spending whatever trivial amount it is on POR-15 pretreatment, I'm leaving the uprights in a bucket of salty water for a couple of days to rust them a bit., with some cling film arond the stub axle as protection , 'cos I want those bits to stay shiney... POR-15, by the way, as it tends to stick better to metal than Hammerite, and is less brittle. It's also less hassle than getting them powder coated. | 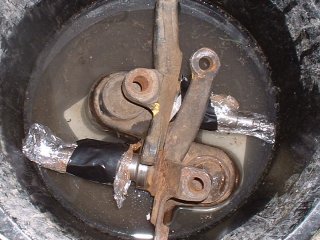
|
- June 14 -
The uprights are nice and rusty by now, so I cleaned them with wire wool, degreased them with carb cleaner, and painted them.
- June 15 -
The paint took really well, so a second coat shouldn't be necessary. I've given one of them a second coat, and we'll see in a couple of years time whether or not it makes any difference or not.
Prepping the rear hubs
- June 18 -
It never really occured to me that Sierras were old cars until I got the rear hub beaing carriers from Ian. I bit of work with a stiff wire brush, a cold chisel to bash out the old bearings, and some POR-15, and they turned from heavy, rusty chunks of metal into something much nicer. A replacement bearing kit is on order from PartCo. I'm not sure if the kit includes the 41mm hub nuts or not, but we'll soon see.
The front hubs, by contrast, are light, gold anodised loveliness from Fisher Sportscars. I'm looking forward to putting all the bits together.
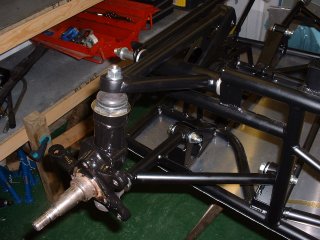
Getting the front suspension bolted together
- June 20 -
This morning was spent bolting the front suspension together. A bit of copaslip here, a bit of judicious bashing with a hammer and it all went together quite easily. I'm not completely sure I understand metalastic bushes though. On the 21, I just used to do everything up about as tight as seemed sensible, and it was all OK. With these bushes, doing the bolts up tight traps the centres of the bushes betwixt the washers on either end, and wishbones get jammed in place - they can only move as far as the rubber in the bush can twist. Only by backing off the nuts a bit is the tension on the bushes reduced enough to allow the wishbones to be moved by hand.
So I have. There's no side to side play, and the nuts are still tight - they're just not TIGHT. Comments on a (virtual) postcard please...
As for the rocker arms - bearing carriers in the oven, bearings in the freezer, wait 30 minutes, and Bob's your uncle, the latter drops nicely into the former. No such luck with getting the bearing carriers into the rocker arms, and for the want of a hydraulic press, a 22mm socket and a large adjuster were pressed into service.
So that completed the assembly, all except for a missing 1/2" bush that Ian uses to space out the nuts on the rocker arm pins (I guess the pins just the same size as the rear ones, and it's easier to use the same part than to source one that's the right size.)
Then onto the hubs. These have studs that have to be pressed into place, and they cut their own splines as they go. For the want of a hydraulic press, a Heath Robinson arrangement of a 3x3 lump of wood, clamps and a medium adjuster were pressed into service.
Finally, the bearings. For the want of a hydraulic press, and after a bit of feeble thwacking with a large adjuster and the back end of a 41mm socket, I decided to give up. Tomorrow, I'll head into Mackays and see what offcuts of steel rounds they can provide for me to use as drifts. I need 1-7/8" and 1-1/2" for the fronts, and 2-1/2" for the rears.
- June 22 -
Thanks to all you mailed me to comment on the metallistic bushes. Seems crazy to me that they do work by being clamped and relying on the twistiness of the rubber, but there we go. I spy a future upgrade
Today's excitement was using some old socket of Tim's as drifts to bash in the wheel bearings and seals. I overdid one of the nearside fronts and had to bash it back out a bit again, which wasn't very mechanically sympathetic. Bet I know which one fails first.
- June 22 -
Then I turned my attention to bolting the rear hub bearing carriers on. Yet more money to Namrick needed.
Getting the front suspension bolted together
- June 26 -
Managed to spend plenty of time in the garage today. The main job was to get some some dimensions off to Ian for the front dampers. He's allowing for the fact that this is to be mostly a road car rather than a race car, so he wants me to set a front wheel up at my prefered ride height and measure the damper length at that position. I haven't yet figured out why my dampers should be any different to his - the damper has to have a long enough open length to accomodate the suspension at full droop, and the closed length needs to enough to stop the suspension crashing at maximum travel.
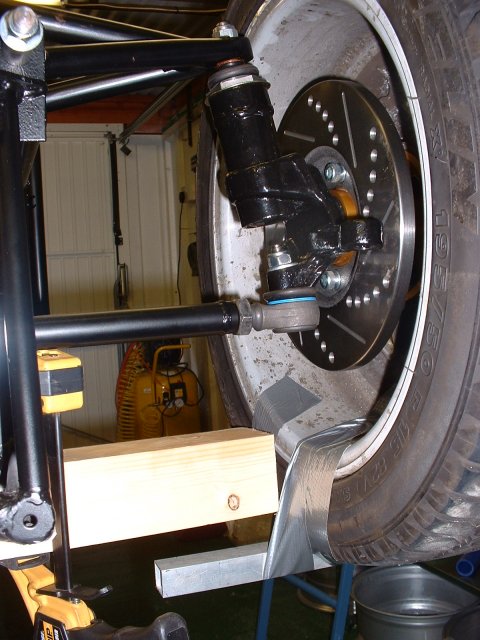
With the right length bolts having arrived from Namrick, I attached the brake discs to the hubs and plonked them onto the stub axles. I haven't got any stub axle castle nuts, and the local Ford place say they can't get hold of them any more, but they measure up the same as 5/8 UNF, so I'll see if I can get hold of some from somewhere.
Nonetheless, I borrowed a spare 15" wheel off my housemate Alex, and used some mole grips to hold it in place (no wheel nuts either!), and then set up yet another Heath Robinson arrangement (using gaffer tape and cable ties, of course) to set the suspension to the 'correct' height. As to what is correct; the maximum permissible speed bump height is 100mm, so I chose a ride height of 110mm. This matches with my expectations based on Caterham 7's (they are factory set to 140mm and this always looks just a bit too high when you follow them), and will give a ride height height of 100mm if I change to lower profile 12" tyres, and will raise it to 115mm on my current tyres.
The total wheel travel is 120mm, and set at this position, there is 30mm of down and 90mm of up travel, which seems fine to me. Well, if it were a mountain bike, that would be fine, as 3:1 ratio is how you normally set those up. Guess it's gotta be kinda the same for a car.
Tighten it all up
- June 26 -
Now in a good frame of mind, I went round and copasliped up all the rear suspension bolts, fed in padding washers where needed, fitted the 2 rear rose joints and generally made myself busy. It's not clear to me at this point now the bearing part of the rose joints should be restrained. I'll take a squizz at Tim's when he's not racing in the RGB series at Brands Hatch tomorrow.
I also got a call from a friend Rob to say that he'd been in a nut and bolt emporium in Bury St Edmunds, and had found me some 5/8 UNF castle nuts. Yay!
- June 27 -
Grrr. It seems that the Escort axle nuts aren't 5/8 UNF at all. I call Ian, and he confirms that "it's a weird thread - no idea what it is. We always make sure we get them with the uprights." So, if you're reading this and you're planning on buying Escort uprights - get the nuts with 'em...
I'll call Tendring Spares tomorrow and see what they can do
Oh dear
- July 1 -
I woke up this morning with the realisation that I've put my front hub bearings in the wrong way round. I mean, not just in backwards, but the whole assembly in the wrong way, bearing first, and held in place with the races. This has the disadvantage, as I found out last week, that the bearing clearances have to be set with a hammer, rather by gently turning the hub nut...
I'm glad my brain worries about this stuff in the background, and lets me know about it when it feels the time is right
Lets do them properly this time
- July 3 -
After a trip out to PartCo this morning, I've got a replacement set of bearings, as I'm sure that bashing out the old ones is going to damage them. Mark at Fisher Sportscars who supplied the hubs assured me they were standard Mk2 Escort bearings. However, after some considerable faffing at PartCo, it turns out that they are in fact Mk1 Escort bearings. The seal, however isn't the right size - maybe it's a Mk2 seal.
The old bearings came out with some help from a medium sized adjusting device, and the new ones popped in quite nicely, using the old races as drifts.
Then some good luck. I measured and re-measured the axle thread, and it still matches up with 5/8UNF. The nuts that Rob got me are quite soft, and the axles hard, so I thought I'd see what happened if I wound them on with a bit more force than I'd been willing to use before. Having spent many years dealing with delicate threads on aluminium bicycle components, I like to think I've got a feel for 'good', 'not too bad', and 'stop now' when tapping out a damaged thread. And miracle of miracles the axles tapped out a new thread in the nuts, with only a tiny amount of swarf coming out of the nuts. The nuts are secure, don't wobble, and wind on and off freely, so I'm pretty happy to use them.
So, on they went with a washer, a split pin to secure them, and they're all done.
Next job was bolting in the dampers I got from Ian on Wednesday.
Let's split
- August 29 -
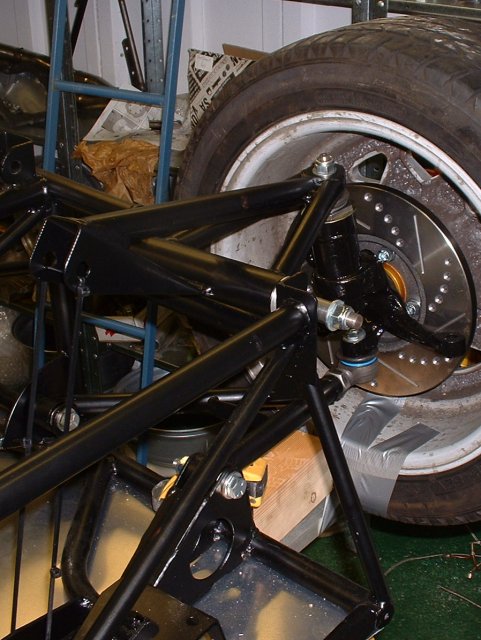
I noticed recently that the lower ball joint boots on the front suspension had split. This despite the car not having even been on the ground, never mind turned a wheel in anger.
A call to Ian, and he said that he sometimes ground the bottom of the uprights away at an angle to alleviate this.
So I guess I'd better do the same...Here's a before and after
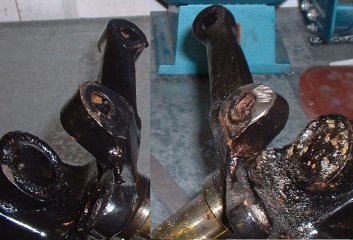
Oops look at that rust peeking through - me thinks I forgot the 2nd coat of POR-15 on that one...
Ian's offered to swap the joints for some new ones, as he can use the old ones on a race car, where Mr SVA man won't care. For the record, they're off a Sherpa.
Looking for driveshafts...
- September 4 -
Went to 2 scrapyards today - there were a couple of 2.0l Sierras, but both had Lobro joints. I guess I'll have to use one of those 'Contact 00's of breakers at once' websites. I don't fancy my chances though, since I can't exactly describe what it is I want! Ian's on the lookout for me too.
Front suspension back together again
- September 8 -
With the parts I got from Ian today were the replacement lower ball joints, so I reassembled the front suspension and brakes, and put the wheels on. He'd also remembered to include the spacer that goes on the rod that runs through the rocker arm, so that's now in place too.
Fitting the Audi calipers
- October 13 -
Trying to fit a wheel to the rear revealed that the outer suspension bolt in the lower wishbone is too long to fit inside the rim. I shortened it with the help of Mr A. Grinder, but it was still too long. Replacing the nylocs with normal nuts and shortening the bolt again fixed the problem. Must remember to studlock the nuts on.
After the first test run
- December 12 -
To investigate the stiff damper, I followed Mr DH2's advice and swapped the N/S and O/S units, to see if it was the damper or something else causing the difficulty. Mystery of mysteries, both sides were now the same. Problem fixed - next
Camber, Castor and Toe
- April 7 -
I set up the suspension today, to a recipe given me by Ian many months ago (Camber: 1 ° front, 0 ° back. Toe 2mm front, 1mm back - it seems sensible enough.) Once I find the relevant bit of paper I'll try and remember to put up on this page the angle of camber introduced by each turn of the camber adjusters.
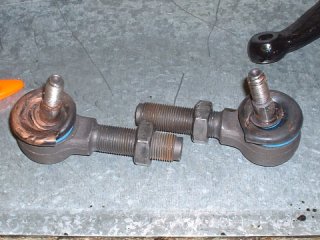
Whilst doing this, I noted that the rubber on the N/S lower ball-joint has started to split. I glued it back together with superglue, but in the long term I think I'm going to replace these with rod-end bearings.
I didn't actually change the toe at all as I don't have long enough bits of straight things with which to go about measuring it. The long straight thing I do have indicates that I've got a 'some' toe on the front, and hardly any, if at all, on the back. Good enough for now.
Important little job
- April 8 -
A little job that turned into a much bigger one this morning. Ever since I fitted the Barnby wheels, I've just has a pair of plain nuts on the ends of 1/2" rid that runs through the bottom of the suspension upright - there wasn't clearance for some nylocs, so I left it until 'later'. Today was 'later'. I decided to replace the plain nuts with stiff nuts, but to cut a long story short, I couldn't do up the stiff nuts on both ends of the rod at the same time - either one undid itself as I did the other one up, or the one that was already on as far as I wanted it. In the end, I welded one of the plain nuts on one end, and used a stiff nut on the other end.
Then I tightened up every bolt on the suspension, front and rear. My original plan was to do this with the car on the ground, so that the metallastic bushes would all stand a bit more of a chance of some longevity. But most of the rear bolts are pretty inaccesible with the wheels on, so I gave up and just did them up as they were.
Checking the rear toe
- March 28 -
Something I didn't do before SVA was to check that the rear toe was OK - I did a visual check by laying a piece of angle along the tyre and tweaking the toe in until the angle just touched the front tyre. So today I set about making sure it was OK, with the help of an old laser pointer of Dad's. Here's the picture that speaks a thousand words.
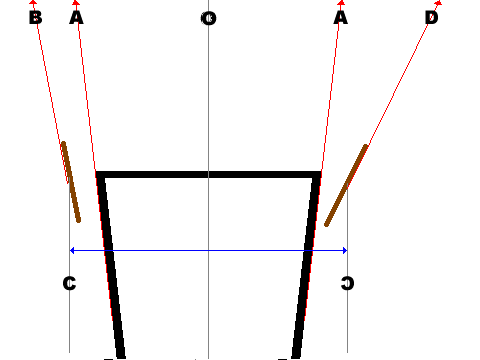
So, I projected the bottom chassis rails against the garage door, and found the centre point - this of course assumes that the garage door is perpendicular to the chassis (although this isn't critical), and that the chassis is in some way symettrical about its centre line
Next, I projected the brake disc faces back to the garage door. By a miracle, the projected points D and B ended up equidistant from the centre line, meaning that either that the discs are equidistant from the center of the chassis and have the same toe, or that they are not, and they don't. It's pretty to hard to tell, so I assumed the former
Finally, I measured the separation of the discs (131cm), the separation of the projected points (134cm), and the distance from the discs to the garage door (175cm), giving an arctan of total toe-in of 3/175, which is 1/58. And as everybody knows, in radians, arctan of small angles is just about equal to the angle itself, and as everybody also knows, 1 radian = 57 degrees, so I calculate a toe-in for each wheel of 0.5 degrees.
I've since been told that I should be aiming for something closer to 10 minutes, and not with the suspension at full droop (which the smart amongst you will realise must be the case if I'm taking projected lines off the discs...)
But it will do for now!
This page last updated on: Sunday, Jul 16 2006
Date
aeroscreen
body
boot
brakes
chassis
cooling
clutch
dashboard
electrics
emissions
engine
exhaust
final drive
fuel system
gear shift
lubrication
mirrors
panelling
propshaft
reverse
seats
steering
suspension
throttle
trim
wheels
garage